Cloudillo is an open-source, decentralized collaboration platform that empowers users to maintain complete control over their data while collaborating globally. Whether you’re building collaborative applications, hosting your own instance, or exploring decentralized architectures, this documentation guides you through every aspect of Cloudillo.
Choose your path below:
Open collaborative document formats
There are no open standards for how real-time collaborative documents should be structured. We are designing open, documented CRDT-based formats for presentations, spreadsheets, whiteboards, and more — and we are looking for people who care about document freedom to help.
Get involved — Learn about the initiative and how you can contribute.
👥 For Everyone: Getting Started
New to Cloudillo? Start here to understand what it is and how to get up and running.
What is Cloudillo? — Understand Cloudillo’s vision: global accessibility with local control, revolutionary authentication, and seamless interconnectivity
Prerequisites — System requirements and what you need to know before getting started
You can open a collaborative presentation in one app and continue editing it in another — as long as both apps speak the same format. But today, no open standard defines how a real-time collaborative document should be structured. Every platform invents its own proprietary model, and your documents are trapped inside whichever tool you started with.
We are designing open, CRDT-based document format specifications so that collaborative documents can move freely between applications. We need people who care about document freedom to help us get it right.
The problem: no open standards for collaborative documents
Traditional document formats like ODF and OOXML define how a finished document looks — paragraphs, cells, slides. But they have no concept of the structures that make real-time collaboration work: CRDT state, concurrent edit resolution, operational history, or presence information.
As a result, every collaboration platform builds its own proprietary data model:
Google Docs, Sheets, and Slides use internal formats that are never exposed
Microsoft 365 layers proprietary real-time structures on top of OOXML
Notion, CryptPad, ONLYOFFICE, and others each have their own approach
None of these formats are documented, interoperable, or standardized
The consequence is vendor lock-in at the collaboration layer. Even when the static export format is open, the collaboration data model is not. You cannot take a collaboratively edited document from one platform and continue collaborating on it in another without losing structure, history, and concurrent editing capability.
Document Freedom Day 2026
Document Freedom Day is March 25, 2026 — an annual celebration of open document standards and the right to communicate freely. The need for open collaborative document formats is exactly the kind of challenge DFD exists to highlight.
What we are building
We are creating open, documented format specifications for collaborative document types:
These formats are built on Yjs CRDTs (Conflict-free Replicated Data Types), which allow multiple users to edit the same document simultaneously without conflicts and without a central server deciding the outcome.
Each specification documents the exact data structures, field names, types, and relationships — enough for any developer to build a compatible reader, writer, or editor. See the Document Formats overview for the full specifications and the CRDT Design Guide for the patterns and principles behind the format design.
Early stage
These specifications are working documents, not ratified standards. The formats are implemented in Cloudillo apps and are actively used, but they have not gone through a formal standardization process. Community review and feedback at this stage has the most impact — the designs are mature enough to be meaningful but flexible enough to incorporate improvements.
How you can help
Review and critique the format specifications
Read through the Prezillo, Calcillo, and Ideallo format specs. Look for ambiguities, missing edge cases, unnecessary complexity, or things that would make implementation difficult. File issues or start discussions on GitHub.
Design formats for new document types
Notillo (notes) and Quillo (rich text) are planned but not yet specified. If you have experience with collaborative text editing, rich text data models, or CRDT-based editors, your input on these formats would be valuable. The CRDT Design Guide describes the patterns we follow.
Test concurrent editing scenarios
Collaborative formats need to handle multi-user editing, conflict resolution, offline edits, and large documents gracefully. Testing these scenarios and reporting issues helps ensure the formats work in practice, not just on paper.
Contribute to standardization efforts
If you have experience with standards bodies (OASIS, W3C, IETF) or with the ODF/OOXML standardization process, your perspective on how to move these specifications toward formal standardization is welcome.
Spread the word
Share this page with people who care about document freedom, open standards, and interoperability. The more eyes on these formats, the better they will be.
Where to start
Read the specs:Document Formats — complete format specifications for each app
Understand the patterns:CRDT Design Guide — design principles and common patterns
Cloudillo is an open-source, decentralized collaboration platform where each user or organization hosts their own data while collaborating globally through federation. The collaborative document formats described here are part of that platform, but the formats themselves are designed to be useful to anyone building collaborative tools — you do not need to use Cloudillo to benefit from or contribute to these specifications. Learn more at What is Cloudillo?.
See also
Document Formats — Complete format specifications for Prezillo, Calcillo, and Ideallo
CRDT Design Guide — Patterns, pitfalls, and practical guidance for CRDT-based apps
CRDT Architecture — How CRDTs are stored and synchronized in Cloudillo
Cloudillo is under active development. The Rust-based server is 90% complete,
with core functionality operational but some API endpoints still in progress.
The platform is suitable for developers and early adopters but not yet
recommended for production use.
Cloudillo is a versatile Decentralized, Self-Hosted, Open-Source Application Platform
designed to empower your creativity, facilitate seamless collaboration, and
enable easy sharing.
Cloudillo can be:
Your Document Store: Store all your documents securely, accessible only
to you or shared with selected individuals or groups.
Your Personal or Group Knowledge Base: Compile and organize your
knowledge effortlessly, whether it’s for personal use or sharing within your
team or community.
Your Collaboration Platform: Work together with colleagues or friends on
projects, documents, or tasks in real-time, enhancing productivity and
efficiency.
Your Community Network: Build a vibrant community network where members can
connect, share ideas, and collaborate on common interests or goals.
What sets Cloudillo apart?
Global Accessibility, Local Control
Cloudillo takes a unique approach by storing all your data locally while making
it globally accessible through its unparalleled API. This ensures you have full
control over your data while enjoying the benefits of a worldwide reach.
Revolutionary Global Authentication and Authorization
Cloudillo introduces a groundbreaking method for Global Authentication,
Authorization, and Verification. Share your data securely without requiring
users to register on your instance, mirroring the convenience of Cloud-based
platforms.
Seamless Interconnectivity
Thanks to this fresh perspective, Cloudillo-based applications can establish
connections that might seem impossible on other platforms. This newfound
flexibility opens doors to innovative and seamless collaborations between
applications.
Ready to experience collaboration on a whole new level? Explore Cloudillo and
witness the difference.
Prerequisites
Before installing or using Cloudillo, ensure your system meets the requirements below.
For Self-Hosting (Rust Version)
System Requirements
Minimum:
CPU: 1 core (2+ recommended)
RAM: 512MB (1GB+ recommended)
Disk: 1GB + storage for user data
OS: Linux (x86_64 or ARM64), macOS, Windows with WSL2
Recommended for 10+ users:
CPU: 2+ cores
RAM: 2GB+
Disk: 10GB+ SSD
OS: Linux (Ubuntu 22.04+ or Debian 12+)
Recommended for 100+ users:
CPU: 4+ cores
RAM: 8GB+
Disk: 50GB+ SSD
OS: Linux on dedicated hardware/VPS
Software Requirements
For Docker Installation (recommended):
Docker 20.10+
Docker Compose 2.0+ (optional but recommended)
For Building from Source:
Rust 1.70+ with cargo
Git
For Domain-Based Identity:
Domain name with DNS control
SSL/TLS certificate (Let’s Encrypt supported via ACME)
Network Requirements
Required Ports:
443 (HTTPS) - Required for application access
80 (HTTP) - Required for ACME/Let’s Encrypt certificate validation
OR custom ports if using reverse proxy
DNS Records Required:
A record: yourdomain.com → server IP address
A record: cl-o.yourdomain.com → server IP address
Example:
yourdomain.com          A    203.0.113.42
cl-o.yourdomain.com     A    203.0.113.42
Server meets minimum requirements (1 core, 512MB RAM, 1GB disk)
Docker 20.10+ installed OR Rust 1.70+ installed
Domain name registered and DNS configured
Ports 80 and 443 accessible (firewall configured)
SSH access to server (if remote)
Backup plan in place
Development Checklist
Node.js 18+ installed
pnpm 8+ installed
TypeScript 5+ installed
Code editor ready (VS Code recommended)
Git configured
Access to Cloudillo instance (for testing)
Contributing Checklist
Rust 1.70+ installed
GitHub account created
Repository forked/cloned
Tests running (cargo test)
Code style configured (cargo fmt, cargo clippy)
Architecture documentation reviewed
Verification Commands
Check Docker Installation
docker --version
# Should show: Docker version 20.10+ or higherdocker compose version
# Should show: Docker Compose version 2.0+ or higher
Check Rust Installation
rustc --version
# Should show: rustc 1.70.0 or highercargo --version
# Should show: cargo 1.70.0 or higher
Check Node.js Installation
node --version
# Should show: v18.0.0 or higherpnpm --version
# Should show: 8.0.0 or higher
Check DNS Configuration
# Check A recordsdig yourdomain.com A
dig cl-o.yourdomain.com A
# Or use nslookupnslookup yourdomain.com
nslookup cl-o.yourdomain.com
Check Port Accessibility
# Check if ports are open (from another machine)nc -zv yourserver.com 80nc -zv yourserver.com 443# Or use telnettelnet yourserver.com 80telnet yourserver.com 443
Cloudillo is under active development (90% complete). This guide explains core concepts that apply to all versions. For installation, see Installing Cloudillo for the Rust version, and check the Status Page for available features.
When you are ready to join the Cloudillo Network, you’ll need to make two
decisions:
1. Identity
You identity is like your unique username on the network. Cloudillo uses the Domain
Name System — the backbone of the internet — to create profile identities.
This approach eliminates the need for a central provider,
although it might seem overwhelming for newcomers.
To simplify the process, you have two options:
Option 1: If you already have a domain name, you can use it to create
your identity. This option may require technical know-how — but we’ve got you
covered.
Option 2: If you don’t have a domain name or prefer to avoid the hassle,
you can choose a Cloudillo Identity Provider. These services make it
super easy to create your identity.
Note
cloudillo.net identity provider is planned for launch in Q1 2026 (Phase 4).
Until then, you’ll need to use your own domain or wait for community providers to emerge.
2. Storage Provider
This is where your data will be stored.
Option 1: If you have your own server or a home NAS (Network Attached
Storage), you can use that as your storage provider.
You can even invite your family and friends to use it.
Option 2: Don’t want to manage your own storage? No problem. You can
opt for a Cloudillo Storage Provider. They handle all the technical stuff
for you.
Why Two Services?
Cloudillo is all about giving you control and keeping your data secure.
Separating your identity from your storage provider makes it easy to switch
storage options whenever you need to.
Using Your Own Domain
Many people and organizations already have domain names. You can use yours as
your identity and even create sub-identities for different purposes. This helps
organizations give their members identities tied to their domain.
Changing Your Storage Provider
If you control your identity, switching storage providers is simple.
Whether you move to self-hosting or another provider, your identity remains
intact, making the transition seamless.
Can You Use the Same Provider for Both?
Technically, yes. However, for security reasons, it’s better to choose different
providers. Using separate providers avoids potential conflicts of interest if
you ever need to switch storage providers.
Trust Your Identity Provider
Your identity provider is crucial. Ensure you trust them, as they could
theoretically take control of your identity.
If this concerns you, registering your own domain name can offer maximum security.
Warning
Keep in mind, on Cloudillo you own not only your data, but also your network,
followers, and likes.
No one can take these away from you, unless they gain control of your identity.
Installing Cloudillo Yourself
Rust Version
This guide is for the Rust implementation of Cloudillo (v0.1.0-alpha).
The Node.js version is deprecated and no longer maintained.
Alpha Software
The Rust version is 90% complete. Core functionality works, but some API
endpoints are still in development. See Status Page for details.
Before You Begin
Review Prerequisites to ensure your system meets requirements
Have a domain name ready with DNS control
Decide on deployment mode (standalone vs proxy)
Installation Options
You have several options for installing Cloudillo:
Docker (recommended) - Simplest and most versatile
Build from source - For development or custom builds
You also need to decide whether to run in:
Standalone mode - Cloudillo handles HTTPS with Let’s Encrypt
Proxy mode - Run behind a reverse proxy (nginx, Caddy, etc.)
Running Cloudillo using Docker in Standalone Mode
Warning
Docker images for the Rust version may not be published yet. Check the
cloudillo-rs repository for latest status.
If not available, use the build from source method below.
Here is the Docker command (adjust image name when available):
You basically need a local directory on your server and mount it to /data inside the container
and publish port 443 (HTTPS) and 80 (HTTP).
You can read about the configuration environment variables below.
Cloudillo in standalone mode uses TLS certificates managed by Let’s Encrypt.
If you want to use different certificates then you have to use Proxy Mode.
DNS Required
For Let’s Encrypt certificate issuance to work you have to ensure that
$BASE_APP_DOMAIN and cl-o.$BASE_ID_TAG both have DNS A records pointing to one
of $LOCAL_IPS before first starting the container.
You should change the default password as soon as possible!
Configuration Environment Variables
Variable
Value
Default
MODE
“standalone” or “proxy”
“standalone”
LOCAL_IPS
Comma separated list of IP addresses this node serves
*
BASE_ID_TAG
ID tag for the admin user to create
*
BASE_APP_DOMAIN
App domain for the admin user to create
*
BASE_PASSWORD
Password for the admin user to create
*
ACME_EMAIL
Email address for ACME registration
-
ACME_TERMS_AGREED
Whether to agree to ACME terms
-
DATA_DIR
Path to the data directory
/data
PRIVATE_DATA_DIR
Path to the private data directory
$DATA/priv
PUBLIC_DATA_DIR
Path to the public data directory
$DATA/pub
In case you are not familiar with the Cloudillo Identity System we provide some information about the notions used above:
The ID tag is the unique identifier of a Cloudillo profile. It can be any domain name associated with a user.
The App Domain is the domain address used by the user to access their
Cloudillo shell. Currently the App Domain is also unique for every
user, but it might change in the future. It is preferably the same as the ID
tag of the user, but it can be different when the domain is used by an other
site.
For a domain to work as a Cloudillo Identity it must serve a Cloudillo API endpoint accessable at the cl-o subdomain. In the above example you have to create the following DNS records:
In proxy mode you have to provide your own solution for TLS certificates.
In proxy mode Cloudillo serves its API port on 1443 but using HTTP and it doesn’t serve the HTTP port
by default. You should provide your own redirections.
However, you can turn it on with the LISTEN_HTTP=1080 environment variable.
We provide an example nginx configuration:
server {
listen80;
server_nameagatha.example.comcl-o.agatha.example.com;
location/.well-known/ {
root/var/www/certbot;
autoindexoff;
}
location/ {
return301https://$host$request_uri;
}
}
server {
listen443ssl;
server_nameagatha.example.comcl-o.agatha.example.com;
ssl_certificate/etc/letsencrypt/live/agatha.example.com/fullchain.pem;
ssl_certificate_key/etc/letsencrypt/live/agatha.example.com/privkey.pem;
location/.well-known/cloudillo/id-tag {
add_header'Access-Control-Allow-Origin''*';
return200'{"idTag":"agatha.example.com"}\n';
}
location/api {
rewrite/api/(.*)/api/$1 break;
proxy_passhttp://localhost:1443/;
proxy_set_headerX-Forwarded-For $proxy_add_x_forwarded_for;
proxy_set_headerX-Forwarded-Protohttps;
proxy_set_headerX-Forwarded-Host $host;
client_max_body_size100M;
}
location/ws {
proxy_passhttp://localhost:1443;
proxy_set_headerX-Forwarded-For $proxy_add_x_forwarded_for;
proxy_set_headerX-Forwarded-Protohttps;
proxy_set_headerX-Forwarded-Host $host;
proxy_set_headerUpgrade $http_upgrade;
proxy_set_headerConnection"Upgrade";
}
location/ {
# You can serve the cloudillo shell locally, or proxy it.
root/home/agatha/cloudillo/shell;
try_files $uri /index.html;
autoindexoff;
expires0;
}
}
Building from Source
For the latest features or if Docker images aren’t available yet, build from source:
Prerequisites
# Install Rust (if not already installed)curl --proto '=https' --tlsv1.2 -sSf https://sh.rustup.rs | sh
source $HOME/.cargo/env
# Verify installationrustc --version # Should be 1.70+cargo --version
Clone and Build
# Clone the Rust repositorygit clone https://github.com/cloudillo/cloudillo-rs.git
cd cloudillo-rs
# Build release versioncargo build --release
# Binary will be at:./target/release/cloudillo-server
Run the Server
# Set environment variablesexport DATA_DIR=/var/vol/cloudillo
export BASE_ID_TAG=agatha.example.com
export BASE_APP_DOMAIN=agatha.example.com
export BASE_PASSWORD=SomeSecret
export ACME_EMAIL=user@example.com
export ACME_TERMS_AGREED=true
# Create data directorymkdir -p $DATA_DIR
# Run the server./target/release/cloudillo-server
Once you’ve set up your Cloudillo Identity and Storage, it’s time to
get creative and start sharing content.
Accessing your Cloudillo Space
To access your Cloudillo Space, use your own URL, which usually matches
your Identity. First, authenticate yourself using the method you set up
during installation or registration.
Important
Remember, always access Cloudillo using your own URL, and never give your
credentials on any other site!
Inside your Cloudillo Space you’ll run various applications from other
spaces. Cloudillo will always let you know when this happens and shows the
trust level of the application.
The Cloudillo Shell
When you enter your Cloudillo Space, you’ll see the Cloudillo Shell.
This is the main application and it typically displays a header on the top of
the window, unless you are running a full-screen application.
Connecting with Others
Cloudillo doesn’t have a central database, so you’ll need to know the
identities of other users, organizations, or groups to connect with them. Once
you’ve joined some groups, you can connect with others through those groups.
You can start by following the cloudillo.net identity, which is the
official identity of the Cloudillo Community.
From there you can find and join other groups.
Core Concept & Architecture
Cloudillo is an open-source collaboration platform that allows users to store
their own data wherever they choose. Users can:
Self-host their data
Store data with community-hosted servers
Use third-party storage providers offering Cloudillo as a service
This ensures privacy-conscious users maintain full control while enabling
seamless onboarding for less technical users.
The design also ensures full user autonomy, preventing vendor lock-in by
allowing seamless migration between storage providers or self-hosting at any
time.
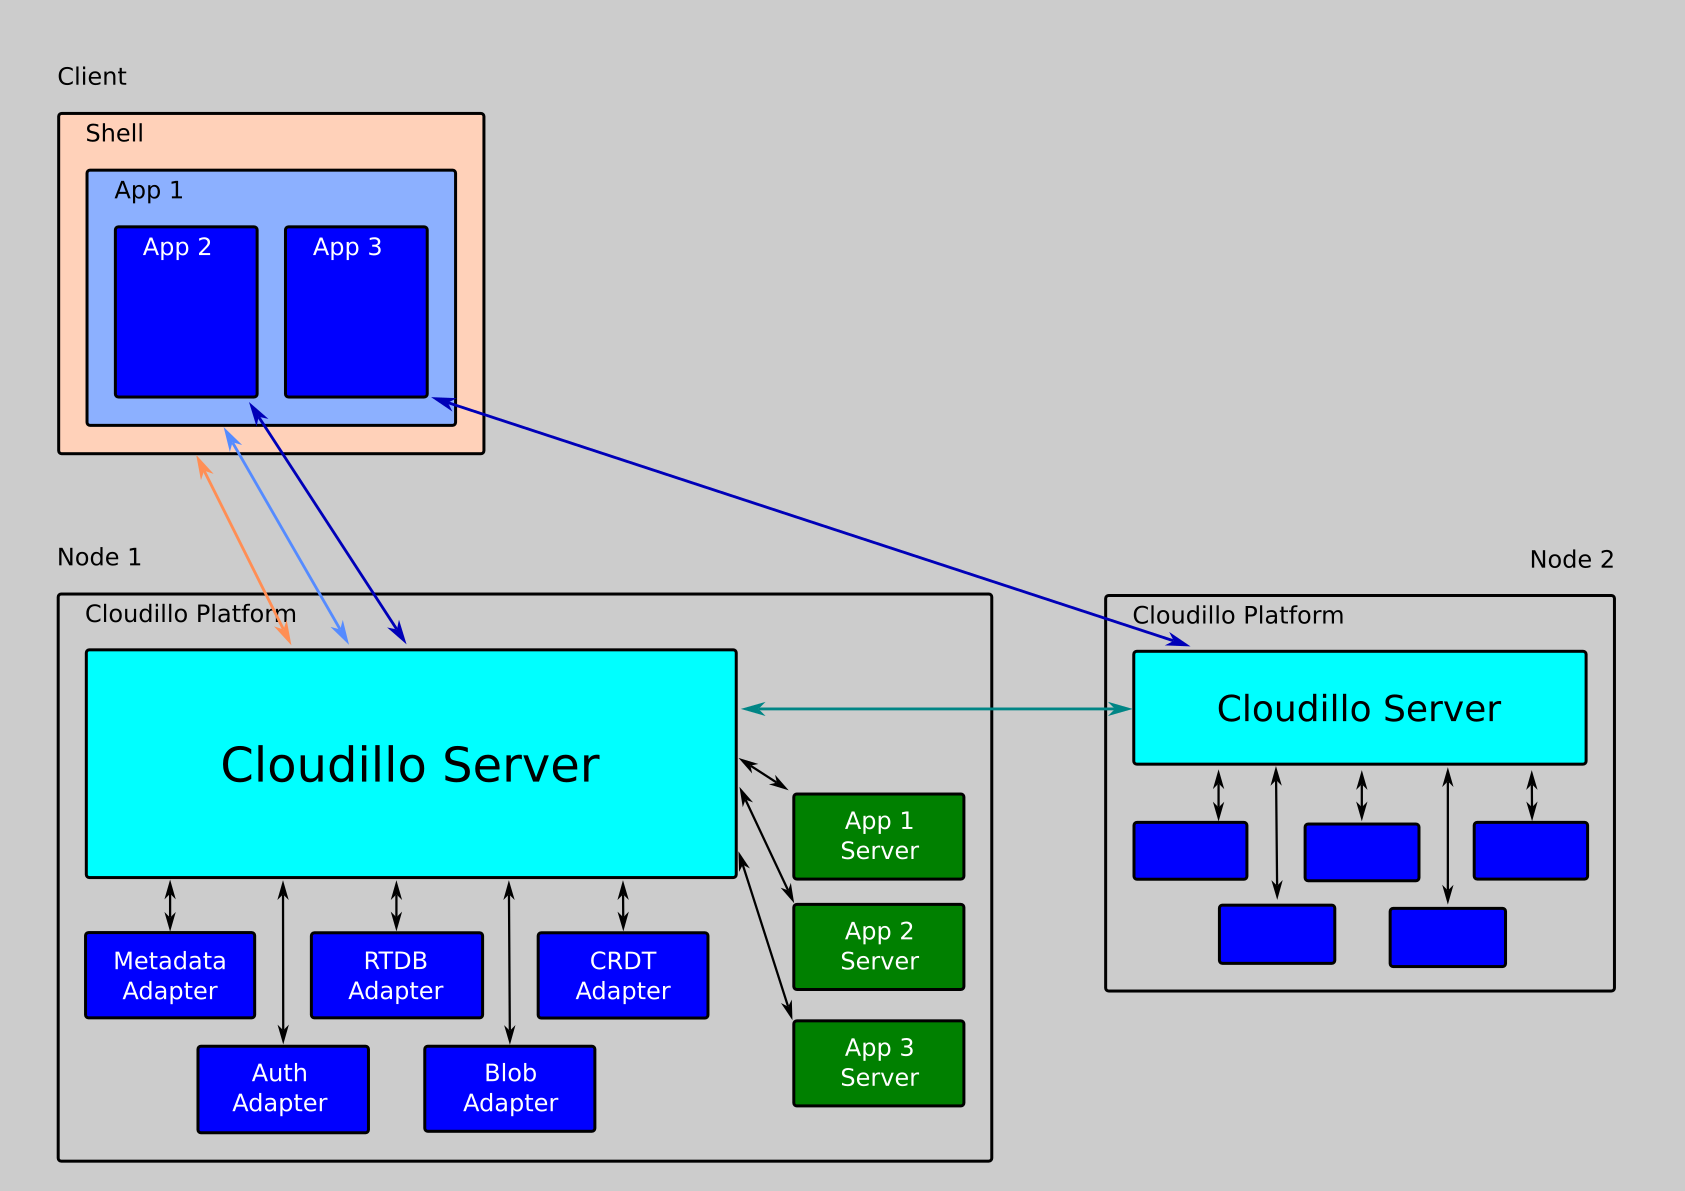
Architecture Diagram
Identity System & User Profiles
Cloudillo decouples identity from storage through a
Domain Name System (DNS)-based identity system.
Each user and community has a stable, trusted identifier independent of storage
location.
Users can create identities using their own domain name, allowing them to
maintain full control and leverage their trusted brand within the platform.
Cloudillo Identity Providers (CIP) help users create and manage identities
without manual DNS setup. Any domain owner can implement a CIP, with the first
provider being cloudillo.net.
Each Cloudillo Identity has a publicly accessible profile containing:
Identity Name
Identity Public Key
Optional additional metadata
The Identity Public Key verifies user authenticity within the Cloudillo network.
Content-Addressing & Merkle Trees
Cloudillo uses content-addressing throughout its architecture, where every action, file, and data blob is identified by the cryptographic hash of its content. This creates a merkle tree structure that provides:
Cryptographic proof of authenticity: Anyone can verify content integrity
Immutability: Content cannot be modified without changing its identifier
Tamper-evidence: Any modification is immediately detectable
Trustless verification: No need to trust storage providers
Every resource in Cloudillo—from action tokens to image blobs—is part of this merkle tree, creating a verifiable chain of trust from user actions down to individual bytes of data.
Cloudillo supports event-driven communication between nodes.
Actions are event-driven interactions that users perform, such as:
Connecting with another user
Following a user
Posting, commenting, or reacting
Sharing a document
When an action occurs, Cloudillo generates a cryptographically signed
Action Token, distributing it to involved parties.
This mechanism prevents spam and unauthorized actions.
Action tokens are content-addressed, meaning each action has a unique identifier derived from the hash of its content. This ensures actions are immutable and verifiable.
Access Control & Resource Sharing
When a user wants to access a resource stored on another node (e.g., editing a
document hosted by another user), the following process occurs:
The user’s node requests access using their Identity Key.
The remote node validates the request and grants an Access Token.
The application uses this token to interact with the resource on behalf of the user.
This process ensures secure, decentralized access control without requiring
direct trust between storage providers.
This process is designed to be seamless, requiring no additional user
interaction—offering the ease of centralized cloud platforms while maintaining
full decentralization.
Authentication & Authorization Tokens
Cloudillo utilizes cryptographic tokens for authentication and authorization:
Action Tokens: Signed by users, representing their activities (e.g., posting, following).
Access Tokens: Used for resource access, granted by the data owner’s node.
Verification: All tokens are cryptographically signed and validated by the recipient nodes before processing.
Resource Types & Storage Model
Cloudillo supports multiple resource types:
Extensible Actions: Developers can define new action types that integrate seamlessly with Cloudillo’s decentralized architecture, allowing for future expansion of platform capabilities.
Immutable Resources: Content such as images, videos, and published documents. These are content-addressed using cryptographic hashes to ensure integrity and enable deduplication.
WebSocket Bus - Real-time notifications and presence tracking
Subsections of Core Concept & Architecture
Fundamentals
The foundational concepts underlying Cloudillo’s architecture. These documents explain the core principles, system design patterns, identity mechanisms, and security considerations that enable Cloudillo’s federated, decentralized design.
Core Topics
System Architecture - Technical overview of the core patterns and components
Identity System - DNS-based identity and profile key management
Network & Security - Security architecture and inter-instance communication
These fundamentals form the basis for understanding Cloudillo’s data storage, action systems, and federation mechanisms.
Subsections of Fundamentals
System Architecture Overview
This document provides a technical overview of the Cloudillo system architecture, explaining the core patterns and components that enable its federated, privacy-focused design.
Workspace Structure
Cloudillo is organized as a Rust workspace with feature-specific crates:
Why separate? Authentication and cryptography require special security considerations and may need different storage backends (HSM, vault services, etc.).
Why separate? CRDT storage can use different backends (redb, dedicated CRDT stores) and has different performance characteristics than traditional databases.
✅ Flexible Deployment: Switch storage backends without changing core logic
✅ Separation of Concerns: Security, metadata, and binary data have different requirements
✅ Testing: Easy to create in-memory adapters for testing
✅ Scalability: Can distribute adapters across different services
✅ Cost Optimization: Use appropriate storage for each data type
Content-Addressed Architecture
Cloudillo uses content-addressing throughout its architecture, where resource identifiers are cryptographic hashes of their content. This creates a merkle tree structure that provides cryptographic proof of authenticity and immutability.
Hash-Based Identifiers
All resource IDs are SHA-256 hashes with versioned prefixes:
Prefix
Resource Type
Hash Input
Example
a1~
Action
Entire JWT token (header + payload + signature)
a1~8kR3mN9pQ2vL6xW...
f1~
File
File descriptor string
f1~Qo2E3G8TJZ2HTGh...
b1~
Blob
Blob bytes (actual image/video data)
b1~abc123def456ghi...
d2,
Descriptor
(not a hash, the encoded string itself)
d2,vis.tn:b1,abc:f=avif:...
Version Scheme
Format: {prefix}{version}~{base64_encoded_hash}
Version 1: SHA-256 with base64url encoding (no padding)
Future versions: Can upgrade to SHA-3, BLAKE3, etc. without breaking old content
Backward compatibility: Old content remains valid forever
Algorithm agility: Migrate to new algorithms without breaking existing references
Example upgrade path:
a1~...  (SHA-256)
a2~...  (SHA-3)
a3~...  (BLAKE3)
Six-Level Merkle Tree
Content-addressing creates a hierarchical merkle tree:
Level 1: Blob Data (raw bytes)
   ↓ SHA-256 hash
Level 2: Blob ID (b1~hash)
   ↓ collected in descriptor
Level 3: File Descriptor (d2,class.variant:b1,hash:f=format:s=size:r=resolution;...)
   ↓ SHA-256 hash of descriptor
Level 4: File ID (f1~hash)
   ↓ referenced in action
Level 5: Action Token (JWT with content, parent, attachments)
   ↓ SHA-256 hash of entire JWT
Level 6: Action ID (a1~hash)
Properties
✅ Immutable: Content cannot change without changing the ID
✅ Tamper-Evident: Any modification is immediately detectable
Complex operations in Cloudillo are modeled as persistent tasks that can execute asynchronously, survive restarts, and depend on other tasks.
Task System Components
Tasks
Tasks implement the Task<S> trait, whose core methods are kind() (a static
type name), build()/serialize() (for persistence), run(&self, state) (the
work itself, returning ClResult<()>), and on_failed() (cleanup after retries
are exhausted). Dependencies and retry policy are supplied when a task is
scheduled, not declared on the trait.
Built-in Task Types (non-exhaustive):
ActionCreatorTask: Creates and signs action tokens for federation
The scheduler manages task lifecycle with dependency resolution:
Features:
Task registry with dynamic builders
Dependency resolution (DAG-based)
Scheduled execution (cron-like)
Persistence via MetaAdapter (survives restarts)
Notification system for task completion
Example Flow:
ActionCreatorTask (depends on FileIdGeneratorTask)
    ↓
    waits for file processing to complete
    ↓
FileIdGeneratorTask completes
    ↓
ActionCreatorTask auto-starts
    ↓
Creates signed JWT, stores in MetaAdapter
Worker Pool
A priority-based thread pool for CPU-intensive and blocking operations:
Architecture:
Three priority tiers: High > Medium > Low
Per-tier worker thread counts set at construction (hardcoded in the server)
Uses flume MPMC channels for work distribution
Returns futures for async integration
Default Configuration (cloudillo-server):
1 high-priority worker
2 medium-priority workers
1 low-priority worker
Use Cases:
Image processing (CPU-intensive)
Cryptographic operations
File compression
Blocking I/O
Application State Management
AppState Structure
The core application state contains: scheduler, worker pool, HTTP client, TLS certificates, and all five adapters (auth, meta, blob, rtdb, crdt).
AppBuilder Pattern
Configuration uses a fluent builder API with mode, identity, domain, data directory, and adapter selections.
Configuration Options:
Server mode (Standalone, Proxy, StreamProxy)
Network binding (HTTPS/HTTP ports)
Domain configuration
Directory paths (dist, tmp, data)
Adapter injection
Worker pool sizing
Crate Organization
The workspace is organized into feature-specific crates under crates/:
cloudillo-types - Foundation Layer
Shared types and trait definitions used across all crates:
Certificate handled is the responsibility of the proxy
Use case: Managed hosting providers, self-hosting with multiple services on one IP address
Security Architecture
Implemented in Rust
Maximal memory and concurrency safety. Minimal attack surface.
No Unsafe Code
Cloudillo enforces memory safety:
#![forbid(unsafe_code)]
ABAC Permission System
Cloudillo uses Attribute-Based Access Control (ABAC) for fine-grained permissions across all resources. ABAC provides flexible permission rules based on:
User attributes (identity, roles, relationships)
Resource attributes (owner, visibility, type)
Contextual factors (time, environment)
Key Features:
Six visibility levels: Public (P), Verified (V), SecondDegree (2), Follower (F), Connected (C), Direct (NULL)
Cloudillo Profiles are located using a DNS-based identity system.
Each Cloudillo Identity is associated with a specific API endpoint, which
can be accessed via the “cl-o” subdomain of the identity.
For example, the API domain of the cloudillo.net identity is available at
https://cl-o.cloudillo.net/.
Retrieving a Cloudillo Profile
Fetch a profile by requesting the /api/me endpoint of the identity’s API
domain. It is unauthenticated, so any peer (or client) can read it:
curl https://cl-o.cloudillo.net/api/me
The response is wrapped in the standard API envelope (data, time):
Private keys are held only in the AuthAdapter and never appear in the
response.
Cryptographic Algorithm
Signing keys use the P-384 elliptic curve (NIST P-384 / secp384r1). Action
tokens are signed with ES384 (ECDSA over P-384 with SHA-384).
Key Rotation
The key ID is the creation date in YYMMDD format (e.g. 250205). To rotate,
the server generates a new key, adds it alongside the existing ones, and marks
the old key as expired. Because each action token records the keyId it was
signed with, old tokens stay verifiable against the matching (expired) key.
Push Notification Keys
Web push uses a separate per-tenant VAPID key pair (ES256 / P-256), stored
in the AuthAdapter. These are independent from the signing keys above and are
not part of the /api/me response. See Network & Security
for the full cryptography table.
Identity Resolution
DNS-Based Discovery
Cloudillo uses DNS to discover the API endpoint for an identity:
Identity: alice.example.com
API Domain: cl-o.alice.example.com
API Endpoint: https://cl-o.alice.example.com/api/me
Cloudillo Identity Providers (CIP)
Users without their own domain can use a Cloudillo Identity Provider:
CIP Responsibilities:
Domain management (subdomains or custom domains)
DNS configuration
Dynamic DNS support
CIPs never store or access any user data, nor have any responsibility for it.
Example CIP: cloudillo.net
Provides identities like alice.cloudillo.net
API available at https://cl-o.alice.cloudillo.net
Users can migrate to their own domain later
Custom Domain Setup
To use your own domain with Cloudillo:
DNS Configuration:
cl-o.alice.example.com.  A      <your-server-ip>
cl-o.alice.example.com.  AAAA   <your-server-ipv6>
app.example.com.  A             <your-server-ip>
app.example.com.  AAAA          <your-server-ipv6>
TLS Certificate: Automatic via ACME (Let’s Encrypt)
Display metadata (name, type, profile picture, extended sections) lives in the
MetaAdapter; the ProfileType enum is either Person or Community.
Signing keys live in the AuthAdapter. The /api/me handler combines both.
When an instance interacts with a remote identity, it fetches
https://cl-o.{remote_id_tag}/api/me and caches the result locally. The
response carries an ETag, so frequent re-syncs answer 304 Not Modified
when nothing has changed.
Security Considerations
Public Key Infrastructure
Public keys are publicly accessible via /api/me
Private keys are stored securely in AuthAdapter
No private key export - keys never leave the server
Key verification happens on every action token
Identity Trust Model
Trust is established through:
DNS ownership: Control of domain proves identity ownership
Key signatures: Private key proves control of identity
Cloudillo implements a merkle tree structure using content-addressed identifiers throughout its architecture. Every action, file, and data blob is identified by the cryptographic hash of its content, creating an immutable, verifiable chain of trust.
What is Content-Addressing?
Content-addressing means identifying data by what it is (its content) rather than where it is (its location). Instead of using arbitrary IDs or URLs, Cloudillo computes a cryptographic hash of the content itself and uses that hash as the identifier.
Benefits
✅ Immutable: Content cannot change without changing its identifier
✅ Tamper-Evident: Any modification is immediately detectable
Cloudillo’s content-addressing creates a variable-depth merkle tree where actions can reference other actions recursively. The example below shows a six-level hierarchy for a POST action with image attachments:
Content-addressed action identifier computed as SHA256(complete_jwt_token).
Hash Versioning Scheme
All identifiers use a versioned prefix format for future-proofing:
{prefix}{version}~{base64_encoded_hash}
Current Prefixes
Prefix
Resource Type
Hash Input
Example
a1~
Action
Entire JWT token
a1~8kR3mN9pQ2vL6xW...
f1~
File
File descriptor string
f1~Qo2E3G8TJZ2HTGh...
d2,
Descriptor
(not a hash, the encoded format itself)
d2,vis.tn:b1,abc:f=avif:...
b1~
Blob
Blob bytes (raw data)
b1~abc123def456ghi...
Version Scheme
Version 1: SHA-256 with base64url encoding (no padding)
Future versions: Can upgrade to SHA-3, BLAKE3, etc.
Backward compatibility: Old content remains valid forever
Algorithm agility: Migrate to new algorithms without breaking existing references
Example upgrade path:
a1~...  (SHA-256)
a2~...  (SHA-3)
a3~...  (BLAKE3)
Merkle Tree Properties
Content-addressing gives the tree several properties for free:
Immutability: Changing any content changes its ID, so the original is
never overwritten — edits produce a new action with a new a1~... ID.
Tamper-evidence: A modification anywhere propagates upward. Altering a
thumbnail changes its b1~... ID, which changes the descriptor, the
f1~... file ID, and breaks the post’s attachment reference — verification
fails.
Deduplication: Identical content yields identical IDs, so a file shared
by many users is stored once.
Chain of Trust
Each reply references its parent by content hash (the p claim), binding a
thread together cryptographically:
Post (a1~abc...)
  ↑ p (parent)
Comment (a1~def...)
  ↑ p (parent)
Reply (a1~ghi...)
Modifying the Post would change its ID and break the Comment’s reference, which
would break the Reply’s — the whole thread is bound together.
Proof of Authenticity
Cloudillo provides two complementary layers of proof:
Cloudillo’s network layer uses Rustls with the AWS-LC-RS cryptographic provider for TLS, automatic certificate management via ACME, and runs a dual-server architecture.
TLS architecture
Cloudillo uses Rustls for TLS termination, configured with HTTP/2 (preferred) and HTTP/1.1 via ALPN negotiation.
SNI-based certificate resolution
A custom CertResolver serves the correct certificate for each domain using SNI (Server Name Indication). This is essential for multi-tenant hosting where many users share a single server.
The resolver maintains an in-memory RwLock<HashMap<domain, CertifiedKey>> cache, prepopulated on startup from the database. On a TLS handshake:
Check in-memory cache (fast path, read lock)
On cache miss, load from database on a blocking worker thread
Parse PEM certificate and private key, insert into cache
Return certificate for TLS handshake
Each tenant gets entries for both its canonical domain (cl-o.{id_tag}) and any custom domain.
Certificate management
Cloudillo uses instant-acme to automatically provision and renew TLS certificates from Let’s Encrypt using the HTTP-01 challenge method.
Dual-server setup
HTTPS server (primary): Handles all application traffic with TLS via Rustls and the SNI-based certificate resolver
HTTP server (optional): Serves ACME HTTP-01 challenge responses at /.well-known/acme-challenge/{token} and redirects everything else to HTTPS
Certificate renewal
A scheduled CertRenewalTask checks all certificates periodically. Certificates expiring within 30 days are automatically renewed. The renewal uses exponential backoff (1s initial, 1.5x factor, 90s timeout) for resilience.
Certificates are stored via the AuthAdapter trait, which provides create_cert, read_cert_by_domain (and by tenant or id_tag), list_all_certs, and list_tenants_needing_cert_renewal.
Cryptography
Algorithms
Purpose
Algorithm
Details
Action token signing
ES384 (P-384)
Federated action tokens between instances
Access tokens
HS256 (HMAC-SHA256)
Session JWTs, symmetric secret per instance
Web Push (VAPID)
ES256 (P-256)
Push notification subscription keys
Password hashing
bcrypt (cost 10)
Per-password random salt
Content hashing
SHA256
File IDs, content addressing, deduplication
TLS
TLS 1.2/1.3
Rustls defaults, modern cipher suites
Key management
Profile signing keys use the P-384 elliptic curve (ES384). Keys are identified by date-based key IDs (format: YYMMDD) and stored in PKCS#8 PEM format. Each tenant has its own signing key pair:
Public key: Published for other instances to verify action tokens
Private key: Used to sign outgoing action tokens
A key failure cache (default size: 100 entries) prevents repeated fetch attempts for unreachable remote keys during federation.
Security policies
Memory safety
Cloudillo enforces unsafe_code = "forbid" as a workspace-wide lint, along with strict clippy rules (unwrap_used = "deny", expect_used = "deny", panic = "deny").
CORS
API endpoints use a permissive CORS policy (CorsLayer::very_permissive()). This is intentional: Cloudillo apps run in sandboxed iframes served from the /apps/ directory and need cross-origin access to the API.
Request size limits
File upload size is configurable per tenant via the file.max_file_size_mb setting (default: 50 MiB).
See also
Rate Limiting - Hierarchical rate limiting and proof-of-work
Cloudillo’s data storage systems and access control mechanisms. These documents explain how data is stored, organized, queried, and protected across the decentralized network.
Storage Types
Cloudillo provides three storage systems for different use cases:
Feature
Blob
RTDB
CRDT
Primary Use
Static files
Structured data with queries
Collaborative editing
Data Model
Immutable binary
Collections of JSON documents
Shared types (text, maps, arrays)
Mutability
Immutable (new version = new blob)
Mutable with real-time sync
Mutable with automatic merge
Conflict Resolution
N/A (content-addressed)
Last-write-wins
Automatic merge (no conflicts)
Offline Support
Cache only
Reconnection sync
Full offline with local persistence
Query Capabilities
By ID, metadata, tags
Rich queries (where, orderBy, limit)
Read entire document
Best For
Images, videos, PDFs, attachments
Todos, settings, lists, forms
Text editors, whiteboards, real-time docs
Blob Storage
Blob Storage - Content-addressed immutable binary data. Every file is identified by its SHA-256 hash, enabling deduplication and integrity verification. Supports automatic variant generation (thumbnails, transcoded video). Choose Blob for static files that don’t change frequently.
RTDB (Real-Time Database)
RTDB - Firebase-like API for structured data. Choose RTDB when you need to query and filter data, or when your application works with structured records (users, posts, settings). Changes sync in real-time, but concurrent edits use last-write-wins semantics.
CRDT (Collaborative Editing)
CRDT - Conflict-free replicated data types using Yjs. Choose CRDT when multiple users edit the same content simultaneously (documents, spreadsheets, presentations). All changes merge automatically without conflicts, even when users are offline.
Choosing the Right System
Use Blob when:
Storing static files (images, videos, PDFs)
Content is immutable or versioned
You need content-addressing and deduplication
Generating variants (thumbnails, transcodes)
Use RTDB when:
You need to query/filter data (e.g., “show incomplete todos”)
Data is structured as records/documents
Users typically edit different records
You need server-side validation
Use CRDT when:
Multiple users edit the same content simultaneously
You’re building a collaborative editor
Offline-first is critical
Character-level or element-level merging is needed
Many applications use all three: Blob for attachments, CRDT for document content, RTDB for metadata and settings.
Access Control
Access Control - How resources are protected and shared while maintaining user privacy and sovereignty through token-based authentication and attribute-based permissions.
Subsections of Data Storage & Access
Blob Storage
Cloudillo’s blob storage holds immutable binary data (files, images, videos) under content-addressed IDs — every blob is named by the SHA-256 hash of its bytes. This gives automatic deduplication, integrity verification, and permanent cacheability. Uploaded media is additionally split into multiple size/quality variants grouped by a file descriptor.
Content-Addressed Storage
File Identifier Format
Cloudillo uses multiple identifier types in its content-addressing system:
{prefix}{version}~{base64url_hash}
Components:
{prefix}: Resource type indicator (a, f, b, d)
{version}: Hash algorithm version (currently 1 = SHA-256)
~: Separator
{base64url_hash}: Base64url-encoded hash (43 characters, no padding)
Identifier Types
Prefix
Resource Type
Hash Input
Example
b1~
Blob
Blob bytes (raw image/video data)
b1~abc123def456...
f1~
File
File descriptor string
f1~QoEYeG8TJZ2HTGh...
d2,
Descriptor
(not a hash, the encoded format itself)
d2,vis.tn:b1~abc:f=avif:...
a1~
Action
Complete JWT token
a1~8kR3mN9pQ2vL...
Important: d2, is not a content-addressed identifier—it’s the actual encoded descriptor string. The file ID (f1~) is the hash of this descriptor.
{blob_id} - Content-addressed ID of the blob (b1~...)
f={format} - Format: avif, webp, jpeg, png, mp4, opus, pdf
s={size} - File size in bytes (integer, no separators)
r={width}x{height} - Resolution in pixels (width × height)
; - Semicolon separator between variants (no spaces)
The original is encoded as the bare token orig (no class prefix), regardless of its media class — e.g. orig:b1~...:f=jpeg:.... A descriptor may also begin with an optional R={root_id}; field that links the file to its document-tree access-control root.
Optional Fields
For video, audio, and document files:
dur={seconds} - Duration in seconds (floating point, video/audio only)
br={kbps} - Bitrate in kbps (integer, video/audio only)
r={width}x{height} → Split by x, parse as u32 × u32
dur={seconds} → Parse as f64 (optional)
br={kbps} → Parse as u32 (optional)
pg={count} → Parse as u32 (optional)
Parsing logic: split by semicolons for variants, then by colons for fields, then parse key=value pairs.
Variant Size Classes - Exact Specifications
Cloudillo generates image variants at specific size targets to optimize bandwidth and storage:
Quality
Code
Max Dimension
Use Case
Profile
pf
80px
Profile picture icons
Thumbnail
tn
256px
List views, previews, avatars
Standard
sd
720px
Mobile devices, low bandwidth
Medium
md
1280px
Desktop viewing
High
hd
1920px
High quality display
Extra
xd
3840px
4K displays, maximum quality
Original
orig
-
Unprocessed source file
Generation Rules
Which variants are generated depends on the preset configuration. The default preset generates: tn, sd, md, hd. The high_quality preset adds xd. Variants larger than the original image are automatically skipped (smaller originals are never upscaled).
Properties:
Each variant maintains the original aspect ratio
Uses Lanczos3 filter for high-quality downscaling
Maximum dimension constraint prevents oversizing
Smaller originals don’t get upscaled
Variant Selection
Clients request a specific variant:
GET /api/files/f1~Qo2E3G8TJZ...?variant=hd
Response: Returns HD variant if available, otherwise falls back to smaller variants.
Automatic Fallback
If the requested variant doesn’t exist, the server returns the best available:
Try requested variant (e.g., hd)
Fall back to next smaller (e.g., md)
Continue until variant found
Return smallest if none larger
Fallback order: xd → hd → md → sd → tn
Content-Addressing Flow
File storage uses a three-level content-addressing hierarchy:
Level 1: Blob Storage
Upload image → Save as blob → Compute SHA256 of blob bytes → Store blob with ID: b1~{hash}
Generate all variants (tn, sd, md, hd) → Each variant gets its own blob ID (b1~...) → Collect all variant metadata → Create descriptor string encoding all variants
1. User uploads photo.jpg (3MB, 3024x4032px)

2. System generates variants:
   vis.tn:  150x200px → 4KB   → b1~abc123
   vis.sd:  600x800px → 32KB  → b1~def456
   vis.md:  1440x1920px → 256KB → b1~ghi789
   vis.hd:  2880x3840px → 1MB → b1~jkl012

3. System builds descriptor:
   "d2,vis.tn:b1~abc123:f=avif:s=4096:r=150x200;
       vis.sd:b1~def456:f=avif:s=32768:r=600x800;
       vis.md:b1~ghi789:f=avif:s=262144:r=1440x1920;
       vis.hd:b1~jkl012:f=avif:s=1048576:r=2880x3840"

4. System hashes descriptor:
   file_id = f1~Qo2E3G8TJZ2... = SHA256(descriptor)

5. Action references file:
   POST action attachments = ["f1~Qo2E3G8TJZ2..."]

6. Anyone can verify:
   - Download all variants
   - Verify each blob_id = SHA256(blob)
   - Rebuild descriptor
   - Verify file_id = SHA256(descriptor)
   - Cryptographic proof established ✓
File attachments integrate into Cloudillo’s merkle tree structure. See Content-Addressing & Merkle Trees for how files fit into the verification chain.
The image dimensions are extracted and the preset’s image variant list (e.g. ["vis.tn", "vis.sd", "vis.md", "vis.hd"] for default) is walked from smallest to largest. Each variant’s bounding box is capped at the original’s longest side — the original is never upscaled. A variant is then skipped if its capped size is less than 10% larger than the last variant actually created, so a small original collapses to just the thumbnail plus one or two distinct sizes instead of several near-identical blobs.
The intermediate steps (task scheduling, hash computation, blob storage, variant generation, and metadata storage) are shown in the Complete Upload Flow Diagram below.
Response
The upload responds immediately with a temporary local ID (@{f_id}) plus the synchronously-generated thumbnail blob ID and original dimensions. The remaining variants are still being generated asynchronously:
The final content-addressed file ID (f1~...) is only known once all variant tasks finish. The server then pushes a FILE_ID_GENERATED WebSocket event ( { tempId, fileId, rootId } ) so clients can swap the temporary @{f_id} for the permanent f1~ ID.
Complete Upload Flow Diagram
Client uploads image
  ↓
POST /api/files/{preset}/filename.jpg
  ↓
Read image, extract dimensions, allocate local f_id
  ↓
Generate thumbnail synchronously
  ├─ Resize with Lanczos3 → encode → SHA256 → b1~ blob
  ├─ Store blob in BlobAdapter
  └─ Record file_variants row
  ↓
Respond immediately: { fileId: "@<f_id>", thumbnailVariantId, dim }
  ↓
Schedule image.resize task per remaining variant
  ├─ Resize / encode / hash / store blob
  └─ Record file_variants row
  ↓
file.id-generate task (depends on all variant tasks)
  ├─ Collect variant rows → build d2 descriptor
  ├─ file_id = SHA256(descriptor) → f1~...
  ├─ Finalize file (status P → A)
  └─ Broadcast FILE_ID_GENERATED over WebSocket
Download Flow
Client Request
GET /api/files/f1~...?variant=hd
Authorization: Bearer <access_token>
Server Processing
Parse Descriptor
variants = parse_file_descriptor(file_id)
# Returns list of VariantInfo
Select Best Variant
selected = get_best_file_variant(
    variants,
    requested_variant,   # "hd"
)

# Falls back by quality within the same class if the
# requested variant isn't locally available:
# hd → md → sd → tn
Note: Content-addressed files are immutable, so can be cached forever.
Metadata Structure
File metadata lives in two tables in the MetaAdapter. The files row holds the logical file (type, preset, owner, visibility, folder/document-tree links); file_variants rows hold one entry per generated variant. A local internal f_id integer keys both tables while the file is still being processed; the content-addressed file_id (f1~...) is written only once all variant tasks finish (status transitions P → A).
CREATETABLE files (
f_id INTEGER NOTNULL, -- local internal id (primary key)
tn_id INTEGER NOTNULL,
file_id TEXT, -- f1~... descriptor hash (set when finalized)
file_tp CHAR(4), -- BLOB / CRDT / RTDB
status CHAR(1), -- A active, P pending, D deleted
preset TEXT,
content_type TEXT,
file_name TEXT,
visibility CHAR(1), -- NULL / P / V / 2 / F / C
parent_id TEXT, -- folder hierarchy
root_id TEXT, -- document-tree access-control root
created_at INTEGER,
PRIMARYKEY(f_id)
);
CREATETABLE file_variants (
tn_id INTEGER NOTNULL,
f_id INTEGER NOTNULL,
variant_id TEXT, -- b1~... blob id
variant TEXT, -- 'vis.sd', 'vid.hd', 'orig', ...
res_x INTEGER,
res_y INTEGER,
format TEXT,
size INTEGER,
available BOOLEAN, -- blob present locally
global BOOLEAN, -- stored in shared global cache
duration REAL, -- video/audio
bitrate INTEGER, -- video/audio (kbps)
page_count INTEGER, -- documents
PRIMARYKEY(f_id, variant_id, tn_id)
);
The available flag matters for federation: a synced file lists all variants in its descriptor, but only the variants whose blobs have actually been fetched are marked available locally. See Access Control for how visibility and root_id drive permission checks.
File Presets
Presets control which variants are generated and whether the original is stored. Files are uploaded with a preset in the path:
POST /api/files/{preset}/{filename}

POST /api/files/default/avatar.jpg       // standard image variants
POST /api/files/archive/document.pdf     // keep original, minimal processing
Available presets: default, profile-picture, cover, high_quality, mobile, archive, podcast, video, orig-only, thumbnail-only, apkg. See File Processing for the full per-preset variant matrix.
Storage Organization
BlobAdapter Layout
Blobs are stored on disk under a per-tenant directory, sharded into two levels by the first four characters of the hash (after the ~). The filename is the full blob ID:
{data_dir}/
├── {tn_id}/
│   ├── {h0h1}/                      // first 2 hash chars
│   │   └── {h2h3}/                  // next 2 hash chars
│   │       └── b1~QoEYeG8TJ...46w   // blob, filename = full ID
│   └── ...
└── {other_tn_id}/
    └── ...
Each variant (and the original, when stored) is an independent blob with its own ID. The file descriptor — not the filesystem — is what groups variants into a logical file. File metadata is stored separately in the MetaAdapter (see Metadata Structure above).
Query-oriented database system providing Firebase-like functionality for structured JSON data with real-time subscriptions.
Overview
The RTDB system enables:
JSON document storage and retrieval
Query filters (equals, greater than, less than)
Sorting and pagination
Computed values (increment, aggregate, functions)
Atomic transactions
Real-time subscriptions via WebSocket
Documents
Overview - Introduction to RTDB architecture and features
redb Implementation - How RTDB is implemented using the lightweight redb embedded database
Use Cases
User profiles and settings
Task lists and project management
E-commerce catalogs
Analytics and reporting
Structured forms and surveys
Subsections of RTDB (Real-Time Database)
RTDB Overview
Cloudillo’s RTDB (Real-Time Database) provides Firebase-like functionality for structured JSON data with queries, subscriptions, and real-time synchronization. It integrates seamlessly with Cloudillo’s federated architecture while maintaining privacy and user control.
CRDT Collaborative Editing (Separate System)
Cloudillo also provides a separate CRDT API for collaborative editing:
Note: These are separate, complementary systems. Use RTDB for structured data with queries, and CRDT for collaborative editing scenarios.
Core Concept: Database-as-File
Both systems use the same foundational concept: databases/documents are special files in the Cloudillo file system.
How It Works
File Metadata (MetaAdapter) stores:
Database ID, name, owner
Creation timestamp, last accessed
Permission rules
Configuration (max size, retention policy)
Database Content (RtdbAdapter or CrdtAdapter) stores:
Actual data (documents, CRDT state)
Indexes (for query performance)
Snapshots (for fast loading)
File ID serves as database identifier:
/ws/rtdb/:fileId // WebSocket connection endpoint
Benefits
Natural Integration: Databases managed like files
Permission Reuse: File permissions apply to databases
Federation Ready: Databases can be shared across instances
Discoverable: Find databases through file APIs
Creating and Opening a Database
There is no dedicated “create database” call. A database is opened by connecting to its WebSocket endpoint with a file ID. For authenticated users the backing store file is created lazily on first connect:
Store databases (s~<app-id>): an app’s persistent store, auto-created with file type RTDB.
Meta databases (<fileId>~meta): per-file comment/metadata stores, auto-created against the parent file’s permissions.
// Connecting opens (and, for store/meta IDs, lazily creates) the database
constws=newWebSocket(`wss://cl-o.alice.example.com/ws/rtdb/${fileId}`);
Access is granted through the file’s existing permissions — see the permission model below.
Permissions are checked once at WebSocket connection time using file_access::check_file_access_with_scope(). This function evaluates multiple access sources:
The result determines whether the connection operates in read_only or read_write mode. Clients can also request a specific access level via the ?access=read or ?access=write query parameter.
Info
There is no per-operation permission check — access level is determined at connection time and applies for the duration of the WebSocket session.
Future: Fine-Grained Permissions
Planned for future releases:
Per-collection permissions: Different access per table
Per-document permissions: Filter queries by ownership
Runtime rules: JavaScript-like expressions evaluated at runtime
Attribute-based: Permissions based on user attributes
WebSocket Protocol
Both systems (RTDB and CRDT) use WebSocket for real-time communication, though with different protocols:
Connection
The endpoint is authenticated like any other Cloudillo request (session cookie or token); the browser WebSocket constructor takes only the URL. An optional ?access=read|write query parameter requests a specific access level.
// Client → Server
{
"type":"query", // or "subscribe", "create", "update", "delete"
"id":123, // Request ID for correlation
// ... type-specific fields
}
// Server → Client
{
"type":"queryResult", // or "change", "error"
"id":123, // Matches request ID
// ... response data
}
Storage Strategy
Each database is backed by a redb file. The RtdbAdapter persists every write through an ACID transaction committed atomically — redb is the durable store, so there is no separate snapshot format. Opened databases are cached in memory; idle instances are evicted by a background LRU task, releasing the file handle until the next connection reopens it.
Databases can be shared across Cloudillo instances through the file sharing mechanism (FSHR action tokens). Access from remote users is granted via the same check_file_access_with_scope() system used for local access control.
Note
Full database replication (read-only replicas, bidirectional sync) is planned for a future release. Currently, remote users connect directly to the origin instance via WebSocket.
Security Considerations
WebSocket connections require valid access tokens, validated when the connection is established
Permissions are evaluated once at connection time, fixing the session to read-only or read-write (there is no per-operation re-check)
TLS/WSS is used for all connections
Choosing Between RTDB and CRDT
Use RTDB (redb) for structured data with schemas, complex queries (filters, sorts, aggregates), computed values, document locking, and atomic transactions.
Use CRDT (Yrs) for concurrent multi-user editing, conflict-free merging, rich text editing, offline-first design, and Yjs ecosystem compatibility.
Both can be used together – for example, Yrs for collaborative document editing and redb for structured metadata.
API Overview
RTDB has a single endpoint — the WebSocket. All reads, writes, subscriptions, locks, and index management happen over it (see RTDB with redb for the message protocol).
Because a database is a file, lifecycle and metadata are handled through the standard file APIs (/api/files/...): listing, deletion, sharing, and permission changes all apply to the underlying store file. There are no RTDB-specific create, metadata, export, or import endpoints.
Next Steps
RTDB with redb - Query-based database with WebSocket protocol
The query-based RTDB uses redb, a lightweight embedded database, to provide Firebase-like functionality with minimal overhead. This approach is ideal for structured data, complex queries, and traditional database operations.
Cloudillo uses redb, a lightweight pure-Rust embedded database with ACID transactions and zero-copy reads.
The core interface for database operations. All methods are tenant-aware (tn_id parameter). Write operations go through the separate Transaction trait.
#[async_trait]pubtrait RtdbAdapter: Debug+ Send + Sync {
/// Begin a new transaction for write operations
asyncfntransaction(&self, tn_id: TnId, db_id: &str) -> ClResult<Box<dyn Transaction>>;
/// Close a database instance, flushing pending changes
asyncfnclose_db(&self, tn_id: TnId, db_id: &str) -> ClResult<()>;
/// Query documents with optional filtering, sorting, and pagination
asyncfnquery(&self, tn_id: TnId, db_id: &str, path: &str, opts: QueryOptions)
-> ClResult<Vec<Value>>;
/// Get a single document at a specific path
asyncfnget(&self, tn_id: TnId, db_id: &str, path: &str) -> ClResult<Option<Value>>;
/// Subscribe to real-time changes (returns a stream of ChangeEvents)
asyncfnsubscribe(&self, tn_id: TnId, db_id: &str, opts: SubscriptionOptions)
-> ClResult<Pin<Box<dyn Stream<Item = ChangeEvent>+ Send>>>;
/// Create an index on a field for query performance
asyncfncreate_index(&self, tn_id: TnId, db_id: &str, path: &str, field: &str)
-> ClResult<()>;
/// Get database statistics (size, record count, table count)
asyncfnstats(&self, tn_id: TnId, db_id: &str) -> ClResult<DbStats>;
/// Export all documents from a database
asyncfnexport_all(&self, tn_id: TnId, db_id: &str) -> ClResult<Vec<(Box<str>, Value)>>;
/// Acquire a lock on a document path
asyncfnacquire_lock(&self, tn_id: TnId, db_id: &str, path: &str,
user_id: &str, mode: LockMode, conn_id: &str) -> ClResult<Option<LockInfo>>;
/// Release a lock on a document path
asyncfnrelease_lock(&self, tn_id: TnId, db_id: &str, path: &str,
user_id: &str, conn_id: &str) -> ClResult<()>;
/// Check if a path has an active lock
asyncfncheck_lock(&self, tn_id: TnId, db_id: &str, path: &str)
-> ClResult<Option<LockInfo>>;
/// Release all locks held by a specific user (on disconnect)
asyncfnrelease_all_locks(&self, tn_id: TnId, db_id: &str,
user_id: &str, conn_id: &str) -> ClResult<()>;
}
Transaction Trait
All write operations (create, update, delete) are performed within a transaction:
#[async_trait]pubtrait Transaction: Send + Sync {
/// Create a new document with auto-generated ID
asyncfncreate(&mut self, path: &str, data: Value) -> ClResult<Box<str>>;
/// Update an existing document (full replacement)
asyncfnupdate(&mut self, path: &str, data: Value) -> ClResult<()>;
/// Delete a document at a path
asyncfndelete(&mut self, path: &str) -> ClResult<()>;
/// Read a document (with read-your-own-writes semantics)
asyncfnget(&self, path: &str) -> ClResult<Option<Value>>;
/// Commit all changes atomically
asyncfncommit(&mut self) -> ClResult<()>;
/// Rollback all changes
asyncfnrollback(&mut self) -> ClResult<()>;
}
Data Model
Collections and Documents
Data is organized into collections containing JSON documents:
Documents are JSON objects. On create, the server generates a random ID and injects it into the document as the id field; the same id is also returned to the caller and is injected at read time if missing.
The only auto-managed field is id. Timestamps are not added automatically — use the { "$fn": "now" } computed value if you want a creation or update timestamp on a document.
Path Syntax
Paths use slash-separated segments:
users                    // Collection
users/user_001          // Specific document
posts/post_abc/comments // Sub-collection
Storage Schema (redb)
Each database is backed by a redb file containing three string-keyed tables:
Table
Purpose
Key format
docs
Document JSON
{db_id}/{path}
idxs
Secondary-index entries
{collection}/_idx/{field}/{value}/{doc_id}
meta
Index definitions and bookkeeping
{collection}/_meta/indexes
Values are JSON strings (index entries store an empty value — the key itself encodes the indexed field, value, and document ID). When a single redb file is shared across tenants, the tenant ID is prepended to every key ({tn_id}/{db_id}/{path}).
QueryFilter is a flat struct (not an enum) where each field is a HashMap<String, Value>. Multiple conditions within the struct are ANDed implicitly — a document must satisfy all specified constraints. All field names use camelCase serialization.
All write operations (create, update, replace, delete) must be wrapped in a transaction message. There are no standalone write message types. The update operation merges fields into the existing document, while replace does a full document replacement.
Client sends subscribe message
  ↓
Server validates permissions
  ↓
Server creates broadcast channel
  ↓
Server executes initial query
  ↓
Server sends subscribeResult with data
  ↓
Server watches for changes matching filter
  ↓
On change: Server sends change event
  ↓
Client updates local state
Implementation
Subscription Structure:
id: Unique subscription identifier
path: Collection path being subscribed to
filter: Optional query filter to match changes
sender: Broadcast channel for sending change events
Change Event Types
ChangeEvent is a tagged enum with #[serde(tag = "action")] serialization:
Second operation references $post, replaced with actual ID
Comment gets correct post ID even though it wasn’t known initially
Document Locking
The RTDB supports document-level locking for exclusive or advisory editing access.
Lock Modes
Soft lock (advisory): Other clients can still write but receive a notification that the document is locked. Useful for signaling editing intent.
Hard lock (enforced): The server rejects writes from other clients while the lock is held. Only the lock holder (identified by conn_id) can modify the document.
Locks expire automatically after a TTL (time-to-live) period. This prevents permanently locked documents when clients disconnect unexpectedly or crash without releasing their locks. The server cleans up expired locks during its periodic maintenance cycle.
Connection-Based Echo Suppression
The server tracks lock ownership by conn_id. When a lock change event is broadcast to subscribers, the originating connection is excluded from the notification (echo suppression), similar to how write operations suppress echoes. This prevents the client that acquired the lock from receiving its own lock notification.
Lock Status in Change Events
Active subscriptions receive lock/unlock events as part of the change stream:
When aggregate is used with a subscribe message, the server computes aggregates incrementally. On each change event that affects the subscribed path and filter, the server recalculates the affected groups and sends an updated aggregate snapshot rather than the full document set. This keeps aggregate subscriptions efficient even for large collections.
Each index produces idxs-table entries keyed {collection}/_idx/{field}/{value}/{doc_id}. Array fields are expanded: one entry is written per scalar element, so an index over a tag array can answer arrayContains queries. The set of indexed fields per collection is persisted in the meta table and reloaded when the database instance is opened.
Note
There are no compound (multi-field) indexes and no unique constraints — createIndex indexes one field at a time. Queries with multiple conditions can use an index for one field and filter the rest in memory; queries without a matching index fall back to a full collection scan.
Conflict-free replicated data types enabling true collaborative editing with automatic conflict resolution.
Overview
The CRDT system provides:
Conflict-free replicated data types (CRDTs)
Rich data structures (Text, Map, Array, XML)
Automatic conflict resolution
Real-time synchronization
Offline editing support
Yrs/Yjs ecosystem compatibility
For App Developers
If you’re building collaborative applications, see the CRDT Design Guide for schema design patterns, best practices, and common pitfalls when working with Yjs/CRDTs.
Documents
Overview - Introduction to CRDTs and Yrs implementation
Cloudillo’s CRDT system uses Yrs, a Rust implementation of the Yjs CRDT (Conflict-free Replicated Data Type), to enable true collaborative editing with automatic conflict resolution. This is a separate API from RTDB, optimized specifically for concurrent editing scenarios where multiple users modify the same data simultaneously.
What are CRDTs?
Conflict-free Replicated Data Types (CRDTs) are data structures that can be replicated across multiple nodes and modified independently, then merged automatically without conflicts.
Key Properties
Eventual Consistency: All replicas converge to the same state
No Central Authority: No server needed to resolve conflicts
Deterministic Merging: Same operations always produce same result
Commutative: Order of operations doesn’t matter
Idempotent: Applying same operation twice has no extra effect
The server keeps a live Doc in memory per active document, loaded from stored updates on the first connection. This lets it answer the Yjs sync handshake instantly — computing state vectors and diffs without replaying updates from disk — and merge cleanly on the last disconnect. The Doc is dropped once all clients leave.
Document Registry
Each active document holds a DocState in a global registry — the live Doc plus two broadcast channels:
The first connection loads (or initializes) the Doc and inserts the DocState; later connections share it. Each connection is tracked with a CrdtConnection that clones the channels and doc and adds its own conn_id (distinguishing multiple tabs), user_id, tn_id, throttled access/modification timestamps, and a has_modified flag. When the last client disconnects (zero receivers on both channels), the entry is removed after a grace period and the document is optimized.
Data Types
Cloudillo supports all Yjs shared types: Y.Text (collaborative text), Y.Map (key-value), Y.Array (ordered lists), and Y.XmlFragment (structured documents). See the Yjs documentation for usage details.
WebSocket Sync Protocol
Connection Flow
Client                          Server
  |                               |
  |--- GET /ws/crdt/:docId ------>|
  |    (Authorization: Bearer...) |
  |                               |--- Validate token
  |                               |--- Load database instance
  |                               |--- Create session
  |<-- 101 Switching Protocols ---|
  |                               |
  |<====== WebSocket Open =======>|
  |                               |
  |<-- SyncStep1 (server SV) -----|  Server sends its state vector
  |--- SyncStep1 (client SV) ---->|  Client sends its state vector
  |<-- SyncStep2 (diff) ----------|  Server replies with missing updates
  |--- SyncStep2 (client diff) -->|  Client sends what server is missing
  |                               |
  |<====== Synchronized =========>|
  |                               |
  |--- Update (user edits) ------>|--- Apply to live Doc, store, broadcast
  |<-- Update (echo back) --------|--- Echo to sender (keepalive)
  |<-- Update (remote edits) -----|
  |                               |
  |--- Awareness Update --------->|--- Broadcast to others
  |<-- Awareness Update ----------|--- Echo to sender
Message Types
All messages use the Yjs sync protocol binary format (lib0 encoding, not JSON), encoded/decoded with yrs::sync::Message:
Sync messages carry document state: SyncStep1 (a state vector), SyncStep2 (the diff of updates the peer is missing), and Update (a live change).
Because the server holds a live Doc, it participates in the standard two-way y-sync handshake. On open it sends SyncStep1 with its own state vector; the client replies with SyncStep2 (and its own SyncStep1), and the server answers with a SyncStep2 diff computed from the live Doc. After the handshake, live edits flow as Update messages.
Inbound SyncStep2 data is persisted like an update, then re-encoded as an Update before broadcasting to other clients (a SyncStep2 is a handshake reply, not a live update).
Awareness Update
Presence information (cursors, selections), broadcast verbatim and never persisted.
WebSocket Connection Handler
Algorithm: Handle CRDT WebSocket Connection
Input: WebSocket, user_id, doc_id, app, tn_id, read_only
Output: ()

1. Connection Setup:
   - Generate unique conn_id
   - Get or create the DocState (live Doc + channels) in CRDT_DOCS.
     The first connection loads the Doc via load_or_init_doc():
       - If no stored updates: create a Doc with a "meta" map, persist it
       - Otherwise: replay all stored updates into a fresh Doc (worker pool)
   - Create CrdtConnection (clones channels + doc)
   - Record initial file access (throttled)
   - Send SyncStep1 with the live Doc's state vector

2. Spawn Concurrent Tasks:
   - Heartbeat task: sends ping frames every 15 seconds
   - Receive task: processes incoming WebSocket messages
   - Sync broadcast task: forwards CRDT updates from other clients
   - Awareness broadcast task: forwards awareness updates from other clients

3. Message Loop (receive task), per Sync message:

   a. SyncStep1 (client state vector):
      - Compute diff from live Doc, reply with SyncStep2. Return (no broadcast).

   b. SyncStep2 / Update:
      - If read_only or empty: reject, return
      - Apply to the live Doc; if decode/apply fails: reject
      - If the apply was a no-op (snapshot unchanged): skip persist, return
      - Persist via CrdtAdapter.store_update(); on failure: return
      - Broadcast to other clients (SyncStep2 re-encoded as Update)
      - Echo back to sender (keepalive)

   c. Awareness:
      - Broadcast to other clients, echo back to sender

   Broadcast tasks skip messages originating from the same conn_id.

4. Connection Close:
   - Record final file access/modification
   - Abort heartbeat, sync, and awareness tasks
   - If last connection: wait 2s grace period, re-check receivers;
     if still none, remove DocState and optimize the document

This pattern ensures:
- Live Doc enables an instant state-vector handshake
- Apply-before-persist with no-op detection (avoids storing redundant updates)
- Echo + broadcast (sender gets echo, others get broadcast)
- Automatic optimization when all clients disconnect
CRDT changes are appended as individual binary updates via the CrdtAdapter. There is no separate snapshot record — updates accumulate and are merged into one compacted update during optimization.
Optimization (Update Merging)
When the last client disconnects, the server compacts the document’s stored updates into a single merged update, computed directly from the in-memory live Doc (no replay needed):
Algorithm: Optimize Document
Input: app, tn_id, doc_id, live Doc
Output: ()

1. Last connection closes → wait 2s grace period, re-check receivers.
   If a new connection arrived: skip optimization.

2. Load stored updates (for seq numbers and size comparison).
   If 0 or 1 updates: skip.

3. Encode the live Doc's full state as one update via
   encode_state_as_update_v1() — instant, no reconstruction.

4. If the merged update is not smaller than the originals: skip.

5. Atomically replace all updates via CrdtAdapter.compact_updates():
   removes the old seqs and inserts the merged update (client_id = "system")
   in a single redb transaction.

Benefits: faster initial sync and lower storage for subsequent connections.
Memory Management
When a client disconnects, the server checks whether both broadcast channels (awareness and sync) have zero receivers. If so — after the 2s grace period and a re-check — the DocState (including the live Doc) is removed from the CRDT_DOCS registry and the document is optimized. While any connection remains, the live Doc stays resident, so its memory footprint scales with the number of actively-edited documents.
Client Integration
Connect to Cloudillo’s CRDT endpoint using the standard y-websocket provider with the WebSocket URL wss://cl-o.{domain}/ws/crdt/{fileId} and an auth token as a query parameter.
Security Considerations
Authentication
WebSocket connections use axum’s OptionalAuth extractor for authentication:
Extract auth context from the WebSocket upgrade request
If no auth context: reject with close code 4401 (“Unauthorized”)
Auth context provides: id_tag, tn_id, roles, and optional scope
Permission Enforcement
Permissions are checked once at connection time using file_access::check_file_access_with_scope(). This function evaluates:
Scoped tokens: Share links with restricted access (read-only or read-write)
The result determines whether the connection is read_only or read_write. Clients can also request a specific access level via the ?access=read or ?access=write query parameter.
Warning
Access level is checked once at connection time but not re-validated during the session. If a user’s access is revoked (e.g., an FSHR action is deleted), they retain their original access level until they reconnect.
Read-Only Enforcement
Read-only connections (determined at connection time) are enforced at the message handler level. When a read-only client sends an Update message, the server silently rejects it — the update is not stored and not broadcast. The client will see its changes rejected on the next sync cycle.
The CRDT adapter stores collaborative document updates persistently using redb, enabling conflict-free replicated data types to survive server restarts while maintaining real-time synchronization capabilities.
Architecture Overview
The CRDT adapter bridges between the Yrs CRDT engine (in-memory) and persistent storage, storing binary update streams that can be replayed to reconstruct document state.
CRDT systems work by accumulating operation updates rather than storing full document state. Each update is a binary-encoded operation (insert, delete, format, etc.) that can be:
Applied to reconstruct current document state
Sent to new subscribers for synchronization
Replayed in any order (commutative property)
Storage Layout
The adapter uses a single redb table per database:
Updates Table (crdt_updates_v2)
Stores binary CRDT update blobs using structured binary keys for efficient range scanning.
Schema: binary_key → update_bytes
Key Format (34 bytes total):
  [version: 1 byte]       Protocol version (currently 1)
  [doc_id: 24 bytes]      Fixed-length document ID (zero-padded)
  [type: 1 byte]          Record type (0=update; other values reserved)
  [seq: 8 bytes BE]       Sequence number in big-endian (for proper sorting)

Value: Binary CRDT update blob (from Yrs)
Properties:
Binary keys enable efficient range scans per document
Big-endian sequence numbers ensure correct sort order in B-tree
Record type field reserves space for future record kinds (only update is used today)
The adapter uses only this single table. Document metadata (ownership, permissions) is managed by the MetaAdapter, not the CRDT storage layer. Statistics (update count, byte size) are computed dynamically from the stored updates via the CrdtAdapter::stats() default implementation.
Multi-Tenancy Storage Modes
The adapter supports two storage strategies configured at initialization:
Per-Tenant Files Mode (per_tenant_files=true)
Each tenant gets a dedicated redb file:
storage/
├── tn_{tn_id}.db      (e.g., tn_42.db for tenant 42)
├── tn_{tn_id}.db      (one file per tenant)
└── ...
Advantages:
✅ Complete isolation between tenants
✅ Independent backups per tenant
✅ Easier to delete/archive specific tenants
✅ Better fault isolation
Trade-offs:
⚠️ More file handles required
⚠️ Slightly higher disk overhead
Use case: Multi-tenant SaaS deployments where tenant isolation is critical
Single File Mode (per_tenant_files=false)
All tenants share one database:
storage/
└── crdt.db      (All tenants)
Advantages:
✅ Fewer file handles
✅ Simpler operational management
✅ Easier bulk operations
Trade-offs:
⚠️ No physical isolation between tenants
⚠️ Tenant deletion requires filtering
Use case: Single-user deployments or trusted environments
In-Memory Document Instances
The adapter caches document instances in memory to optimize performance and enable real-time subscriptions.
DocumentInstance Structure
structDocumentInstance {
broadcaster: broadcast::Sender<CrdtChangeEvent>,
last_accessed: AtomicU64, // Timestamp for LRU eviction
update_count: AtomicU64, // Sequence counter (initialized from DB max seq)
}
Each instance provides:
Broadcast channel: Real-time notifications to subscribed clients
// 1. Send all existing updates (from redb)
for update in get_updates(doc_id).await? {
yield update;
}
// 2. Then stream new updates (from broadcaster)
letmut rx = instance.broadcaster.subscribe();
whilelet Ok(event) = rx.recv().await {
yield event;
}
Snapshot mode enables new clients to:
Receive complete document history
Reconstruct current state
Continue receiving live updates
Deleting Documents
1. Begin write transaction
2. Range scan to find all updates: make_doc_range(doc_id)
3. Collect keys, then delete each one
4. Commit transaction
5. Remove from instance cache
Note: Compaction (merging updates) is performed automatically by the WebSocket layer when the last client disconnects from a document (see CRDT Overview).
Cloudillo’s access control and permission systems for protecting resources while maintaining user privacy and enabling secure resource sharing across the decentralized network.
Permission System — Two-pillar system: ABAC policies (community-level constraints/guarantees) and discretionary access control (visibility, shares, audience)
Key Concepts
When a user wants to access a resource stored on another node, Cloudillo uses cryptographic tokens to grant access without requiring direct trust between storage providers. This process is designed to be seamless, requiring no additional user interaction while maintaining full decentralization.
Subsections of Access Control
Access Control & Resource Sharing
Access tokens are used to authenticate and authorize requests to the API.
They are usually bound to a resource, which can reside on any node within the Cloudillo network.
Token Types
Cloudillo uses different token types for different purposes:
AccessToken
Session tokens for authenticated API requests.
Purpose: Grant a client access to specific resources
Format: JWT (JSON Web Token)
Lifetime: 1-24 hours (configurable)
The AuthAdapter creates a JWT with appropriate claims.
3. Token Validation
Every API request validates the token before processing.
4. Token Expiration
Tokens expire and must be refreshed.
Requesting an Access Token
When a user wants to access a resource, they follow this process:
The user’s node requests an access token.
If the resource is local, the node issues the token directly.
If the resource is remote, the node authenticates with the remote node and requests a token on behalf of the user.
The access token is returned to the user, allowing them to interact with the resource directly on its home node.
Security & Trust Model
Access tokens are cryptographically signed to prevent tampering.
Tokens have expiration times and scopes to limit misuse.
Nodes validate access tokens before granting access to a resource.
Example 1: Request access to own resource
sequenceDiagram
    box Alice frontend
        participant Alice shell
        participant Alice app
    end
    participant Alice node
    Alice shell ->>+Alice node: Initiate access token request
    Note right of Alice node: Create access token
    Alice node ->>+Alice shell: Access token granted
    deactivate Alice node
    Alice shell ->>+Alice app: Open resource with this token
    deactivate Alice shell
    Alice app ->+Alice node: Use access token
    loop Edit resource
        Alice app --> Alice node: Edit resource
    end
    deactivate Alice app
Alice opens a resource using her Cloudillo Shell
Her shell initiates an access token request at her node
Her node creates an access token and sends it to her shell
Her shell gives the access token to the App Alice uses to open the resource
The App uses the access token to edit the resource
Example 2: Request access to resource of an other identity
sequenceDiagram
    box Alice frontend
        participant Alice shell
        participant Alice app
    end
    participant Alice node
    participant Bob node
    Alice shell ->>+Alice node: Initiate access token request
    Note right of Alice node: Create signed request
    Alice node ->>+Bob node: Request access token
    Note right of Bob node: Verify signed request
    Note right of Bob node: Create access token
    deactivate Alice node
    Bob node ->>+Alice node: Grant access token
    deactivate Bob node
    Alice node ->>+Alice shell: Access token granted
    deactivate Alice node
    Alice shell ->>+Alice app: Open resource with this token
    deactivate Alice shell
    Alice app ->+Bob node: Use access token
    loop Edit resource
        Alice app --> Bob node: Edit resource
    end
    deactivate Alice app
    deactivate Bob node
Alice opens a resource using her Cloudillo Shell
Her shell initiates an access token request through her node
Her node creates a signed request and sends it to Bob’s node
Bob’s node creates an access token and sends it back to Alice’s node
Alice’s node sends the access token to her shell
Her shell gives the access token to the App Alice uses to open the resource
The App uses the access token to edit the resource
Token Validation Process
Authentication Middleware
Cloudillo uses Axum middleware to validate tokens on protected routes:
Handler Patterns:
Pattern 1: Required Authentication
async fn protected_handler(auth: Auth) -> Result<Response> {
    // auth.tn_id, auth.id_tag, auth.scope available
    // Access granted only if middleware validated token
}

Pattern 2: Optional Authentication
async fn public_handler(auth: Option<Auth>) -> Result<Response> {
    if let Some(auth) = auth {
        // Authenticated user - access Auth context
    } else {
        // Anonymous access - no Auth context
    }
}

The Axum extractor validates token before passing to handler.
If validation fails on required routes, request is rejected.
Validation Steps
When a request includes an Authorization: Bearer <token> header:
Extract Token: Parse JWT from Authorization header
Decode JWT: Parse header and claims (no verification yet)
Verify Signature: Validate using AuthAdapter-stored secret
Check Expiration: Ensure exp > current time
Read Claims: Extract sub (identity), r (roles), and scope
Create Auth Context: Build the AuthCtx struct for the handler
pubstructAuthCtx {
pub tn_id: TnId, // Tenant ID (database key)
pub id_tag: Box<str>, // Identity tag (e.g., "alice.example.com")
pub roles: Box<[Box<str>]>, // Roles (e.g., ["moderator"], ["SADM"] for site admin)
pub scope: Option<Box<str>>, // Optional scope (e.g., "apkg:publish")
}
Custom Extractors
Axum extractors provide typed access to authentication context:
TnId Extractor:
struct TnId(pub u32) - Wraps internal tenant ID
Usage: handler(TnId(tn_id): TnId) extracts from Auth context
IdTag Extractor:
struct IdTag(pub String) - Wraps user identity domain
Usage: handler(IdTag(id_tag): IdTag) extracts from Auth context
Auth Extractor (Full Context):
tn_id: Internal tenant identifier (TnId(u32))
id_tag: User identity (e.g., “alice.example.com”)
roles: Assigned roles (e.g., [“moderator”], or [“SADM”] for a site admin)
scope: Optional scope string (e.g., “apkg:publish” or “file:f1~abc:R”)
Usage: Check auth.roles for role-based access, auth.scope for scoped API key permissions
Permission System
Cloudillo uses ABAC (Attribute-Based Access Control) for comprehensive permission management. Access tokens work in conjunction with ABAC policies to determine what actions users can perform.
Access tokens include a scope claim that specifies permissions.
Resource-Level Permissions
Permissions are checked at multiple levels:
File-Level: Who can access a file
Database-Level: Who can access a database (RTDB)
Action-Level: Who can see an action token
API-Level: Rate limiting, quota enforcement
Permission checks combine token scope, resource ownership, and sharing permissions. See ABAC Permission System for the full evaluation flow.
Cross-Instance Authentication
ProxyToken Flow
When Alice (on instance A) wants to access Bob’s resource (on instance B):
Alice’s client requests a ProxyToken from instance A (GET /api/auth/proxy-token)
Instance A creates a ProxyToken signed with its profile key
Alice’s client presents the ProxyToken to instance B’s access-token endpoint
Instance B validates ProxyToken:
Fetches instance A’s public key
Verifies signature
Checks expiration
Instance B creates AccessToken for Alice
Instance B returns AccessToken to instance A
Instance A returns AccessToken to Alice’s client
Alice’s client uses AccessToken to access Bob’s resource directly on instance B
ProxyToken Verification
Algorithm: Verify ProxyToken

Input: JWT token string, requester_id_tag
Output: Result<ProxyTokenClaims>

1. Decode JWT without verification (read claims)

2. Fetch requester's profile:
   - GET /api/me from requester's instance
   - Extract public keys from profile

3. Find signing key:
   - Look up key by key_id (kid) in claims
   - If not found: Return KeyNotFound error

4. Verify signature:
   - Use requester's public key to verify JWT signature

5. Check expiration:
   - If exp < current_time: Return TokenExpired

6. Return verified claims
Token Lifecycle
Access tokens are JWTs signed with the instance’s key and are short-lived. There is no
refresh endpoint — a client simply requests a fresh token from /api/auth/access-token
(authenticated by its session) when the current one is near expiry.
API Reference
GET /api/auth/access-token
Request an access token, authenticated by the caller’s session. Parameters are passed as
query string, not a body:
scope (optional) — restrict the token to a resource, e.g. file:f1~abc123:R
refId (optional) — exchange a share-link reference for a scoped token
via (optional) — request a token for a target file reached through a source file
(cross-document link); requires scope naming the target file
Issue a ProxyToken so a remote instance can mint an access token on behalf of the caller
(cross-instance flow). Authenticated by the caller’s session; returns the signed proxy
token (and the caller’s roles) which is then presented to the resource’s home instance.
See Also
Identity System - Profile keys and cryptographic foundations
Cloudillo’s permission system has two pillars that work together to control access to all resources:
ABAC Policies (profile/community-level) — Configurable TOP and BOTTOM policy rules that define hard constraints and guarantees
Discretionary Access Control — The content creator’s own choices: visibility levels, explicit audience, file shares, and access grants
These two pillars combine in a layered evaluation:
1. TOP POLICY (ABAC)   → Hard constraints — what is NEVER allowed
       ↓
2. BOTTOM POLICY (ABAC) → Hard guarantees — what is ALWAYS allowed
       ↓
3. DISCRETIONARY ACCESS  → Creator's choices: visibility, shares, ownership
       ↓
4. DEFAULT DENY          → If nothing matched, deny access
Pillar 1: ABAC Policies
Attribute-Based Access Control evaluates rules based on attributes of users, resources, and context. In Cloudillo, ABAC is used for profile-level (community/company) policies that set boundaries around the discretionary access decisions.
The Four-Object Model
ABAC decisions involve four types of objects:
1. Subject (Who)
The user or entity requesting access.
pubstructAuthCtx {
pub tn_id: TnId, // Tenant ID (database key)
pub id_tag: Box<str>, // Identity (e.g., "alice.example.com")
pub roles: Box<[Box<str>]>, // Roles (e.g., ["moderator"], or ["SADM"] for site admin)
pub scope: Option<Box<str>>, // Optional scope (e.g., "apkg:publish")
}
Roles come from a fixed hierarchy — public, follower, supporter, contributor,
moderator, leader (each inherits the lower ones) — plus the site-admin role SADM,
which is checked separately by require_admin rather than through ABAC.
2. Action (What)
The operation being attempted, in resource:operation format:
file:read         → Read a file
file:write        → Modify, delete, tag, or restore a file
file:create       → Upload/create a file
action:read       → View an action token
action:write      → Change an action's status (accept/reject/dismiss), delete, or publish a draft
action:create     → Create an action token
profile:read      → Read a profile
profile:write     → Update own profile
profile:admin     → Administer another community member's profile
The operation string maps directly to the middleware on the route — for example
PATCH /api/files/{id} and DELETE /api/files/{id} both run check_perm_file("write"),
so deletion is gated by the same file:write check rather than a separate file:delete.
Action bodies are immutable; status is not
An action’s signed payload (type, audience, visibility) is content-addressed and fixed at
creation. What action:write controls is the mutable status — accepting, rejecting,
dismissing, deleting, or publishing a scheduled draft — never the payload itself.
3. Object (Resource)
The resource being accessed. Must implement the AttrSet trait:
pubstructEnvironment {
pub time: Timestamp, // Current Unix timestamp
}
TOP Policy (Constraints)
Defines maximum permissions — what is never allowed, regardless of discretionary settings. Evaluated first; if a rule matches with Deny effect, access is immediately denied.
Use case: Community or company-wide restrictions.
Examples:
TopPolicy:
    Rule 1:
        Condition: visibility == "public" AND size > 100MB
        Effect: DENY
        # Community rule: files larger than 100MB cannot be shared publicly

    Rule 2:
        Condition: subject.banned == true
        Effect: DENY
        # Banned users cannot access any resource
BOTTOM Policy (Guarantees)
Defines minimum permissions — what is always allowed, regardless of other rules. Evaluated second; if a rule matches with Allow effect, access is immediately granted.
Use case: Platform guarantees and special role privileges.
Examples:
BottomPolicy:
    Rule 1:
        Condition: subject.id_tag == resource.owner
        Effect: ALLOW
        # Owner can always access their own resources

    Rule 2:
        Condition: subject.HasRole("leader")
        Effect: ALLOW
        # Community leaders have full access
Policy Operators
A rule holds a list of conditions; all conditions must match for the rule to fire (implicit AND — there is no separate And/Or operator). Each condition uses one of:
Role: HasRole — checks if the subject has a specific role
Pillar 2: Discretionary Access Control
Between the TOP and BOTTOM policies, discretionary access control determines access based on the content creator’s own choices. This is the primary day-to-day access mechanism.
Ownership
The simplest check: owners always have full access to their own resources. The tenant
is treated as owner-equivalent, so a community profile owns the resources stored on it.
if resource.owner == subject.id_tag → Owner access
if subject.id_tag == tenant_id_tag  → Owner access (tenant = owner equivalent)
Separately, the leader role short-circuits to ALLOW for any operation (see the
evaluation order below), so community leaders effectively have owner-level reach.
Visibility Levels
Content creators set visibility when creating resources. This is a discretionary choice stored as a single character in the database (or NULL for direct).
Hierarchy (most to least permissive):
Code
Level
Who can access
P
Public
Anyone, including unauthenticated users
V
Verified
Any authenticated user from any federated instance
2
SecondDegree
Friend of friend (reserved for voucher token system)
F
Follower
Authenticated users who follow the owner
C
Connected
Authenticated users with mutual connection
NULL
Direct
Only owner + explicit audience
The system computes the subject’s access level based on their relationship with the resource owner, then checks if it meets the visibility requirement:
Subject Access Level
Description
Owner
Is the resource owner (highest)
Connected
Has mutual CONN with owner
Follower
Has FLLW to owner
SecondDegree
Friend of friend (future)
Verified
Authenticated user
Public
Unauthenticated (lowest)
These levels form an ordered enum (using Rust’s PartialOrd derive), where higher levels grant access to all visibility settings that lower levels can access.
For Direct visibility, the system also checks explicit audience membership — if the subject’s identity is listed in the resource’s audience field, access is granted.
Explicit Access Grants
Beyond visibility, access can be granted explicitly through several mechanisms:
File Shares (FSHR Actions)
When a user shares a file, the system creates a share entry in the database (file → recipient with a permission char) and an FSHR action token for federation. The FSHR subType maps to an access level: WRITE → Write, COMMENT → Comment, otherwise → Read. Shares attached to a folder are inherited by descendant files (the parent chain is walked, bounded to 64 levels).
The recipient gets Confirmation status and must accept the share, after which the file appears in their listing with the granted level.
Scoped Access Tokens
Access tokens can carry a scope that limits them to a single resource (used by share links):
File scope format: file:{file_id}:{R|C|W} → Read / Comment / Write on that file
A scope for a folder extends to files nested under it; a scope for a document root extends to its child files
apkg:publish is the only non-file scope (package upload), and grants no file access
Role-Based File Access (Communities)
For files owned by a community (a file whose owner is the tenant), member roles determine access:
leader, moderator, contributor → Write access
Any other community role → Read access
This applies only to files owned by the community profile, not files owned by individual users.
Discretionary Evaluation Order
When neither TOP nor BOTTOM policy matches, the discretionary layer evaluates by operation:
1. Leader role override → ALLOW (the "leader" role can do everything)

2. write / update / delete:
   a. Ownership → ALLOW
   b. Pre-computed access_level == "write" → ALLOW
   c. Otherwise → DENY

3. read:
   a. Pre-computed access_level in {read, comment, write} → ALLOW
   b. Visibility vs. subject's access level → ALLOW/DENY
      (for Direct visibility, audience membership also grants access)

4. create:
   a. ALLOW at this layer (quota/role checks live in the
      collection-policy middleware, not here)

5. admin (e.g. profile:admin):
   a. Subject is moderator or higher → ALLOW, else DENY

6. Default → DENY
The single pre-computed access_level attribute is what carries share, scoped-token,
ownership, and community-role grants into the check — the read and write branches above
just compare against it.
Complete Evaluation Flow
When a permission check is requested, the full flow is:
Request: Bob wants to read Alice’s connected-only file
Subject:
    id_tag: "bob.example.com"
    roles: []

Action: "file:read"

Object:
    owner: "alice.example.com"
    visibility: 'C' (Connected)
    file_id: "f1~abc123"

Evaluation:
1. TOP Policy: No blocking rules → continue
2. BOTTOM Policy: Not owner → continue
3. Discretionary:
   a. Is owner? No (alice ≠ bob)
   b. Explicit grants? No shares found
   c. Visibility = Connected
   d. Check connection:
      - Alice has CONN to Bob? Yes
      - Bob has CONN to Alice? Yes
      - Subject access level = Connected
      - Connected.can_access(Connected) = true
   → ALLOW
Integration with Routes
Cloudillo uses permission middleware to enforce access control on HTTP routes:
Protected Routes:
    # Actions
    POST /api/actions                  + check_perm_create("action", "create")
    POST /api/actions/:id/accept|reject|dismiss + check_perm_action("write")
    DEL  /api/actions/:id              + check_perm_action("write")

    # Files
    POST /api/files                    + check_perm_create("file", "create")
    PATCH /api/files/:id               + check_perm_file("write")
    DEL  /api/files/:id                + check_perm_file("write")

    # Profiles
    PATCH /api/me                      + check_perm_profile("write")
    PATCH /api/admin/profiles/:id      + check_perm_profile("admin")

    # Site administration (separate from ABAC — requires SADM role)
    *    /api/admin/tenants/*          + require_admin
Object-bound middleware (check_perm_file, check_perm_action, check_perm_profile)
loads the resource, computes the subject’s relationship to the owner, and runs the full
evaluation flow. check_perm_create evaluates the collection policy (role/quota) before
the object exists. require_admin is a plain SADM-role gate, not an ABAC check.
Dave can now read the file despite not being connected:
Permission Check:
    Subject: dave
    Action: file:read
    Object: { owner: alice, visibility: C }
    1. TOP Policy: No blocking rules → continue
    2. BOTTOM Policy: No match → continue
    3. Discretionary:
       a. Ownership? No
       b. Explicit grants? YES — share entry found (permission=R)
       → ALLOW (share overrides visibility restriction)
Attribute Set Implementations
Cloudillo implements the AttrSet trait for different resource types, providing consistent attribute access for permission evaluation.
The attribute keys are what policy conditions reference. Visibility is exposed as its
lowercase string form (public, verified, second_degree, follower, connected,
direct), not the single-char DB code.
File Attributes (FileAttrs)
file_id          → Content-addressed ID
owner_id_tag     → File owner identity
mime_type        → Content type
visibility       → public/verified/second_degree/follower/connected/direct
access_level     → Pre-computed grant: none/read/comment/write/admin
following        → Subject follows owner (bool)
connected        → Subject connected to owner (bool)
tags             → File tags (list)
Action Attributes (ActionAttrs)
type             → Action type (e.g. POST, CONN, FSHR)
sub_type         → Action sub-type
owner_id_tag     → Storage tenant (alias of tenant_id_tag)
issuer_id_tag    → Action creator identity (may differ from tenant)
parent_id        → Parent action ID
root_id          → Root action ID
audience_tag     → Target recipient(s) (list)
visibility       → public/verified/.../direct
following        → Subject follows issuer (bool)
connected        → Subject connected to issuer (bool)
Profile Attributes (ProfileAttrs)
id_tag           → Profile identity
profile_type     → "community" or empty
owner_id_tag     → Owning tenant (alias of tenant_tag)
roles            → Subject's roles on this profile (list)
status           → Profile status
visibility       → public/.../direct
following        → Subject follows profile (bool)
connected        → Subject connected to profile (bool)
Subject Attributes for CREATE (SubjectAttrs)
id_tag                 → Requesting user identity
roles                  → User roles (list)
tier                   → "free", "standard", "premium"
quota_remaining_bytes  → Remaining storage quota (bytes)
rate_limit_remaining   → Remaining requests this hour
banned                 → Whether user is banned
email_verified         → Whether email is verified
Security Best Practices
Default Deny
The system defaults to denying access unless explicitly allowed. Unknown visibility values are parsed as Direct (most restrictive). Unknown access levels default to None.
Validate Server-Side
Client-side visibility checks are for UX only (show/hide UI elements). The server always validates permissions before serving resources, regardless of client-side checks.
Audit Permission Denials
All permission denials are logged with debug-level tracing, including subject identity, action attempted, visibility level, access level, and relationship status.
Immutable Actions
Action tokens are cryptographically signed and content-addressed. They cannot be modified after creation. Visibility and audience are set at creation time and cannot be changed.
Cloudillo processes uploaded files through an asynchronous pipeline that generates multiple variants optimized for different use cases. The system uses FFmpeg for multimedia processing, resvg for SVG rasterization, and poppler-utils for PDF handling. Supported media types include images, SVG, videos, audio, PDFs, and raw files.
Processing Architecture
Upload (POST /api/files/{preset}/{file_name})
    ↓
Detect MIME type → Map to VariantClass
    ↓
Validate against preset's allowed_media_classes
    ↓
Route to type-specific handler:
    ├─ Image: Read into memory → thumbnail sync → schedule ImageResizerTask per variant
    ├─ SVG: Sanitize → store as vis.sd → rasterize thumbnail sync
    ├─ Video: Stream to temp → FFprobe → extract frame → thumbnail sync
    │         → schedule VideoTranscoderTask + optional AudioExtractorTask
    ├─ Audio: Stream to temp → FFprobe → schedule AudioExtractorTask per tier
    ├─ PDF: Read into memory → store original → schedule PdfProcessorTask
    └─ Raw: Stream to temp → store as-is (orig variant only)
    ↓
Schedule FileIdGeneratorTask (depends on all variant tasks)
    ↓
Create file descriptor → Content-address all variants
    ↓
Return file ID (f1~...)
The upload handler runs directly (not as a scheduled task). Thumbnails are generated synchronously so clients receive an immediate preview. Additional variants are generated asynchronously via the task scheduler.
Supported File Types
Images
Format
Extensions
Processing
JPEG
.jpg, .jpeg
Resize, format conversion
PNG
.png
Resize, format conversion
GIF
.gif
First frame extraction, resize
WebP
.webp
Resize
AVIF
.avif
Resize
SVG
.svg
Sanitization, rasterized thumbnail
Image Format Configuration
The vis.pf (profile) variant always uses AVIF. For all other variants, the format is configurable: file.thumbnail_format (default: WebP) controls vis.tn, and file.image_format (default: WebP) controls vis.sd through vis.xd.
SVG Security
SVG files are sanitized before storage: <script>, <foreignObject>, and animation elements are removed, on* event handlers are stripped, and javascript:/data:text/html/vbscript: URLs are blocked. The sanitized SVG is stored as vis.sd (vector format scales infinitely) and rasterized via resvg for the thumbnail variant.
Video
Format
Extensions
Processing
MP4
.mp4
H.264 transcode, thumbnails
WebM
.webm
H.264 transcode, thumbnails
MOV
.mov
H.264 transcode, thumbnails
MKV
.mkv
H.264 transcode, thumbnails
AVI
.avi
H.264 transcode, thumbnails
Audio
Format
Extensions
Processing
MP3
.mp3
OPUS conversion
WAV
.wav
OPUS conversion
OGG
.ogg
OPUS conversion
FLAC
.flac
OPUS conversion
AAC
.aac
OPUS conversion
WebM Audio
.weba
OPUS conversion
Documents
Format
Extensions
Processing
PDF
.pdf
Page count extraction, first-page thumbnail
Raw Files
Any file type not listed above can be uploaded using presets that allow the Raw variant class (e.g., archive, orig-only). Raw files are stored as-is with no processing beyond content-addressing.
Variant System
Cloudillo uses a two-level variant system with format <class>.<quality>:
Variant Classes
Class
Code
Description
Source Types
Visual
vis
Static images
JPEG, PNG, WebP, AVIF, GIF, SVG
Video
vid
Video content
MP4, WebM, MKV, AVI, MOV
Audio
aud
Audio tracks
MP3, WAV, OGG, FLAC, AAC, OPUS
Document
doc
Documents
PDF
Raw
raw
Original file
Any (unprocessed)
Quality Levels
Quality
Code
Max Size / Bitrate
Use Case
Profile
pf
80px (always AVIF)
Profile pictures
Thumbnail
tn
256px
Small previews
Standard
sd
720px / 1.5 Mbps / 64 kbps
Mobile/low bandwidth
Medium
md
1280px / 3 Mbps / 128 kbps
Desktop viewing
High
hd
1920px / 5 Mbps / 256 kbps
High quality
Extra
xd
3840px / 15 Mbps
4K/maximum quality
Original
orig
Unprocessed
Source file
Variant Fallback
When a requested variant isn’t available, the system falls back to lower quality:
Presets define which variants to generate for different use cases:
Preset
Visual
Video
Audio
Use Case
default
vis.tn, vis.sd, vis.md, vis.hd
vid.sd, vid.md, vid.hd
aud.md
General uploads
profile-picture
vis.pf, vis.tn, vis.sd, vis.md, vis.hd
-
-
Profile images
cover
vis.tn, vis.sd, vis.md, vis.hd
-
-
Cover/banner images
high_quality
vis.tn, vis.sd, vis.md, vis.hd, vis.xd
vid.sd, vid.md, vid.hd, vid.xd
aud.md, aud.hd
Maximum quality
mobile
vis.tn, vis.sd, vis.md
vid.sd, vid.md
aud.sd
Optimized for mobile
archive
vis.tn only
-
-
Minimal (keeps original)
podcast
vis.tn
vid.sd
aud.sd, aud.md, aud.hd
Audio-focused
video
vis.tn, vis.sd, vis.md, vis.hd
vid.sd, vid.md, vid.hd
-
Video-focused
orig-only
-
-
-
Store original only, no processing
thumbnail-only
-
-
-
Generate thumbnail only, discard original
apkg
vis.pf (icon extraction)
-
-
App packages (zip)
Presets that set store_original: true (default, high_quality, archive, podcast, video, orig-only, apkg) preserve the original file as orig. Profile-picture, cover, mobile, and thumbnail-only do not store the original.
The archive and orig-only presets also accept raw (unrecognized) file types. Other presets reject uploads with unsupported MIME types.
FFmpeg Integration
Video Transcoding
Video is transcoded to H.264/MP4 at the tier’s target bitrate (not CRF), scaled to fit the tier’s bounding box while preserving aspect ratio, with dimensions cropped to even values (required by libx264) and +faststart for progressive playback. The in-container audio is re-encoded to AAC at 128 kbps:
This enables deduplication (identical files share blobs), integrity verification, and permanent caching of immutable content.
Task Scheduling
File processing uses the task scheduler for asynchronous variant generation:
Task Type
Description
image.resize
Resize image to target variant dimensions and format
video.transcode
Transcode video to target resolution and bitrate
audio.extract
Extract/transcode audio to OPUS at target bitrate
pdf.process
Extract page count (pdfinfo) and render first-page thumbnail (pdftoppm)
file.id-generate
Build descriptor and compute the f1~ file ID after all variant tasks complete
Dependencies ensure actions only reference fully processed files.
Federation Sync
When syncing files across instances, only file descriptors are synced initially. Variants are fetched on demand from the origin server and cached locally.
Cloudillo’s event-driven action system and federation architecture. These documents explain how users perform actions (posting, following, connecting), how actions are distributed across the network, and how independent instances communicate.
Core Subsystems
Action Tokens
Cryptographically signed events representing user activities and interactions. Actions enable event-driven communication between nodes in a federated network.
Cloudillo’s federated architecture enables independent instances to communicate, share content, and enable collaboration while maintaining user sovereignty and privacy.
Federation Architecture - Decentralization principles, inter-instance communication, and federation protocols
Subsections of Actions & Federation
Actions & Action Tokens
An Action Token represents a user action within Cloudillo. Examples of actions include creating a post, adding a comment, leaving a like, or performing other interactions.
Why Action Tokens?
Traditional social platforms store your posts, likes, and comments in their private databases. If the platform disappears, so does your content. Cloudillo takes a different approach: your actions are portable, verifiable, and truly yours.
Think of action tokens like signed letters:
Anyone can verify who wrote them (cryptographic signature)
They can be delivered to any server (federation)
They can’t be tampered with without detection (content-addressing)
They belong to you, not to any platform (decentralization)
Real-world example: When Alice posts a photo, her server creates a signed action token. This token can be delivered to Bob’s server (federation), verified as authentic (no trust required), and displayed in Bob’s feed. If Alice’s server goes offline, Bob still has a cryptographic proof that Alice created that post.
Key benefits:
Portable identity: Your actions follow your identity, not a server
Trustless verification: Anyone can verify authenticity without trusting intermediaries
Censorship-resistant: No single entity controls your content
Offline-capable: Actions can be verified without network access
Each Action Token is:
Cryptographically signed by it’s creator.
Time-stamped with an issue time.
Structured with relevant metadata about the action.
Action tokens are implemented as JSON web tokens (JWTs).
Action Token Fields
Standard JWT Claims
Field
Type
Required
Description
iss
identity
*
The identity of the creator of the Action Token.
aud
identity
The audience of the Action Token (recipient for directed actions).
sub
identity
The subject of the Action Token (references content/user WITHOUT creating hierarchy).
iat
timestamp
*
The time when the Action Token was issued.
exp
timestamp
The time when the Action Token will expire.
Cloudillo-Specific Claims
Field
Type
Required
Description
k
string
*
The ID of the key the identity used to sign the Token.
t
string
*
Action type, with optional subtype as TYPE:SUBTYPE (e.g., POST, POST:IMG, REACT:LIKE, CONN:DEL).
c
string / object
The content of the Action Token (specific to the token type).
p
string
The action ID of the parent token (creates hierarchical threading).
a
string[]
The IDs of the attachments (file references, f1~...).
Nonce for proof-of-work (used in CONN actions for rate limiting).
Note
There is no separate subtype claim. The subtype is encoded in t after a colon. Type and subtype are split during processing.
Field Semantics
Parent (p) vs Subject (sub):
p (parent): Creates TRUE hierarchy (threading). Used by CMNT to form comment chains (and by STAT to attach to its target).
sub (subject): References content WITHOUT creating hierarchy. Used by REACT, REPOST, SUBS, INVT, APRV.
Visibility (v):
P - Public: Anyone can view
V - Verified: Only authenticated users
2 - 2nd-degree: Followers/connections of followers/connections
F - Follower: Only user’s followers
C - Connected: Only mutual connections
absent - Direct: Only owner + explicit audience
Flags (f):
Uppercase = enabled, lowercase = disabled
R/r - Reactions allowed
C/c - Comments allowed
O/o - Open (anyone can interact)
Action Status Codes
Each action has a lifecycle status that determines how it appears in the UI and whether it requires user interaction:
Code
Name
Description
A
Active
Action is active, accepted, or approved. Normal operational state.
C
Confirmation
Awaiting user confirmation (e.g., connection requests, file shares). Shows in notifications.
N
Notification
Informational only, auto-processed. No user action required.
D
Deleted
Action has been deleted or rejected. Excluded from most queries.
R
Draft
Saved as a draft, not yet published. Can be edited before publishing.
S
Scheduled
A draft with a future publish time; auto-publishes when due.
Status Transitions
         ┌──────────────────────────────────────────────┐
         │                                              │
         ▼                                              │
     ┌───────┐     user accepts      ┌───────┐          │
 ───►│   C   │ ─────────────────────►│   A   │          │
     │ Conf  │                       │Active │          │
     └───┬───┘                       └───────┘          │
         │                               │              │
         │ user rejects                  │ user deletes │
         │                               │              │
         ▼                               ▼              │
     ┌───────┐                       ┌───────┐          │
     │   D   │◄──────────────────────│   D   │──────────┘
     │Delete │                       │Delete │
     └───────┘                       └───────┘
Examples:
CONN request: Arrives as C → user accepts → becomes A (mutual connection)
INVT to conversation: Arrives as C → user accepts → creates SUBS with status A
Mutual CONN: When both users have sent CONN → auto-accepted → status N
DELETE subtype: Changes target action status to D
Merkle Tree Structure
Cloudillo’s action system implements a merkle tree structure where every action, file, and attachment is content-addressed using SHA-256 hashing. This creates cryptographic proof of authenticity and immutability through a six-level hierarchy:
Blob Data → hashed to create Variant IDs (b1~...)
File Descriptor → hashed to create File IDs (f1~...)
Action Token JWT → hashed to create Action IDs (a1~...)
Parent References → create immutable chains between actions
Attachment References → bind files to actions cryptographically
Complete DAG → forms a verifiable directed acyclic graph
Each level is tamper-evident: modifying any content changes all parent hashes, making tampering immediately detectable.
Tamper-evident: Any modification breaks the hash chain
Overriding Action Tokens
Each token type may define a key_pattern, allowing previous tokens to be overridden where applicable. Types without a pattern (POST, CMNT, CONV) are always unique.
Key templates interpolate fields such as {type}, {issuer}, {audience}, {subject}, and {parent}.
Example: A REACT token uses the key {type}:{subject}:{issuer}. If a user reacts to the same subject again, the latest reaction replaces the previous one.
Root ID Handling
Important: The root_id field is NOT included in the action token JWT.
root_id is stored in the database for query optimization
It is a computed field, derived by traversing the parent chain to find the root action
It is NOT cryptographically signed (not in the JWT payload)
Recipients must compute root_id by following parent references
Why Root ID is Computed
Smaller JWT payload: Keeps tokens compact and efficient
Avoids redundancy: Root ID can be derived from the parent chain
Maintains flexibility: Thread structure can be recomputed if needed
Action Creation Pipeline
Client
  ↓ POST /api/actions
Server creates ActionCreatorTask
  ↓
Scheduler checks dependencies
  ↓
Wait for FileIdGeneratorTask (if attachments)
  ↓
ActionCreatorTask runs
  ├─ Build JWT claims
  ├─ Fetch private key from AuthAdapter
  ├─ Sign JWT (ES384)
  ├─ Compute action ID (SHA256)
  └─ Store in MetaAdapter
  ↓
Response to client
Action Verification Pipeline
Remote Instance
  ↓ POST /api/inbox
Create ActionVerifierTask
  ↓
Decode JWT (unverified)
  ↓
Fetch issuer's public keys
  ↓ GET https://cl-o.{issuer}/api/me
Verify JWT signature (ES384)
  ↓
Check expiration
  ↓
Verify permissions
  ├─ Following/Connected status
  ├─ Audience matches
  └─ Parent ownership (for replies)
  ↓
Sync attachments (if any)
  ↓ GET https://cl-o.{issuer}/api/files/{id}
Store in MetaAdapter
  ↓
Trigger hooks (notifications, etc.)
Detailed Processing Pipelines
The following sections describe the complete processing pipelines implemented in the codebase.
Inbound Pipeline (12 Steps)
When receiving a federated action at /api/inbox:
Step
Operation
Description
1
Decode
Parse JWT token without verification
2
PoW Check
Verify proof-of-work nonce (for CONN actions)
3
Signature Verify
Fetch public key, verify ES384 signature
4
DSL Validation
Validate against action type definition schema
5
Permission Check
Verify sender has permission (following/connected)
6
Subscription Check
For subscribable actions, verify subscription exists
7
Store Action
Persist to MetaAdapter with computed action ID
8
Execute Hooks
Run on_receive hooks from DSL definition
9
WebSocket Forward
Broadcast to connected tenant clients
10
Fan-out
Create delivery tasks for related actions
11
Related Actions
Process APRV fan-out to followers
12
ACK Response
Generate acknowledgment token if required
Outbound Pipeline (8 Steps)
When a user creates an action via /api/actions:
Step
Operation
Description
1
Validate
Check request parameters against DSL schema
2
Serialize
Build JWT claims (iss, iat, t, c, p, a, etc.)
3
Generate
Sign JWT with user’s private key (ES384)
4
Compute ID
Calculate action ID as SHA256(token)
5
Store
Persist to MetaAdapter
6
Execute Hooks
Run on_create hooks from DSL definition
7
WebSocket Forward
Notify local connected clients
8
Delivery Tasks
Schedule ActionDeliveryTask for each recipient
Action Retrieval
GET /api/actions
Retrieve actions owned by or visible to the authenticated user:
Request:
GET /api/actions?type=POST&limit=50&offset=0
Authorization: Bearer <access_token>
Determine recipients based on action type:
  - POST: send to all followers
  - CMNT/REACT: send to parent action owner
  - CONN/FLLW: send to audience

For each recipient:
  POST https://cl-o.{recipient}/api/inbox
  Body: {"token": "eyJhbGc..."}
The /api/inbox endpoint is public (no authentication required) because the action token itself contains the cryptographic proof of authenticity.
Security Considerations
Action Token Immutability
Action tokens are content-addressed using SHA-256: action_id = SHA256(entire_jwt_token).
This token represents a bidirectional connection between two users (mutual, unlike the one-way follow).
The token must contain an audience (aud) field pointing to the identity being connected with. It may carry an optional content (c) field (a short connection message, max 500 chars). For other constraints see the Action Tokens.
Subtypes
Subtype
Description
CONN
New connection request
CONN:ACC
Acceptance response (establishes the connection on both sides)
CONN:DEL
Disconnect
Connection Flow
Alice sends a CONN to Bob. On Bob’s side the request rests at status C (confirmation) so he can accept or reject — unless his profile.connection_mode is set to auto-accept (A) or ignore (I).
Bob accepts: his instance creates a CONN:ACC back to Alice. Both profiles become Connected.
If both sides independently send a CONN to each other, the second one is detected as mutual and auto-accepted (no manual confirmation).
Either side may send CONN:DEL to disconnect.
Proof-of-Work
CONN actions carry a proof-of-work nonce in the _ claim and are PoW-verified before signature verification. This rate-limits unsolicited connection requests from strangers.
Content-Addressing
This token is content-addressed using SHA-256:
The entire JWT token (header + payload + signature) is hashed
The deduplication key for a connect token is {type}:{issuer}:{audience} (e.g. CONN:alice.example.com:bob.example.com).
Purpose: ensures only ONE active connection from a given issuer to a given audience. A new CONN with the same key supersedes the previous one (which is marked deleted).
Example
User @alice.cloudillo.net wants to connect with @bob.cloudillo.net:
Field
Value
iss
alice.cloudillo.net
aud
bob.cloudillo.net
iat
2024-04-13T00:01:10.000Z
k
20240101
t
CONN
c
Hi! Remember me? We met last week on the bus.
Follow Token
This token represents a one-way follow created by a user (unlike the mutual connection, a follow needs no acceptance).
The token must contain an audience (aud) field pointing to the identity being followed. It may carry an optional content (c) field. For other constraints see the Action Tokens.
Subtypes
Subtype
Description
FLLW
Follow
FLLW:DEL
Unfollow
A follow takes effect immediately and does not require the target to confirm. The target may, however, disable followers entirely via the privacy.allow_followers setting — in that case incoming follows are silently dropped (rest at status D).
Content-Addressing
This token is content-addressed using SHA-256:
The entire JWT token (header + payload + signature) is hashed
The deduplication key for a follow token is {type}:{issuer}:{audience} (e.g. FLLW:alice.example.com:bob.example.com).
Purpose: ensures only ONE active follow from a given issuer to a given audience. Re-following after an unfollow creates a new token with the same key, superseding the previous one.
Example
User @alice.cloudillo.net follows @bob.cloudillo.net:
Field
Value
iss
alice.cloudillo.net
aud
bob.cloudillo.net
iat
2024-04-13T00:01:10.000Z
k
20240101
t
FLLW
Content Actions
Action tokens representing content creation, sharing, and interaction on the Cloudillo network. These tokens enable users to post, share, comment on, and react to content.
Attachments are cryptographically bound to the post
Cannot swap images without breaking the action signature
Deduplication: same image in multiple posts = same file_id
Federation: remote instances can verify attachment integrity
Database Key
POST has no key_pattern defined, so every post is unique and identified solely by its action ID. Posts are never overridden by subsequent posts (unlike REACT or REPOST, which use a key to dedup/override).
Example
User @someuser.cloudillo.net writes a post on the wall of @somegroup.cloudillo.net, attaching an image:
This token represents a reaction created by a user.
The react token must not contain a content (c) field.
The token must contain a subject (sub) field which points to the action being reacted to.
For other constraints see the Action Tokens.
Content-Addressing
This token is content-addressed using SHA-256:
The entire JWT token (header + payload + signature) is hashed
Immutability: Once created, a REACT token cannot be modified without changing its action ID.
Subject Reference
The sub (subject) field references the action being reacted to:
Contains the target action’s action_id (a1~...)
Target action must exist and be verified
Creates a non-hierarchical reference (reactions don’t create visible threading)
Cannot modify subject without breaking reference
Why Subject Instead of Parent:
parent (p) is used for hierarchical threading (comments create visible child hierarchy)
subject (sub) is used for non-hierarchical references (reactions reference without creating hierarchy)
Reactions don’t create visible child actions in the timeline
This semantic distinction keeps threading clean
Properties:
Subject references are immutable
Cannot change which post you’re reacting to
Merkle tree ensures subject hasn’t been tampered with
Federation: remote instances can verify the complete reference
Database Key
The database key for a react token is {type}:{sub}:{iss}
Purpose: This key ensures that a user can only have one active reaction of each type to a specific action. The key components are:
{type}: Full type including subtype (e.g., “REACT:LIKE”)
{sub}: Subject ID (what they’re reacting to)
{iss}: Issuer identity (who is reacting)
Example:
Alice LIKEs a post → Stored with key REACT:LIKE:a1~post123:alice.example.com
Alice changes to LOVE → New LOVE token, previous LIKE is marked deleted
Only ONE reaction of each type per user per post
Changing reaction type creates a new action but invalidates the previous one
Gating
A reaction is rejected if the subject action has reactions disabled. The REACT definition sets gated_by_subject_flag: 'R', so a subject carrying the lowercase r flag (reactions off) blocks new reactions.
Audience Resolution
The aud (audience) field is automatically resolved from the subject action:
Set to the issuer of the subject action (the post owner)
Ensures the reaction notification reaches the content creator
Does not need to be explicitly provided when creating the reaction
Example
User @someotheruser.cloudillo.net likes a post:
Field
Value
iss
someotheruser.cloudillo.net
aud
somegroup.cloudillo.net
iat
2024-04-13T00:01:10.000Z
k
20240301
t
REACT:LIKE
sub
a1~8kR3mN9pQ2vL6xWpYzT4BjN…
Subtypes
REACT tokens use subtypes to indicate the reaction type:
Subtype
Description
REACT:LIKE
Standard like reaction
REACT:LOVE
Love/heart reaction
REACT:LAUGH
Laughing reaction
REACT:WOW
Surprised/amazed reaction
REACT:SAD
Sad reaction
REACT:ANGRY
Angry reaction
REACT:DEL
Delete/remove the reaction
See Also
Post Token - Creating content that can receive reactions
Comment Token - Comments use parent for threading (different from reactions)
This token represents a comment created by a user.
The comment token must contain a content (c) field which contains the text
of the comment in markdown format.
The token must also contain a parent (p) field which points to the parent
object the comment is referring to.
The p (parent) field references the parent action:
Contains the parent’s action_id (a1~...)
Creates immutable parent-child relationship
Parent can be a POST, another CMNT, or any commentable action
Federation: remote instances can verify the complete chain
Gating
A comment is rejected if the parent action has comments disabled. The CMNT definition sets gated_by_parent_flag: 'C', so a parent carrying the lowercase c flag (comments off) blocks new comments.
Database Key
CMNT has no key_pattern, so every comment is unique and identified by its action ID. A user can post multiple comments on the same parent. Use the CMNT:DEL subtype to delete a comment.
Example
User @someotheruser.cloudillo.net writes a comment on a post:
Field
Value
iss
someotheruser.cloudillo.net
aud
somegroup.cloudillo.net
iat
2024-04-13T00:01:00.000Z
k
20240301
t
CMNT
c
“I love U too!”
p
a1~8kR3mN9pQ2vL6xWpYzT4BjN…
Repost Token
This token represents a repost (share) of another user’s content.
A repost allows a user to share someone else’s post with their own followers, optionally adding their own commentary. This is similar to “retweeting” in Twitter or “sharing” in other social platforms.
The token must contain a subject (sub) field pointing to the original action being reposted. REPOST uses sub — NOT p — because the reposted action is referenced without creating threading hierarchy (the same convention REACT and APRV follow). The reposter’s client always sets an explicit audience (aud): their own idTag when boosting to their own wall, or the target wall otherwise.
For other constraints see the Action Tokens.
Content-Addressing
This token is content-addressed using SHA-256:
The entire JWT token (header + payload + signature) is hashed
The sub (subject) field references the original action being reposted:
Contains the original action’s action_id (a1~...)
Subject must exist and be verified
Creates an immutable, non-hierarchical link to the original content
Federation: remote instances can verify the complete chain
Database Key
The repost key_pattern is {type}:{subject}:{issuer}:{audience}. The audience is part of the identity, so the same user can independently boost a post to their own wall and repost it to a community — two distinct keys, two independently un-repostable rows.
Example:
Alice reposts Bob’s post to her wall → key REPOST:a1~post123:alice.example.com:alice.example.com
Alice reposts the same post again to her wall → same key, previous one is superseded
A REPOST:DEL with the same key removes the repost
Delivery: REPOST is a broadcast action that also delivers to the subject’s owner (deliver_to_subject_owner) so the original poster can count and list reposters, and bundles the reposted action itself (deliver_subject) so recipients get the original content rather than a dangling reference.
Types of Reposts
A repost can be a simple repost (no c field), a repost with commentary, or a quote repost (longer commentary). The token structure is identical in all cases – only the presence and length of the optional c field differs.
{
"iss": "alice.example.com",
"iat": 1738483200,
"k": "20240101",
"t": "REPOST",
"sub": "a1~xyz789...",
"aud": "alice.example.com",
"c": "This is an excellent analysis!"}
Omit the c field for a simple repost without commentary.
Fields
Field
Required
Description
iss
✓
The identity reposting the content
iat
✓
Timestamp when repost was created
k
✓
Key ID used to sign the token
t
✓
Token type (always “REPOST”, or “REPOST:DEL” to undo)
sub
✓
Subject: action ID of the original post being reposted
aud
✓
Audience: target wall (own idTag for a boost, community otherwise)
c
Optional commentary on the repost (markdown)
Example
User @alice.example.com reposts @bob.example.com’s post with commentary:
Field
Value
iss
alice.example.com
iat
2024-04-13T00:01:10.000Z
k
20240101
t
REPOST
sub
a1~xyz789abc…
aud
alice.example.com
c
Great insights on distributed systems!
Visibility and Federation
Repost tokens are broadcast actions, meaning they are:
Sent to all followers of the reposter
Displayed in the reposter’s timeline/feed
Credit the original author
Link back to the original post
Federation Flow
When Alice reposts Bob’s post:
Alice’s instance creates a REPOST token referencing Bob’s original POST token
The REPOST is broadcast to Alice’s followers
The original POST token is fetched/synchronized if not already available locally
Followers see the repost in Alice’s timeline with proper attribution to Bob
Permission Checks
When creating a repost:
Original post exists: Verify the subject action ID is valid
Permission to view: Ensure the reposter can access the original post
Repost allowed: Check if original author allows reposts (future feature)
Audience restrictions: Honor any audience limitations on original post
Statistics Impact
Reposts affect the statistics of the original post:
Original post’s STAT token includes repost count
Reposts increase content visibility and reach
Original author can see who reposted their content
Undo/Delete Repost
To remove a repost, issue a REPOST:DEL token with the same key (same subject and audience). It supersedes the original repost, removing it from the reposter’s timeline and decrementing the original post’s repost count.
Federation - How reposts federate across instances
Communication
Action tokens for direct communication and group collaboration between users on the Cloudillo network, including direct messages, conversations, subscriptions, and invitations.
Contains:
MSG - Message - Direct messages sent from one profile to another, or messages within conversations
For a conversation message, replace aud with p set to the CONV (or parent MSG) action_id. a (attachments) and exp (expiry, for disappearing messages) are optional in both cases.
Fields
Field
Required
Description
iss
✓
The identity sending the message
k
✓
Key ID used to sign the token
t
✓
Token type (“MSG” or “MSG:DEL”)
c
✓
Message content (markdown)
aud
*
Recipient (required for a DM)
p
*
Parent CONV or MSG action_id (required for a conversation message)
iat
✓
Timestamp when message was sent
a
Attachments (file IDs)
exp
Optional expiration (for disappearing messages)
aud and p are mutually defining: a DM uses aud, a conversation message uses p.
Delivery
DM (aud set): delivered directly to the recipient. Not broadcast to followers.
Conversation message (p in a CONV): delivered to all subscribers via subscriber fan-out — see Conversation Token. Requires the sender to hold an active SUBS to the conversation.
MSG triggers a push notification (subject to the recipient’s notify.push.message setting).
This token represents a subscription to a subscribable action, such as a conversation (CONV). Subscriptions control who receives messages and updates from group activities.
The subscription token must contain both a subject (sub) field referencing the subscribable action and an audience (aud) field specifying the owner of that action.
For other constraints see the Action Tokens.
Content-Addressing
This token is content-addressed using SHA-256:
The entire JWT token (header + payload + signature) is hashed
The authoritative role is stored server-side as x.role (extensible metadata, not in the signed JWT). The subject owner assigns it — e.g. the CONV creator’s auto-subscription gets x.role: "admin", and an INVT acceptance creates a SUBS with x.role: "member". A role in the content payload is only used as a fallback. The default role for a plain subscription is member.
Database Key
The database key for a subscription token is {type}:{sub}:{iss}
This ensures only one active subscription per user per subject. Example: SUBS:a1~conv123:alice.example.com.
Auto-Accept Logic
When a SUBS token is received, the system determines whether to accept it automatically:
Once subscribed, messages are delivered via schedule_subscriber_fanout() which walks the parent chain to the CONV and delivers to all subscribers. See Subscriber Fan-Out for details.
To leave, the user creates a SUBS:DEL token. The subject owner marks the subscription as deleted and removes the user from the subscriber list.
Example
User @bob.cloudillo.net subscribes to a conversation owned by @alice.cloudillo.net:
This token represents an invitation for a user to join a subscribable action. The subject (sub) is usually a conversation (CONV) action_id, but it may also be a community identity reference (@<id_tag>) for a community-membership invitation. Invitations enable controlled access to closed groups.
The invitation token must contain a subject (sub) field referencing the target and an audience (aud) field specifying the invited user.
For other constraints see the Action Tokens.
Content-Addressing
This token is content-addressed using SHA-256:
The entire JWT token (header + payload + signature) is hashed
Immutability: Once created, an INVT token cannot be modified without changing its action ID.
Purpose
INVT tokens serve several important purposes:
Access Control: Enable users to join closed/private groups
Role Assignment: Pre-assign roles for invited users
Discoverability: Notify users about groups they can join
Subject Delivery: Include the subject action (CONV) with the invitation
Required Fields
Field
Required
Description
iss
Yes
The inviter’s identity (must have moderator role on the subject, or be its creator)
aud
Yes
The invited user’s identity
sub
Yes
The CONV action_id (a1~...) or community identity (@<id_tag>) being invited to
t
Yes
“INVT” or “INVT:DEL”
c
Optional
Invitation metadata (role, message)
Subtypes
Subtype
Description
INVT
Create a new invitation
INVT:DEL
Revoke an invitation
Content Structure
The optional content (c) field contains invitation metadata:
{
"role": "member",
"message": "Welcome to our project discussion!"}
Property
Type
Required
Description
role
string
No
Role to assign when accepting: “observer”, “member”, “moderator”, “admin”
message
string
No
Optional invitation message
Database Key
The database key for an invitation token is {type}:{sub}:{aud}
Purpose: This key ensures that only one active invitation exists per user per subject. The key components are:
{type}: “INVT” (base type)
{sub}: Subject ID (what they’re invited to)
{aud}: Audience identity (who is invited)
Example:
Alice invites Bob to a CONV → Stored with key INVT:a1~conv123:bob.example.com
A new invitation to the same user replaces the previous one
Permission Requirements
Validated by the on_create hook on the inviter’s side: the inviter must either be the creator of the subject action or hold a moderator (or higher) role on it via an active SUBS. See Subscription Token roles for the full hierarchy.
Subject Delivery
INVT has deliver_subject=true behavior, meaning:
When an invitation is delivered, the subject action (e.g., CONV) is included
The invitee receives both the INVT and the CONV token
This allows the invitee to see conversation details before accepting
The invitee accepts by creating a SUBS token referencing the CONV. Because an INVT exists, the subscription is auto-accepted. See SUBS auto-accept logic for details.
Revoking an Invitation
A moderator creates an INVT:DEL token, which is delivered to the invitee. The original INVT is marked deleted and can no longer be used to subscribe.
Invitation Lifecycle
An invitation is created (Active), then either consumed when the invitee subscribes, or revoked by the inviter via INVT:DEL:
The Action Type DSL defines action types declaratively. Each type configures field constraints, content validation, processing behavior, lifecycle hooks, and permissions without touching the core processing pipeline. All built-in definitions live in cloudillo-action (dsl/definitions.rs) and are validated at compile time.
The action type code in the JWT t claim combines type and subtype as TYPE:SUBTYPE (e.g., POST:IMG, REACT:LIKE, CONN:DEL). The DEL subtype is the conventional delete/revoke marker.
Field Constraints
Only five fields are configurable, and only their optionality — the field types are fixed:
Each field is Required, Forbidden, or — when omitted — optional:
Constraint
Meaning
Required
Field must be present and valid
Forbidden
Field must be absent
(omitted)
Field is optional
The content field is additionally validated against the optional schema (string length, enum, or object properties).
Behavior Flags
Behavior flags control how an action is processed and delivered. The implemented flags:
Flag
Description
broadcast
Send to all followers when posting to own wall (no audience)
allow_unknown
Accept actions from non-connected/non-following senders
ephemeral
Don’t persist; forward to WebSocket only (e.g. PRES)
approvable
Can receive an APRV approval; enables auto-approve for trusted sources
requires_subscription
Child actions require a valid SUBS subscription
subscribable
This action can have SUBS pointing to it (CONV)
deliver_subject
Deliver the subject action alongside this one
deliver_to_subject_owner
Also deliver to the subject’s owner (INVT, REPOST)
default_flags
Default capability flags applied at creation (e.g. rco)
gated_by_parent_flag
Reject if the parent’s flags disable this action (e.g. C for CMNT)
gated_by_subject_flag
Reject if the subject’s flags disable this action (e.g. R for REACT)
Note
requires_acceptance, local_only, ttl, sync, and federated exist in the struct but are reserved and not yet implemented.
Hooks
Hooks run native Rust logic at four lifecycle points. In the DSL definitions they are declared as HookImplementation::None; the actual native implementations are wired up through a registry (native_hooks/).
structActionHooks {
on_create, // local user creates the action
on_receive, // federated action arrives at /api/inbox
on_accept, // user accepts a confirmation action
on_reject, // user rejects a confirmation action
}
Permissions
structPermissionRules {
can_create: Option<String>, // e.g. "authenticated"
can_receive: Option<String>, // e.g. "any", "followers", "authenticated"
requires_following: Option<bool>,
requires_connected: Option<bool>,
}
can_create / can_receive hold named rule strings ("authenticated", "any", "followers"). The requires_* booleans add relationship gates.
Key Pattern
key_pattern is a template that produces the database key used to deduplicate and override actions. A new action with the same key supersedes the previous one. Templates interpolate {type}, {issuer}, {audience}, {subject}, {parent}, and content fields like {content.name}.
Type
key_pattern
Effect
POST, CMNT, CONV
None
Every action is unique (action ID is the identity)
REACT, SUBS
{type}:{subject}:{issuer}
One per user per subject
CONN, FLLW
{type}:{issuer}:{audience}
One per user per target
REPOST
{type}:{subject}:{issuer}:{audience}
One per subject per target wall
STAT
{type}:{parent}
One stat row per action
Override example: Alice LIKEs a post, then changes to LOVE. Both REACT tokens share the key REACT:{subject}:alice.example.com, so the LOVE token supersedes the LIKE.
Validation Flow
When an action is created or received, it is validated against its definition:
Check field constraints (Required present, Forbidden absent)
This token represents the statistics of reactions on an object (post, comment, etc.)
The issuer (iss) of the token must be the audience (aud) of the parent token (p).
A statistics token must not contain an audience (aud) field.
The token must contain a parent (p) field which points to the parent object
the statistics are referring to.
The statistics token must contain a content (c) field which is a JSON object in the following format:
Field
Type
Description
c
number
The number of comments (optional)
r
string
Encoded reaction counts (optional) — see below
rp
number
The number of reposts (optional)
The r field is a compact wire string "<total>,<code><count>,..." (at most 5 per-type entries, sorted descending by count), not a plain number. The receiver normalizes it on arrival.
The database key for a fileshare token is [t, sub, aud]
Purpose: This key ensures that only one active fileshare exists per (file, recipient) pair. The key components are:
t: Token type (FSHR)
sub: Subject (the file being shared)
aud: Audience (the recipient)
Example:
Alice shares file with Bob → Stored with key ["FSHR", f1~file123, bob.example.com]
Alice updates the share → New token with same key, previous one is marked deleted
Only ONE active fileshare of the same file to the same recipient
Examples
Read-Only Share
User @alice.cloudillo.net shares a PDF with @bob.cloudillo.net (read-only):
Field
Value
iss
alice.cloudillo.net
aud
bob.cloudillo.net
iat
2024-04-13T00:01:10.000Z
k
20240101
t
FSHR
sub
f1~7NtuTab_K4FwYmARMNuk4
c.contentType
application/pdf
c.fileName
report.pdf
c.fileTp
BLOB
Write Access Share
User @alice.cloudillo.net grants edit access to a collaborative document:
Field
Value
iss
alice.cloudillo.net
aud
bob.cloudillo.net
iat
2024-04-13T00:01:10.000Z
k
20240101
t
FSHR:WRITE
sub
f1~collaborative_doc_id
c.contentType
application/vnd.cloudillo.doc
c.fileName
Team Notes.quillo
c.fileTp
CRDT
Revoke Share
User @alice.cloudillo.net revokes Bob’s access:
Field
Value
iss
alice.cloudillo.net
aud
bob.cloudillo.net
iat
2024-04-13T00:05:00.000Z
k
20240101
t
FSHR:DEL
sub
f1~7NtuTab_K4FwYmARMNuk4
Integration with References
File shares can be combined with references for public sharing:
Create FSHR action to share with specific user
Or create a reference with type: share.file for public/guest access
Reference tokens support accessLevel: read or accessLevel: write
Access Control Flow
A non-DEL share requires the recipient to accept it. On receipt the action rests at status C (confirmation required); only on acceptance does the recipient’s server create the shared file entry and cache the access level. FSHR:DEL is processed without confirmation.
Owner creates FSHR action
  ↓
Action sent to recipient via federation
  ↓
Recipient's server verifies JWT signature and audience
  ↓
Status set to 'C' (confirmation required)
  ↓
Recipient accepts → file entry created, access granted:
  - FSHR         → read
  - FSHR:COMMENT → comment
  - FSHR:WRITE   → write
  ↓
Access revoked on FSHR:DEL receipt
The IDP:REG (Identity Provider Registration) token enables federated identity registration. It allows a registrar to request identity creation on a remote Identity Provider (IDP) instance, enabling community-owned identities and cross-instance identity management.
Use Cases
Community-Owned Identities: A community owner creates identities under their domain on a remote IDP
Federated Registration: Registrar on instance A creates identities on IDP instance B
Bulk Identity Provisioning: Automated identity creation for organizations
Token Structure
Field
Type
Required
Description
iss
identity
Yes
The registrar’s identity
aud
identity
Yes
The IDP instance to register on
iat
timestamp
Yes
Issue time
k
string
Yes
Signing key ID
t
string
Yes
IDP:REG
c
object
Yes
Registration content (see below)
Content Schema
Content field names are camelCase.
Field
Type
Required
Description
idTag
string
Yes
Identity to register (e.g., alice.cloudillo.net)
email
string
No
Email address (required if no ownerIdTag)
ownerIdTag
string
No
Owner identity for community-owned identities
issuer
string
No
Issuer role: registrar (default) or owner
address
string
No
Identity address; use auto to use the client’s IP
lang
string
No
Preferred language for emails (e.g., hu, de)
Note
The pending identity’s expiration is set server-side (24 hours). It is not supplied as a content field.
Content-Addressing
This token is content-addressed using SHA-256:
The entire JWT token (header + payload + signature) is hashed
This token represents an approval of another user’s content. When you approve someone’s action (e.g., a POST), it signals trust and enables federated fan-out to your followers.
The approval token must NOT contain a content (c) or attachments (a) field.
The token must contain a subject (sub) field referencing the action being approved.
For other constraints see the Action Tokens.
Content-Addressing
This token is content-addressed using SHA-256:
The entire JWT token (header + payload + signature) is hashed
Immutability: Once created, an APRV token cannot be modified without changing its action ID.
Purpose
APRV tokens serve several important purposes in the federated network:
Trust Signal: Indicates that you endorse the referenced content
Federated Fan-Out: When you approve a POST, it gets broadcast to your followers along with the approved content
Content Discovery: Helps content spread across the network through trusted connections
Status Update: Updates the original action’s status to ‘Active’ (A) on the original author’s instance
Required Fields
Field
Required
Description
iss
Yes
Your identity (the approver)
aud
Yes
The issuer of the approved action (content creator)
sub
Yes
The action_id being approved (a1~...)
t
Yes
“APRV”
c
Forbidden
Content field is not allowed
a
Forbidden
Attachments field is not allowed
Subject Reference
The sub (subject) field references the action being approved:
Contains the target action’s action_id (a1~...)
Target action must exist and be verifiable
Creates a non-hierarchical reference
Why Subject Instead of Parent:
APRV doesn’t create a visible hierarchy (unlike comments)
It references the action without threading
The semantic is “this action is about that action”
Broadcast Behavior
APRV tokens have broadcast=true behavior, meaning:
When you create an APRV, it’s sent to all your followers
The approved action (e.g., the POST) is bundled with the APRV delivery
Recipients receive both the APRV and the related action in a single delivery
This is how content spreads across the federated network through trust relationships.
Federation Flow
Creating an approval: The approver creates an APRV (aud = content creator, sub = content action_id). Because APRV is a broadcast action, delivery fans out to all of the approver’s followers, bundling the approved action so recipients receive both in a single delivery.
Receiving an approval: When an APRV for your content arrives, the server verifies the JWT signature and permissions, then the on_receive hook finds the subject action and updates its status to A (Active/Approved).
Auto-Approval
The system can automatically create APRV tokens for content from trusted connections. See Auto-Approval for details.
Auto-approval conditions:
Action type must be approvable (POST, MSG, REPOST)
Action is addressed to you (audience = your id_tag)
Sender is different from you
federation.auto_approve setting is enabled
Sender is connected (bidirectional connection established)
Related Action Bundling
When an APRV is delivered, the approved action is included:
Recipients receive both tokens in a single request. The related action is processed after the APRV, with permission checks skipped (pre-approved by the APRV issuer’s trust).
Example
User @alice.cloudillo.net approves a post from @bob.cloudillo.net:
Field
Value
iss
alice.cloudillo.net
aud
bob.cloudillo.net
iat
2024-04-13T00:01:10.000Z
k
20240301
t
APRV
sub
a1~NAado5PS4j5+abYtRpBELU0e5OQ+zGf/tuuWvUwQ6PA=
Flow:
Alice approves Bob’s post
APRV is sent to Bob (notification)
APRV + Bob’s POST are broadcast to Alice’s followers
Bob’s post status is updated to ‘A’ (Active/Approved)
Auto-Approval - Automatic approval for trusted connections
Presence Token
The PRES token represents an ephemeral presence indication, such as typing status or online presence. Unlike other action types, presence tokens are not persisted – they are forwarded via WebSocket in real-time only, with no action_id generated and no delivery retry logic. They have a default TTL of 30 seconds.
The presence token must contain a subject (sub) field referencing the context (e.g., a conversation).
For other constraints see the Action Tokens.
Fields
Field
Required
Description
iss
Yes
The user’s identity
sub
Yes
Context (e.g., CONV action_id)
aud
Optional
Specific target user (if omitted, broadcast to context)
t
Yes
“PRES:TYPING”, “PRES:ONLINE”, etc.
c
Optional
Additional metadata
a
Forbidden
Attachments are not allowed
Subtypes
Subtype
Description
PRES:TYPING
User is currently typing
PRES:ONLINE
User is online/active
PRES:AWAY
User is away/idle
PRES:OFFLINE
User has gone offline
Additional subtypes can be defined for application-specific presence states.
Subject Reference
The sub (subject) field specifies the context for the presence update (e.g., a CONV action_id for typing indicators, or a profile context for online status). Unlike the parent field used by comments, sub expresses a non-hierarchical contextual reference.
Processing Flow
When a PRES token is received, the server verifies the signature, skips database storage, and immediately forwards it via WebSocket to the audience (single user if aud is set, otherwise all context subscribers).
For cross-instance presence, the token is forwarded via HTTP POST to the context owner’s instance, which then broadcasts to its local subscribers.
Time-To-Live (TTL)
PRES tokens have an implicit 30-second TTL. Clients should send periodic updates to maintain presence (e.g., PRES:TYPING every 5 seconds while typing). After the TTL expires without a new update, recipients consider the presence stale.
Example
User @alice.cloudillo.net is typing in a conversation:
Field
Value
iss
alice.cloudillo.net
sub
a1~NAado5PS4j5+abYtRpBELU0e5OQ+zGf/tuuWvUwQ6PA=
iat
2024-04-13T00:01:10.000Z
k
20240301
t
PRES:TYPING
Security Considerations
Since PRES tokens are ephemeral, they still require valid signature verification, rate limiting applies to prevent spam, and the user must have access to the referenced context.
Cloudillo is designed as a federated system where independent instances communicate to share content, enable collaboration, and maintain user sovereignty. Like email, any Cloudillo server can communicate with any other – users don’t need to be on the same instance.
Core Principles
No central authority: Each instance operates autonomously
User sovereignty: Users choose where their data lives
Explicit consent: Relationship-based sharing with cryptographic verification
Standard protocols: HTTP/HTTPS, WebSocket, JWT, DNS-based identity
Content addressing: SHA256 ensures integrity across instances
Inter-Instance Communication
Request Module
A shared request client handles all federated HTTP calls. It exposes generic
get/post methods that take an id_tag and a path, resolve the target host as
https://cl-o.{id_tag}, and attach a federation bearer token when the call needs
authentication (see ProxyToken Authentication). Public variants
(get_public, post_public, get_noauth) skip the token for endpoints that are
open to any instance, such as the profile/key endpoint GET /api/me.
Federation Flow
When Alice (on instance A) follows Bob (on instance B):
Instance A                          Instance B
  |                                   |
  |--- GET /api/me ------------------>| (Fetch Bob's profile)
  |<-- 200 OK {profile} --------------|
  |                                   |
  |--- Create FLLW action token ---   |
  |                                   |
  |--- POST /api/inbox -------------->| (Send follow action)
  |    {token: "eyJhbGc..."}         |
  |                                   |--- Queue for async verification
  |<-- 201 Created -------------------|
  |                                   |--- Verify signature, check perms, store
How actions are distributed and received across the federated Cloudillo network.
Outbound Actions
When a user creates an action, it is delivered to the relevant recipients. The set
of recipients is derived from the action’s audience and type by the action DSL
(the subject-keyed outbox/relay rules), broadly:
Broadcast actions (e.g. POST) → the issuer’s followers
Replies (e.g. CMNT, REACT) → the owner of the parent action
Relationship actions (e.g. CONN, FLLW) → the target named in the audience
Conversation messages (MSG) → fanned out to subscribers (see Trust & Distribution)
Each recipient gets one ActionDeliveryTask, which POSTs the action token to that
instance’s inbox as {"token": "..."}. Delivery is per-recipient and retried
independently, so one unreachable instance does not block the others.
Inbound Actions
Cloudillo provides two endpoints for receiving federated actions, optimized for different use cases.
Async Inbox (POST /api/inbox)
The standard endpoint for most federated actions. The payload is self-authenticating
(the action token carries its own signature), so no bearer auth is required. The
handler hashes the token into an action ID, queues an ActionVerifierTask on the
scheduler, and returns 201 Created immediately. Verification, permission checks,
and storage happen asynchronously, which keeps the sender from timing out on slow
verification (e.g. while fetching keys or attachments).
If the token is a CONN action, the handler first checks a proof-of-work
challenge tied to the sender’s IP; missing or invalid PoW is rejected with
428 Precondition Required. This throttles unsolicited connection requests.
Sync Inbox (POST /api/inbox/sync)
A synchronous variant for actions that need an immediate result rather than a queued
ack. It runs the same verification and processing inline and returns the hook’s
result in the response body. The same PoW check applies to CONN actions.
Used mainly for identity registration (IDP:REG) and other handshakes where the
sender needs the outcome before continuing.
Delivery Guarantees
Delivery is handled by the task scheduler, which persists tasks so they survive
server restarts and retries failures automatically.
Retry Policy
The default policy uses true exponential backoff: the delay doubles each
attempt, starting at 60 seconds and capped at 1 hour, for up to 10 attempts.
backoff(n) = min(60s × 2ⁿ, 1 hour)

Attempt 1 fails → wait 60s
Attempt 2 fails → wait 120s
Attempt 3 fails → wait 240s
...doubling each time...
→ wait capped at 1 hour for later attempts
A successful POST (2xx) completes the task; any error returns failure and lets the
scheduler reschedule with the next backoff until the attempt limit is reached.
Delivery tasks are keyed per (action_id, recipient), so a re-queued action is not
delivered twice.
Related Actions & Fan-out
Some deliveries carry more than one token. When an action is approved or invites a
user, the original/context token is bundled alongside it in a related array so the
recipient gets everything in one round trip. The inbox payload becomes
{"token": "...", "related": ["..."]}, and conversation messages fan out to all
subscribers. This is covered in detail under
Trust & Distribution.
When receiving federated actions, the server must verify the JWT signature using the issuer’s public key. This involves a 3-tier caching strategy to balance security with performance.
3-Tier Caching Architecture
┌─────────────────────────────────────────────────────────────────┐
│                     Verification Request                        │
└───────────────────────────────┬─────────────────────────────────┘
                                │
                                ▼
┌─────────────────────────────────────────────────────────────────┐
│  Tier 1: In-Memory Failure Cache                                │
│  ├─ Purpose: Prevent repeated requests to unreachable instances │
│  ├─ TTL (network errors): 5 minutes                             │
│  ├─ TTL (persistent errors): 1 hour                             │
│  └─ LRU eviction when capacity exceeded                         │
└───────────────────────────────┬─────────────────────────────────┘
                                │ (cache miss or expired)
                                ▼
┌─────────────────────────────────────────────────────────────────┐
│  Tier 2: SQLite Key Cache                                       │
│  ├─ Purpose: Persistent cache of successful key fetches         │
│  ├─ Key: (issuer, key_id)                                       │
│  ├─ Stores: public key + expiration timestamp                   │
│  └─ If valid & not expired: verify signature immediately        │
└───────────────────────────────┬─────────────────────────────────┘
                                │ (cache miss or expired)
                                ▼
┌─────────────────────────────────────────────────────────────────┐
│  Tier 3: HTTP Fetch from Remote                                 │
│  ├─ Endpoint: GET https://cl-o.{issuer}/api/me                  │
│  ├─ Find matching key by key_id                                 │
│  ├─ On success: cache in SQLite, clear failure cache            │
│  └─ On failure: record in failure cache                         │
└─────────────────────────────────────────────────────────────────┘
Failure Types and TTLs
Error Type
TTL
Reason
Network timeout
5 minutes
May recover quickly
Connection refused
5 minutes
Server may restart
404 Not Found
1 hour
Key doesn’t exist
403 Forbidden
1 hour
Permission denied
Parse error
1 hour
Invalid response format
Verification Flow
verify_action_token(token):
    1. Decode JWT without verifying (extract issuer, key_id)

    2. Check failure cache:
       if failure_cache.has(issuer, key_id) and not expired:
           return Error(CachedFailure)

    3. Check SQLite cache:
       if key_cache.has(issuer, key_id):
           key = key_cache.get(issuer, key_id)
           if key.expires_at > now:
               return verify_signature(token, key.public_key)

    4. Fetch from remote:
       response = HTTP GET https://cl-o.{issuer}/api/me
       if error:
           failure_cache.record(issuer, key_id, error_type)
           return Error(KeyFetchFailed)

       public_key = find_key_by_id(response.keys, key_id)
       if not found:
           failure_cache.record(issuer, key_id, NotFound)
           return Error(KeyNotFound)

       key_cache.store(issuer, key_id, public_key)
       failure_cache.clear(issuer, key_id)

       return verify_signature(token, public_key)
How trust relationships enable automatic content approval and efficient message distribution across the federated network.
Auto-Approval for Trusted Connections
When receiving actions from connected users, the system can automatically create approval (APRV) tokens, enabling content to spread through the network via trusted relationships.
Auto-Approval Conditions
For an action to be auto-approved, ALL of the following must be true:
Approvable action type: Action type has approvable=true behavior
Applies to: POST, MSG, REPOST
Addressed to us: action.audience == our_id_tag
From different user: action.issuer != our_id_tag
Setting enabled: profile.auto_approve_actions = true in settings
Connection established: Issuer has bidirectional connection with us
The system checks issuer_profile.connected.is_connected() to determine trust. A connection is established when both parties have sent CONN tokens to each other.
Subscriber Fan-Out
For subscribable actions (like CONV), messages need to be delivered to all subscribers. The fan-out mechanism ensures efficient message distribution across the federated network.
Subscribable Actions
Actions with subscribable=true behavior can have subscribers:
CONV (Conversation) - subscribers receive messages in the group
Fan-Out Algorithm
schedule_subscriber_fanout(action_id, parent_id, issuer):
    1. Walk parent chain to find subscribable root:
       current = parent_id
       while current:
           parent_action = get_action(current)  // local DB lookup
           if is_subscribable(parent_action.type):
               subscribable_root = parent_action
               break
           current = parent_action.parent_id

    2. Check if we own the subscribable root:
       is_local = (subscribable_root.audience == null
                   && subscribable_root.issuer == our_id_tag)
                  || subscribable_root.audience == our_id_tag

       if not is_local:
           return  // Remote owner handles fan-out

    3. Get subscribers:
       subscribers = query_subscriptions(subscribable_root.action_id)
                     .filter(status = 'A')  // Active only

    4. Create delivery tasks:
       for subscriber in subscribers:
           if subscriber != our_id_tag
              && subscriber != issuer:  // Exclude self and sender
               schedule_delivery_task(
                   action_id,
                   subscriber,
                   key = "fanout:{action_id}:{subscriber}"
               )
Local vs Remote Fan-Out
Scenario 1: Local CONV Owner Sends Message
Alice (CONV owner) sends MSG
         │
         ▼
┌─────────────────────────────┐
│ ActionCreatorTask           │
│ - Creates MSG               │
│ - Calls schedule_delivery() │
└───────────┬─────────────────┘
            │
            ▼
┌─────────────────────────────┐
│ schedule_subscriber_fanout()│
│ - Finds CONV (subscribable) │
│ - CONV is local (we own it) │
│ - Gets all SUBS             │
│ - Schedules delivery to each│
└───────────┬─────────────────┘
            │
            ▼
    Bob, Charlie receive MSG
    (all other subscribers)
Scenario 2: Remote Subscriber Sends Message
Bob (subscriber, not owner) sends MSG
on his instance
         │
         ▼
┌─────────────────────────────┐
│ schedule_subscriber_fanout()│
│ - Finds CONV (subscribable) │
│ - CONV is NOT local         │
│ - No local fan-out          │
└───────────┬─────────────────┘
            │
            ▼
┌─────────────────────────────┐
│ schedule_delivery()         │
│ - Deliver to CONV owner     │
│   (Alice)                   │
└───────────┬─────────────────┘
            │
            ▼ (federation)
┌─────────────────────────────┐
│ Alice's instance receives   │
│ MSG at /inbox               │
└───────────┬─────────────────┘
            │
            ▼
┌─────────────────────────────┐
│ schedule_subscriber_fanout()│
│ - CONV is local to Alice    │
│ - Fan out to all except Bob │
└───────────┬─────────────────┘
            │
            ▼
    Charlie, others receive MSG
Related Action Bundling
When delivering certain actions (like APRV), related actions are bundled together in a single delivery to provide context.
Bundling Use Cases
APRV + Approved POST: When broadcasting an approval, include the approved content
INVT + Subject CONV: When inviting, include the conversation details
Inbox receives action with related tokens
         │
         ▼
┌─────────────────────────────┐
│ Store related tokens        │
│ - Status = 'W' (waiting)    │
│ - ack_token = main action   │
└───────────┬─────────────────┘
            │
            ▼
┌─────────────────────────────┐
│ Process main action         │
│ - Verify signature          │
│ - Check permissions         │
│ - Store action              │
│ - Execute on_receive hook   │
└───────────┬─────────────────┘
            │
            ▼
┌─────────────────────────────┐
│ process_related_actions()   │
│ - Get tokens with           │
│   ack_token = main action   │
│ - For each:                 │
│   - Skip permission check   │
│   - Verify signature        │
│   - Store action            │
└─────────────────────────────┘
Key point: Related actions skip permission checks because they are pre-approved by the main action issuer. The trust flows from the APRV issuer to the related content.
APRV Broadcast Example
Alice approves Bob's POST
         │
         ▼
┌─────────────────────────────┐
│ Create APRV                 │
│ - sub = Bob's post action_id│
│ - Check: subject.broadcast  │
└───────────┬─────────────────┘
            │
            ▼
┌─────────────────────────────┐
│ schedule_broadcast_delivery │
│ - Get Alice's followers     │
│ - Include Bob's POST token  │
│   as related action         │
└───────────┬─────────────────┘
            │
            ▼
┌─────────────────────────────┐
│ For each follower:          │
│ POST /inbox                 │
│ {                           │
│   token: APRV_token,        │
│   related: [POST_token]     │
│ }                           │
└─────────────────────────────┘
When one instance needs to make an authenticated request to another – for example
to download a non-public file – it authenticates itself with a short-lived
PROXY token. The PROXY token is not used directly on the resource request;
instead it is exchanged at the remote for an access token that the requester then
caches and reuses.
How It Works
The PROXY token is a normal action token with t: "PROXY", signed by the
requesting tenant’s own key. Its audience is the target instance and it expires
after one minute – it exists only to prove “this instance is who it claims to
be, right now.”
Instance A (requester)                 Instance B (target)
  |                                       |
  |  Mint PROXY token (1 min, aud=B)      |
  |                                       |
  |  GET /api/auth/access-token?token=... |
  |-------------------------------------->| verify PROXY token
  |                                       | (fetch A's key from /api/me,
  |                                       |  check signature + audience)
  |<-- 200 { token: <access-token> } -----| mint scoped access token
  |                                       |
  |  GET /api/files/... (Bearer access)   |
  |-------------------------------------->| validate access token
  |<-- 200 { file data } -----------------|
Mint PROXY token – A creates a one-minute PROXY action token addressed to B.
Exchange – A calls GET https://cl-o.{B}/api/auth/access-token?token=<proxy>
(optionally with &subject=...). B verifies the PROXY token against A’s public
key and returns a regular access token.
Use the access token – A sends subsequent requests with
Authorization: Bearer <access-token>. B validates it like any local session
token.
Caching and Retry
The exchanged access token is cached per (tenant, target) and reused for further
federated calls, so the PROXY exchange happens only on a cache miss. If a request
comes back 401 or 403, the requester invalidates the cached token, mints a fresh
one, and retries the request once. The cache TTL follows the access token’s own
expiry.
Use Cases
PROXY-token-backed requests are used wherever a remote endpoint requires
authentication, such as:
File fetching – downloading non-public attachments from a remote instance
Authenticated profile and data queries
Endpoints that are open to any instance (such as the profile/key endpoint
GET /api/me used during signature verification) are fetched without a token.
See Also
Key Verification - How the remote verifies the PROXY token’s signature
How files, profiles, and databases are synchronized across federated instances.
File Synchronization
When an inbound action carries file attachments, those files are pulled from the
source instance during action processing. Files are content-addressed: a file’s
ID is the hash of its descriptor, so integrity can be checked by recomputing the
hash after download.
For each attachment that isn’t already held locally, the receiver:
Fetches the descriptor at GET /api/files/{file_id}/descriptor and verifies
that its hash matches the file_id. A mismatch aborts the sync.
Parses the descriptor to discover the file’s variants (e.g. image
resolutions) and downloads each one it needs from
GET /api/files/variant/{variant_id}.
Fetches file metadata from GET /api/files/{file_id}/metadata and stores it.
Attachment sync is atomic per action: if any attachment fails, the inbound action
stays pending and the verifier task retries with exponential backoff until every
attachment is synced. Already-present files are skipped, so deliveries don’t
re-download content.
Profile Synchronization
Remote profiles are mirrored locally so they can be displayed without a round trip
on every request. A profile is synced the first time it is referenced (the
ensure_profile path creates it from the remote /api/me response if it isn’t
already held).
To keep mirrors fresh, a background refresh batch re-fetches profiles whose local
copy is older than 24 hours. If a profile’s source instance keeps failing to
respond, the profile is eventually marked Suspended (after ~1 day of failures) and
refresh attempts stop after ~7 days. There is no push mechanism — profile data is
always pulled.
How following and connection relationships are established and managed across federated instances.
Following
Following is one-way and needs no approval. When Alice follows Bob, her instance
creates a FLLW action (audience = Bob), signs it with her ES384 key, records it
locally, and delivers it to Bob’s inbox. On receipt, Bob’s instance marks Alice’s
profile as following=true. Bob can ignore the follow if he does not accept
followers.
Connection Establishment
A connection is a mutual relationship and uses a request/accept handshake with
CONN subtypes:
Alice creates CONN (audience = Bob)
  ↓  delivered to Bob's inbox
Bob's side records Alice as connected = RequestPending
  ↓  Bob accepts
Bob creates CONN:ACC (audience = Alice)
  ↓  delivered to Alice's inbox
Both profiles move to connected = Connected
The plain CONN token opens the request (state RequestPending); the CONN:ACC
token confirms it (state Connected). Until the CONN:ACC round-trip completes,
the connection is pending rather than established.
Connection vs Following
Aspect
Following
Connection
Direction
One-way
Bidirectional
Consent
None required
Mutual agreement
Trust level
Low
High (auto-approval)
Use case
Content subscription
Direct messaging, trusted sharing
Unfollowing and Disconnecting
Removal is expressed with a :DEL subtype of the same action, not a flag on the
original token:
Unfollow: Alice creates a FLLW:DEL action (audience = Bob) and delivers it.
On receipt, Bob’s instance clears Alice’s following state.
Disconnect: Alice creates a CONN:DEL action (audience = Bob). On receipt,
the connection is removed (connected cleared) on the target side.
Each :DEL action is signed and delivered through the inbox exactly like the
original FLLW/CONN, and it supersedes the prior relationship state.
Security model, spam prevention, and protection mechanisms for federated communication.
Trust Model
DNS-Based Trust
Domain ownership proves identity
TLS certificates prove server authenticity
Action signatures prove content authenticity
Progressive Trust
Initial federation is cautious
Trust builds through successful interactions
Users can block instances/users
Spam Prevention
Relationship-Based Acceptance
After a token’s signature is verified, the receiver decides whether to accept it
based on the relationship with the issuer. The gate is type-agnostic:
If the issuer’s local profile is Suspended, Blocked, or Banned, the action is
rejected outright.
Otherwise the action is accepted if the receiver follows the issuer or has
a connection with them.
A few subject-anchored exceptions admit strangers on public content, e.g. a
REACT or REPOST referencing the receiver’s own public action, or a STAT
update for content the receiver already holds.
Anything else from an unrelated stranger is rejected.
Proof of Work for Connection Requests
CONN actions arriving at the inbox must include a valid proof-of-work token
bound to the sender’s IP. Missing or invalid PoW is rejected with
428 Precondition Required. This raises the cost of bulk, unsolicited connection
requests without requiring a prior relationship.
Rate Limiting
Inbound requests pass through a tiered IP rate limiter (per individual address and
per network/provider block) shared by the whole HTTP surface, not a separate
federation-specific limiter. Token-verification failures also penalize the source
IP, so an instance sending many bad signatures is throttled.
Blocking
Blocking is expressed through the issuer’s local profile status. Setting a
remote user’s profile to Blocked or Banned causes all of their subsequent
actions to be refused during the acceptance check described above. There is no
separate instance-wide blocklist; blocking is per-profile.
Signature Verification
Every federated action token must pass signature verification before it is accepted:
Key fetch - the issuer’s public key (selected by the token’s key ID) is
retrieved from the issuer’s instance, with caching.
JWT signature - the ES384 signature is checked against that key, proving the
token was signed by the claimed issuer.
See Key Verification for the caching strategy and failure handling.
Monitoring, best practices, and troubleshooting for federation.
Monitoring & Observability
Federation activity is observable through structured tracing logs emitted by the
action delivery and verification paths. Key events to watch for:
Delivery: each delivery task logs → DELIVER when attempted and
← DELIVERED on success, with the action ID and target instance. Failures log a
warning with the error before the scheduler reschedules a retry.
Verification: inbound tokens log → VERIFY (issuer and key ID) and
← VERIFIED on success. Signature failures and key-fetch failures are logged as
warnings, and repeated failures are throttled by the key failure cache.
Auto-approval: trusted-connection auto-approvals log AUTO-APPROVE with the
action ID and issuer.
Rejections: actions blocked by permission or role checks are logged as
warnings explaining why (e.g. insufficient role, audience mismatch).
Rate Limiting - Request rate limiting and proof-of-work protection
Subsections of Runtime Systems
Task Scheduler System
Cloudillo’s Task Scheduler is a sophisticated persistent task execution system that enables reliable, async background processing with dependency management, automatic retries, and cron-style scheduling. This system is critical for federation, file processing, and any operations that need to survive server restarts.
Why Task-Based Processing?
Simple async handlers cannot provide the guarantees needed for federation and file processing:
Problems with simple async:
✗ Lost on server restart (no persistence)
✗ No dependency ordering (file must finish before action)
✗ No automatic retry on transient failures
✗ No progress tracking or observability
✗ No priority management for resource allocation
Task scheduler solutions:
✅ Tasks survive server restarts (persisted via MetaAdapter)
Tasks can depend on other tasks forming a Directed Acyclic Graph (DAG):
# Create file processing task
file_task_id = scheduler
.task(FileIdGeneratorTask(temp_path))
.schedule()
# Create image resizing task that depends on file task
resize_task_id = scheduler
.task(ImageResizerTask(file_id, "hd"))
.depend_on([file_task_id]) # Wait for file task
.schedule()
# Create action that depends on both
action_task_id = scheduler
.task(ActionCreatorTask(action_data))
.depend_on([file_task_id, resize_task_id]) # Wait for both
.schedule()
Dependency Resolution:
FileIdGeneratorTask (no dependencies)
↓ completes
ImageResizerTask (depends on file task)
↓ completes
ActionCreatorTask (depends on both)
↓ executes
2. Exponential Backoff Retry
Tasks can retry on failure with increasing delays. RetryPolicy::new((min, max), times) takes a min/max backoff in seconds and a retry count; the default is ((60, 3600), 10). Retries only happen when the error is retryable (Error::is_retryable()) — permanent errors fail immediately. Backoff is min * 2^attempt, capped at max.
retry_policy = RetryPolicy::new((60, 3600), 5) // 60s..1h, up to 5 retries
scheduler
.task(ActionDeliveryTask(action_token, recipient))
.with_retry(retry_policy)
.schedule()
.with_automatic_retry() is a shortcut that applies the default policy.
After times retryable failures the task is marked failed and on_failed runs.
3. Cron Scheduling
Recurring tasks use cron expressions (5-field: minute hour day month weekday) or the convenience helpers daily_at(hour, minute) and weekly_at(weekday, hour, minute) (weekday 0=Sunday). After each run the scheduler computes the next execution and re-queues the task.
# Raw cron expression — every day at 9:00 AM
scheduler.task(CleanupTask(temp_dir)).cron("0 9 * * *").schedule()
# Every day at 2:30 AM
scheduler.task(CleanupTask(temp_dir)).daily_at(2, 30).schedule()
# Every Monday at 9:00 AM
scheduler.task(WeeklyReportTask()).weekly_at(1, 9, 0).schedule()
.run_on_startup() makes a cron task fire once immediately on startup if a scheduled run was missed while the server was down (or on first registration).
4. Persistence
Tasks are persisted to MetaAdapter and survive server restarts:
start_scheduler(app):
scheduler = Scheduler(app)
# Load unfinished tasks from database
pending_tasks = app.meta_adapter.list_pending_tasks()
for task_meta in pending_tasks:
# Rebuild task from serialized context
task = TaskRegistry.build(
task_meta.kind,
task_meta.id,
task_meta.context
)
# Re-queue task
scheduler.enqueue(task_meta.id, task)
# Start processing
scheduler.start()
Built-in Task Types
These are the task types registered at startup (scheduler.register::<T>()):
Task
Purpose
Location
ActionCreatorTask
Creates and signs action tokens for federation
cloudillo-action/src/task.rs
ActionVerifierTask
Validates incoming federated action tokens
cloudillo-action/src/task.rs
DraftPublishTask
Publishes scheduled draft actions
cloudillo-action/src/task.rs
ActionDeliveryTask
Delivers actions to remote instances with retry (POST to /api/inbox)
When a key is set, scheduling deduplicates: an existing task with the same key and identical serialized parameters is reused; if parameters changed, the stored task is updated in place. There is no per-task priority on the builder — the worker pool priority (high/medium/low) is chosen inside each task’s run() when it offloads CPU work.
Cloudillo’s Worker Pool provides a three-tier priority thread pool for executing CPU-intensive and blocking operations. This system complements the async runtime by handling work that shouldn’t block async tasks, ensuring responsive performance even under heavy computational load.
A job is just a boxed closure (Box<dyn FnOnce() + Send>); results are returned to the caller through a per-call oneshot channel, not stored in the job type.
Initialization
WorkerPool::new(n1, n2, n3) creates three unbounded flume channels and spawns OS threads:
n1 threads listen on High only.
n2 threads listen on High + Medium.
n3 threads listen on High + Medium + Low.
Each thread shares the same receivers (via Arc), so any idle thread on a queue can pick up the next job.
Worker Loop
Every worker — regardless of how many queues it serves — runs the same loop:
1. Priority pass: for each queue in priority order (high → ...),
try_recv() (non-blocking). If a job is found, run it and restart.
2. If all queues are empty, block on a flume Selector across all of the
thread's queues until any queue delivers a job.
3. Run the job inside catch_unwind so a panicking job cannot kill the thread.
The non-blocking priority pass ensures higher-priority work is always preferred; the Selector then parks the thread efficiently instead of busy-waiting.
API Usage
Each submission method takes a CPU-bound closure, sends it to a priority queue, and returns a Future that resolves with the closure’s result via a oneshot channel — so async callers offload CPU work without blocking the Tokio runtime.
Method
Queue
Notes
spawn(priority, f)
chosen by Priority
Generic entry point
run_immed(f)
High
“Run now”
run(f)
Medium
Default choice
run_slow(f)
Low
Background work
try_run*(f)
same as above
For closures returning ClResult<T>; flattens ClResult<ClResult<T>>
pubenumPriority { High, Medium, Low }
If a worker panics, its oneshot sender is dropped and the awaiting future resolves to an Internal error rather than hanging.
Priority Guidelines
Priority
Use For
Characteristics
High
Crypto during login, profile picture processing, real-time compression
User actively waiting, <100ms typical, <100 jobs/sec
Medium
Image variants for posts, file compression, data transforms
Background but needed soon, 100ms-10s, default choice
Tasks often use the worker pool for CPU-intensive work following this pattern:
Algorithm: Task with Worker Pool Integration
1. Async I/O: Load data from blob storage
2. CPU work: Execute on worker pool:
- Load image from memory
- Resize using high-quality filter (Lanczos3)
- Encode to desired format
- Return resized buffer
3. Async I/O: Store result to blob storage
This separates I/O (async) from CPU (worker thread), allowing:
- The async runtime to continue processing other tasks during image resizing
- Background tasks (Low priority) not to starve user-facing operations
- Efficient resource utilization
Configuration
The pool is constructed in server/src/main.rs with hardcoded thread counts:
WorkerPool::new(1, 2, 1) // high = 1, medium = 2, low = 1
This 1/2/1 split (4 threads total) suits mixed I/O and CPU workloads while leaving cores for the Tokio runtime. Adjusting it currently requires editing the source; there is no environment variable or runtime setting for worker counts.
See Also
Task Scheduler - Task scheduling system that uses worker pool
Actions - Cryptographic operations with worker pool
WebSocket Bus
Cloudillo’s WebSocket Bus provides real-time notifications for connected clients. It is a general-purpose broadcast channel — separate from the RTDB and CRDT WebSocket protocols.
WebSocket Endpoints Overview
Cloudillo provides three WebSocket endpoints for different real-time use cases:
Authentication: Required — the client is authenticated at connection time via the Axum auth middleware. Once connected, the connection is registered in the BroadcastManager per (tenant, user), so broadcasts can target a whole tenant or a single user.
The server sends a WebSocket Ping frame every 30 seconds to keep the connection alive; the connection is cleaned up when either side closes.
Message Protocol
All messages use JSON format. The bus uses a generic, flexible message structure rather than strict typed enums.
The bus is designed as a generic transport — application-specific command handling can be added without changing the protocol.
Server → Client Messages (Broadcasts)
The server pushes broadcast messages to connected clients via the BroadcastManager. Messages are delivered to all connections for a tenant (send_to_tenant) or to a specific user (send_to_user).
ACTION
Sent when an action is created locally or received via federation:
This is the primary real-time event — it notifies connected clients about new posts, comments, reactions, messages, connection requests, and all other action types.
notification
Sent by the action DSL hook system for targeted notifications:
Actions - Action token types that trigger notifications
Rate Limiting
Overview
Cloudillo implements rate limiting using GCRA (Generic Cell Rate Algorithm) with hierarchical address grouping and dual-tier limits to protect against abuse, DDoS attacks, and credential stuffing.
Hierarchical Address Levels
Requests are rate-limited at multiple network levels simultaneously. All levels must pass for a request to succeed.
IPv4 Levels
Level
Mask
Description
Example
Individual
/32
Single IP address
192.168.1.100
Network
/24
Class C network (256 IPs)
192.168.1.0/24
IPv6 Levels
Level
Mask
Description
Example
Subnet
/64
Single subnet
2001:db8:1234:5678::/64
Provider
/48
ISP allocation
2001:db8:1234::/48
Multi-Level Protection
A single abusive IP can’t overwhelm the system, but neither can a botnet spread across a /24 network. Both individual and network-level limits apply.
Globally, the limiter tracks up to 100,000 IPs, retaining each entry for one hour after its last request.
Proof-of-Work Protection
CONN (connection request) actions require proof-of-work when violations are detected from an IP address. Violations (failed signature, duplicate pending, rejected CONN) increment a counter tracked at both individual IP and network range levels. The counter decays by 1 every hour.
When PoW is required, the action token must end with N A characters (where N = counter value). For example, counter=2 requires the token to end with AA. The server responds with HTTP 428 (Precondition Required) when PoW is insufficient.
Parameter
Default
Description
max_counter
10
Maximum requirement (10 ‘A’ characters)
decay_interval_secs
3600
Counter decay interval (1 hour)
max_individual_entries
50,000
LRU cache size for individual IPs
max_network_entries
10,000
LRU cache size for network ranges
Rate-Limited Response
A rate-limited request returns 429 Too Many Requests with two headers and a JSON error body:
HTTP/1.1429Too Many RequestsRetry-After:60X-RateLimit-Level:ipv4_individual
A banned address instead receives 403 Forbidden with code E-RATE-BANNED. PoW failures return 428 Precondition Required with code E-POW-REQUIRED.
Configuration
Rate limits are defined in code (RateLimitConfig::default) and applied process-wide. They are not currently configurable per tenant via the settings system.
Cloudillo implements Web Push notifications using the VAPID (Voluntary Application Server Identification) protocol. Push notifications are sent when users receive actions while offline or not connected via WebSocket.
Each tenant has a P-256 VAPID key pair for authenticating with push services. The private key is stored in the database; the public key is shared with clients. Keys are generated automatically the first time the public key is requested. The server signs a VAPID JWT (ES256, 12-hour expiry, subject mailto:admin@<id_tag>) per push request.
Subscription Flow
sequenceDiagram
participant C as Client
participant SW as Service Worker
participant S as Cloudillo Server
participant PS as Push Service
C->>S: GET /api/auth/vapid
S-->>C: {vapidPublicKey: "BM5..."}
C->>SW: pushManager.subscribe({userVisibleOnly: true, applicationServerKey})
SW->>PS: Subscribe request
PS-->>SW: PushSubscription
SW-->>C: PushSubscription
C->>S: POST /api/notifications/subscription {subscription}
S-->>C: {id: 12345}
Push Delivery
When an action is received for an offline user:
sequenceDiagram
participant A as Action Sender
participant S as Cloudillo Server
participant PS as Push Service
participant B as User's Browser
A->>S: POST /api/inbox {action}
S->>S: Process action
S->>S: Check if recipient is online
alt User is online (WebSocket connected)
S->>B: WebSocket message
else User is offline
S->>S: Load push subscriptions
S->>S: Encrypt payload with user's public key
S->>PS: POST {encrypted payload}
PS->>B: Push notification
B->>B: Display notification
end
Notification Types
notify.push is the master switch. Per-event toggles let users choose which notifications they receive:
Setting
Default
Event
notify.push.message
true
Direct messages (MSG)
notify.push.connection
true
Connection requests (CONN)
notify.push.file_share
true
File shares (FSHR)
notify.push.comment
true
Comments on your posts (CMNT)
notify.push.mention
true
Mentions in posts
notify.push.follow
false
New followers (FLLW)
notify.push.reaction
false
Reactions to your posts (REACT)
notify.push.post
false
Posts from people you follow (POST)
An equivalent notify.email.* set controls email notifications (master switch notify.email is off by default). Settings are tenant-scoped and checked before sending.
Encryption
Push payloads are encrypted with the browser subscription’s P-256 public key (p256dh) and auth secret using the ece (Encrypted Content-Encoding, aes128gcm) scheme. The push service relays the ciphertext but cannot read it. The encrypted body already embeds the salt and server public key in its header, and is POSTed with Content-Encoding: aes128gcm and TTL: 86400.
Payload Structure
The encrypted payload is the NotificationPayload serialized as JSON:
{
"title": "Alice",
"body": "New message from Alice",
"path": "/messages/alice@example.com"}
Field
Description
title
Notification title
body
Notification body text
path
URL path to open when clicked (optional)
image
Image URL (optional)
tag
Tag for grouping notifications (optional)
Subscription Management
Users can have multiple push subscriptions (one per device/browser). Each subscription has a unique ID, and all active subscriptions receive notifications.
Push subscriptions can expire when the browser reports expiration, the push service responds with HTTP 404/410, or the user manually unsubscribes. Invalid subscriptions are removed automatically.
Error Handling
The push result is classified by the push service’s HTTP status:
Welcome to the Cloudillo API documentation for application developers. This guide will help you build applications on top of the Cloudillo decentralized collaboration platform.
What is Cloudillo?
Cloudillo is an open-source, decentralized collaboration platform that enables users to maintain control over their data while seamlessly collaborating with others. Built on DNS-based identity and cryptographically signed action tokens, Cloudillo allows users to self-host, use community servers, or choose third-party providers without vendor lock-in.
For Application Developers
Cloudillo provides a comprehensive set of APIs and client libraries for building:
Collaborative applications with real-time synchronization
Social features using action tokens (posts, comments, reactions)
Rich content editors with CRDT-based conflict-free editing
File management with automatic image variants
Real-time databases with Firebase-like APIs
Microfrontend applications that integrate with the Cloudillo shell
API Overview
Client Libraries (TypeScript/JavaScript)
@cloudillo/core - Core SDK for initialization and API access
Every user in Cloudillo has an identity tag (idTag) based on a domain name (e.g., alice@example.com). This decouples identity from storage location, allowing users to migrate their data between providers while maintaining their identity.
Action Tokens
Actions are cryptographically signed events that represent user activities:
Cloudillo is designed for multi-tenant deployments. Every request includes a tenant ID (tnId) that isolates data between tenants. Application developers typically don’t need to manage this directly - it’s handled by the client libraries.
Real-Time Collaboration
Cloudillo provides three levels of real-time collaboration:
CRDT - Conflict-free collaborative editing using Yjs
RTDB - Real-time database with structured queries
Message Bus - Pub/sub for notifications and presence
import { getAppBus, createApiClient, openYDoc } from'@cloudillo/core'import*asYfrom'yjs'// Get message bus singleton
constbus=getAppBus()
// Initialize your app
awaitbus.init('my-app')
// Access state via bus properties
console.log('User:', bus.idTag)
console.log('Tenant:', bus.tnId)
console.log('Roles:', bus.roles)
// Create an API client
constapi=createApiClient({
idTag: bus.idTag!,
authToken: bus.accessToken})
// Fetch the user's profile
constprofile=awaitapi.profiles.getOwn()
// Open a collaborative document
constyDoc=newY.Doc()
const { provider } =awaitopenYDoc(yDoc, 'owner:my-document-id')
// Use the CRDT
constyText=yDoc.getText('content')
yText.insert(0, 'Hello, Cloudillo!')
Cloudillo is open source software licensed under the MIT License.
Subsections of API Documentation
Quick Start
Cloudillo applications are microfrontends that run inside the Cloudillo shell. The shell handles authentication, theming and navigation — your app just needs to initialize and start building.
import { getAppBus, createApiClient } from'@cloudillo/core'constbus=getAppBus()
awaitbus.init('my-app')
// You now have: bus.idTag, bus.accessToken, bus.tnId, bus.roles, bus.darkMode
You never implement registration, login or token management — the shell provides all of that through the message bus.
Choose your path
Pick the type of app you’re building and follow the links to the most relevant guides:
import { getAppBus } from'@cloudillo/core'constbus=getAppBus()
awaitbus.init('my-app')
// Check dark mode preference
if (bus.darkMode) {
document.body.classList.add('dark-theme')
}
Using Query Parameters
import { getAppBus, createApiClient } from'@cloudillo/core'constbus=getAppBus()
awaitbus.init('my-app')
constapi=createApiClient({
idTag: bus.idTag!,
authToken: bus.accessToken})
// List actions with filters
constposts=awaitapi.actions.list({
type:'POST',
status:'A', // Active
limit: 20})
Uploading Files
import { getAppBus, createApiClient } from'@cloudillo/core'constbus=getAppBus()
awaitbus.init('my-app')
constapi=createApiClient({
idTag: bus.idTag!,
authToken: bus.accessToken})
// Upload a file using the uploadBlob helper
constresult=awaitapi.files.uploadBlob(
'gallery', // preset
'image.png', // fileName
imageBlob, // file data
'image/png'// contentType
)
console.log('Uploaded file:', result.fileId)
Build and Deploy
Development
Most apps run as microfrontends inside the Cloudillo shell. Use your preferred build tool (Rollup, Webpack, Vite):
# Using Rollup (like the example apps)pnpm build
# Using Vitevite build
Production
Deploy your built app to any static hosting:
# The built output goes to the shell's apps directorycp -r dist /path/to/cloudillo/shell/public/apps/my-app
Troubleshooting
“Failed to initialize”
Make sure you’re either:
Running inside the Cloudillo shell (as a microfrontend), or
Providing authentication manually for standalone apps
“CORS errors”
Ensure your Cloudillo server is configured to allow requests from your app’s origin.
“WebSocket connection failed”
Check that:
The WebSocket URL is correct (wss:// for production)
The server is running and accessible
Your authentication token is valid
Example Apps
Check out the example apps in the Cloudillo repository:
Quillo - Rich text editor with Quill
Prello - Presentation tool
Sheello - Spreadsheet application
Formillo - Form builder
Todollo - Task management
All use the same patterns described in this guide.
Authentication
Cloudillo uses JWT-based authentication with three types of tokens for different use cases. This guide explains how authentication works and how to use it in your applications.
Token Types
1. Access Token (Session Token)
The access token is your primary authentication credential for API requests.
// The access token is automatically managed by @cloudillo/core
import*ascloudillofrom'@cloudillo/core'consttoken=awaitcloudillo.init('my-app')
// Token is now stored and used automatically for all API calls
// Or access it directly
console.log(cloudillo.accessToken)
2. Action Token (Federation Token)
Action tokens are cryptographically signed events used for federation between Cloudillo instances.
Characteristics:
Represents a specific action (POST, CMNT, REACT, etc.)
Signed by the issuer’s private key
Can be verified by anyone with the issuer’s public key
Enables trust-free federation
Usage:
// Action tokens are created automatically when you post actions
constapi=cloudillo.createApiClient()
constaction=awaitapi.actions.create({
type:'POST',
content: { text:'Hello, world!' }
})
// The server automatically signs the action with your key
// Other instances can verify it without trusting your server
3. Proxy Token (Cross-Instance Token)
Proxy tokens enable accessing resources on remote Cloudillo instances.
Characteristics:
Short-lived (typically 5 minutes)
Grants read access to specific resources
Used for federation scenarios
Usage:
constapi=cloudillo.createApiClient()
// Get a proxy token for accessing a remote instance
constproxyToken=awaitapi.auth.proxyToken.get()
// Use it to fetch resources from another instance
// (typically handled automatically by the client)
Authentication Flow
For Microfrontend Apps
When running inside the Cloudillo shell, authentication is handled automatically:
import*ascloudillofrom'@cloudillo/core'// The init() function receives the token from the shell via postMessage
consttoken=awaitcloudillo.init('my-app')
// All API calls now use this token automatically
constapi=cloudillo.createApiClient()
constprofile=awaitapi.profiles.getOwn() // Authenticated request
For Standalone Apps
For standalone applications, you need to handle authentication manually:
import*ascloudillofrom'@cloudillo/core'awaitcloudillo.init('my-app')
// Check if user has a specific role
if (cloudillo.roles?.includes('admin')) {
console.log('User is an admin')
}
// Enable/disable features based on roles
constcanModerate=cloudillo.roles?.includes('admin') ||cloudillo.roles?.includes('moderator')
Requesting Specific Roles
// Request an access token with specific roles
constresponse=awaitfetch(
'/auth/access-token?idTag=alice@example.com&password=secret&roles=user,admin')
Token Validation
All tokens are validated on the server for:
Signature verification - Using ES384 algorithm
Expiration check - Tokens expire after a set period
Tenant isolation - Tokens are tied to specific tenants
Role validation - Roles must be granted by the server
Security Best Practices
1. Token Storage
For web apps:
// Don't store tokens in localStorage (XSS vulnerable)
// ❌ localStorage.setItem('token', token)
// Use memory storage (managed by @cloudillo/core)
// ✅ cloudillo.accessToken = token
// Or use httpOnly cookies (server-side)
import { FetchError } from'@cloudillo/core'try {
constapi=cloudillo.createApiClient()
constdata=awaitapi.profiles.getOwn()
} catch (error) {
if (errorinstanceofFetchError) {
if (error.code==='E-AUTH-UNAUTH') {
// Unauthorized - token expired or invalid
window.location.href='/login' } elseif (error.code==='E-AUTH-FORBID') {
// Forbidden - insufficient permissions
alert('You do not have permission to access this resource')
}
}
}
4. HTTPS Only
Always use HTTPS in production:
// ✅ Good
constapi=cloudillo.createApiClient({
baseUrl:'https://api.cloudillo.com'})
// ❌ Bad (only for local development)
constapi=cloudillo.createApiClient({
baseUrl:'http://localhost:3000'})
WebAuthn Support
Cloudillo supports WebAuthn for passwordless authentication.
Registration Flow
// 1. Get registration options from server
constoptionsResponse=awaitfetch('/auth/webauthn/register/options', {
method:'POST',
headers: { 'Content-Type':'application/json' },
body: JSON.stringify({ idTag:'alice@example.com' })
})
constoptions=awaitoptionsResponse.json()
// 2. Create credential with browser WebAuthn API
constcredential=awaitnavigator.credentials.create({
publicKey: options})
// 3. Verify credential with server
constverifyResponse=awaitfetch('/auth/webauthn/register/verify', {
method:'POST',
headers: { 'Content-Type':'application/json' },
body: JSON.stringify({
idTag:'alice@example.com',
credential: {
id: credential.id,
rawId: Array.from(newUint8Array(credential.rawId)),
response: {
clientDataJSON: Array.from(newUint8Array(credential.response.clientDataJSON)),
attestationObject: Array.from(newUint8Array(credential.response.attestationObject))
},
type:credential.type }
})
})
// The tnId is automatically included in all requests
console.log('Tenant ID:', cloudillo.tnId)
// Tokens are tenant-specific and cannot access other tenants' data
// This is enforced at the database level for security
// Check token expiration and refresh
asyncfunctionensureAuthenticated() {constapi=cloudillo.createApiClient()
try {
// Try to use the current token
awaitapi.profiles.getOwn()
} catch (error) {
if (error.code==='E-AUTH-UNAUTH') {
// Token expired, get a new one
const { token } =awaitapi.auth.loginToken.get()
cloudillo.accessToken=token }
}
}
Cloudillo provides a comprehensive set of TypeScript/JavaScript client libraries for building applications. These libraries handle authentication, API communication, real-time synchronization, and React integration.
import { getAppBus } from'@cloudillo/core'// Get message bus singleton
constbus=getAppBus()
// Initialize (gets token from shell)
conststate=awaitbus.init('my-app')
// Access auth state via bus properties
console.log(bus.idTag) // User's identity
console.log(bus.tnId) // Tenant ID
console.log(bus.roles) // User roles
console.log(bus.accessToken) // JWT token
console.log(bus.access) // 'read' or 'write'
The @cloudillo/core library is the core SDK for Cloudillo applications. It provides initialization via the message bus, API client creation, CRDT document support, and URL helpers.
Installation
pnpm add @cloudillo/core
Core Pattern: AppMessageBus
The main API is accessed through the getAppBus() singleton. This provides authentication state, storage, and shell communication for apps running in the Cloudillo shell.
import { getAppBus } from'@cloudillo/core'// Get the singleton message bus
constbus=getAppBus()
// Initialize your app (communicates with shell)
conststate=awaitbus.init('my-app')
// Access state via bus properties
console.log('Token:', bus.accessToken)
console.log('User ID:', bus.idTag)
console.log('Tenant ID:', bus.tnId)
console.log('Roles:', bus.roles)
console.log('Access level:', bus.access)
console.log('Dark mode:', bus.darkMode)
AppState Properties
After calling bus.init(), these properties are available on the bus:
Property
Type
Description
accessToken
string | undefined
Current JWT access token
idTag
string | undefined
User’s identity tag (e.g., “alice.cloudillo.net”)
tnId
number | undefined
Tenant ID
roles
string[] | undefined
User’s roles
access
'read' | 'write'
Access level to current resource
darkMode
boolean
Dark mode preference
tokenLifetime
number | undefined
Token lifetime in seconds
displayName
string | undefined
Display name (for anonymous guests)
embedded
boolean
Whether the app is running as an embedded document
theme
string | undefined
Theme name
navState
string | undefined
Initial navigation state (from parent embed or shell)
ancestors
string[] | undefined
Ancestor file IDs in the embed chain
Storage API
The bus provides namespaced key-value storage:
constbus=getAppBus()
awaitbus.init('my-app')
// Store data
awaitbus.storage.set('my-app', 'settings', { theme:'dark' })
// Retrieve data
constsettings=awaitbus.storage.get<{ theme: string }>('my-app', 'settings')
// List keys
constkeys=awaitbus.storage.list('my-app', 'user-')
// Delete data
awaitbus.storage.delete('my-app', 'settings')
// Clear namespace
awaitbus.storage.clear('my-app')
// Check quota
constquota=awaitbus.storage.quota('my-app')
console.log(`Used ${quota.used} of ${quota.limit} bytes`)
App Lifecycle Notifications
Notify the shell about your app’s loading progress:
constbus=getAppBus()
awaitbus.init('my-app')
// After auth init (called automatically by init())
bus.notifyReady('auth')
// After CRDT sync complete
bus.notifyReady('synced')
// When fully interactive
bus.notifyReady('ready')
interfaceAuthState {
tnId: number// Tenant ID
idTag?: string// Identity tag (e.g., "alice.cloudillo.net")
name?: string// Display name
profilePic?: string// Profile picture ID
roles?: string[] // Community roles
token?: string// JWT access token
}
Usage patterns:
// Destructure the tuple
const [auth, setAuth] =useAuth()
// Check if user is authenticated
if (!auth?.idTag) {
return <LoginPrompt />
}
// Check for specific role
if (auth?.roles?.includes('admin')) {
return <AdminPanel />
}
// Update auth state (typically done by useCloudillo)
setAuth({
tnId: 123,
idTag:'alice.cloudillo.net',
token:'jwt-token'})
useApi()
Get a type-safe API client with automatic caching per idTag/token combination.
interfaceApiHook {
api: ApiClient|null// Type-safe API client (null if no idTag)
authenticated: boolean// Whether user has a token
setIdTag: (idTag: string) =>void// Set idTag for login flow
}
The API client is the same as returned by createApiClient() from @cloudillo/core.
api can be null
api is null until an idTag is available (either from auth state or set via setIdTag). Always check for null before using.
useCloudillo()
Unified hook for microfrontend app initialization. Handles shell communication, authentication, and document context.
Parses ownerTag and fileId from location.hash (format: #ownerTag:fileId)
Updates auth state via useAuth()
Returns combined state from bus and URL
Returns:
interfaceUseCloudillo {
token?: string// Access token
ownerTag: string// Owner of the current document (from URL hash)
fileId?: string// Current file/document ID (from URL hash)
idTag?: string// Current user's identity tag
tnId?: number// Tenant ID
roles?: string[] // User's roles
access?:'read'|'write'// Access level to current resource
displayName?: string// User's display name (for anonymous guests)
}
useCloudilloEditor()
Extended hook for CRDT-based collaborative document editing. Returns everything from useCloudillo() plus Yjs document and sync state.
import { useCloudilloEditor } from'@cloudillo/react'functionCollaborativeEditor() {const { token, yDoc, provider, synced, ownerTag, fileId, access } =useCloudilloEditor('quillo')
if (!synced) return <LoadingSpinner />
// Use yDoc with your editor binding (Quill, TipTap, Monaco, etc.)
constyText=yDoc.getText('content')
return <QuillEditoryText={yText} provider={provider} />
}
This hook:
Calls useCloudillo(appName) internally
Opens CRDT connection via openYDoc() from @cloudillo/crdt when token and docId are available
Listens for sync events and notifies shell via bus.notifyReady('synced')
import { EmptyState } from'@cloudillo/react'<EmptyStateicon={<FilesIcon />}
title="No files yet"description="Upload your first file to get started"action={<Button>UploadFile</Button>}
/>
Profile Components
Avatar, AvatarStatus, AvatarBadge, AvatarGroup
User avatar components.
import { Avatar, AvatarStatus, AvatarBadge, AvatarGroup } from'@cloudillo/react'// Basic avatar
<Avatarsrc={profilePic} name="Alice"size="md" />
// With status indicator
<Avatarsrc={profilePic}>
<AvatarStatusstatus="online" />
</Avatar>
// With badge
<Avatarsrc={profilePic}>
<AvatarBadge>3</AvatarBadge>
</Avatar>
// Group of avatars
<AvatarGroupmax={3}>
<Avatarsrc={user1.pic} name={user1.name} />
<Avatarsrc={user2.pic} name={user2.name} />
<Avatarsrc={user3.pic} name={user3.name} />
<Avatarsrc={user4.pic} name={user4.name} />
</AvatarGroup>
ACK (Acknowledgment) and RSTAT (Reaction Statistics) exist as action variants in the tagged union (tBaseAction) but are not part of the ActionType literal type. They are used internally for specific action handling.
ActionStatus
Action status enumeration.
importtype { ActionStatus } from'@cloudillo/types'conststatus: ActionStatus=|'P'// Pending (draft/unpublished)
|'A'// Active (default - published/finalized)
|'D'// Deleted (soft delete)
|'C'// Created (pending approval, e.g., connection requests)
|'N'// New (notification awaiting acknowledgment)
|'R'// Draft (saved but not yet published)
|'S'// Scheduled (draft with confirmed publish time)
All types include runtime validators using @symbion/runtype:
import { ProfileValidator, ActionValidator } from'@cloudillo/types'// Validate data at runtime
constdata=awaitapi.profiles.getOwn()
if (ProfileValidator.validate(data)) {
// TypeScript knows data is a valid Profile
console.log(data.idTag)
} else {
console.error('Invalid profile data')
}
React components and hooks for interactive object manipulation in SVG canvas applications. Provides transform gizmos, rotation handles, pivot controls, and gradient pickers for building drawing and design tools.
Installation
pnpm add @cloudillo/canvas-tools
Peer Dependencies:
react >= 18
react-svg-canvas
Components
TransformGizmo
Complete transform control for SVG objects with rotation, scaling, and positioning.
import {
interpolateColor,
getColorAtPosition} from'@cloudillo/canvas-tools'// Blend two colors
constmixed=interpolateColor('#ff0000', '#0000ff', 0.5)
// "#800080"
// Get color at position in gradient
constcolorAt25=getColorAtPosition(gradient.stops, 0.25)
import {
GRADIENT_PRESETS,
getPresetsByCategory,
getPresetById,
getCategories} from'@cloudillo/canvas-tools'// Get all categories
constcategories=getCategories()
// ['warm', 'cool', 'vibrant', 'subtle', 'monochrome']
// Get presets in a category
constwarmGradients=getPresetsByCategory('warm')
// Get specific preset
constsunset=getPresetById('sunset')
The @cloudillo/fonts library provides a curated collection of Google Fonts metadata and pairing suggestions for Cloudillo applications. It enables font selection UIs, typography systems, and design tools.
Key Features:
Curated font metadata for 22 Google Fonts
Pre-defined font pairings (heading + body combinations)
Helper functions for filtering and lookup
Full TypeScript support
Installation
pnpm add @cloudillo/fonts
Font Metadata API
FONTS Constant
The FONTS array contains metadata for all available fonts.
import { FONTS } from'@cloudillo/fonts'// List all fonts
FONTS.forEach(font=> {
console.log(font.displayName, font.category, font.roles)
})
sans-serif - Clean, modern fonts (Roboto, Open Sans, Montserrat, etc.)
serif - Traditional fonts with serifs (Playfair Display, Merriweather, etc.)
display - Decorative fonts for headlines (Oswald, Bebas Neue, etc.)
monospace - Fixed-width fonts (JetBrains Mono)
getFontsByRole
Filter fonts by intended use.
import { getFontsByRole } from'@cloudillo/fonts'constheadingFonts=getFontsByRole('heading')
// Fonts suitable for headings: Roboto, Montserrat, Poppins, Playfair Display, etc.
constbodyFonts=getFontsByRole('body')
// Fonts suitable for body text: Roboto, Open Sans, Lato, Inter, etc.
Available roles:
heading - Suitable for titles and headings
body - Suitable for body text
display - Decorative, for large display text
mono - Monospace, for code
Font Pairings API
The library includes curated heading + body font combinations that work well together.
import { getPairingsForFont } from'@cloudillo/fonts'constrobotoPairings=getPairingsForFont('Roboto')
// Returns pairings where Roboto is used as heading or body
interfaceFontWeight {
value: number// CSS font-weight value (400, 700, etc.)
label: string// Display name ('Regular', 'Bold', etc.)
italic?: boolean// Whether this is an italic variant
}
FontMetadata
interfaceFontMetadata {
family: string// CSS font-family value
displayName: string// Human-readable name
category: FontCategory// Font category
roles: FontRole[] // Suitable roles
weights: FontWeight[] // Available weights
hasItalic: boolean// Has italic variants
license:'OFL'|'Apache-2.0'directory: string// Font directory name
}
FontPairing
interfaceFontPairing {
id: string// Unique identifier
name: string// Human-readable name
heading: string// Heading font family
body: string// Body font family
description: string// Pairing description
}
Integration with FontPicker
The @cloudillo/fonts library works with the FontPicker component from @cloudillo/react.
Idiomatic ways to combine Cloudillo APIs when building apps. Each pattern shows the minimal Cloudillo-specific code — wrap in your own components as needed. For full API details, see the linked reference pages.
Data loading
Paginated lists (infinite scroll)
Cloudillo list APIs use cursor-based pagination. The useInfiniteScroll hook from @cloudillo/react manages cursor tracking, accumulates items across pages, and triggers loading via IntersectionObserver when a sentinel element becomes visible.
Attach sentinelRef to a <div> at the bottom of your list — it automatically triggers loadMore when scrolled into view. Use prepend() to insert real-time updates at the top without resetting the list.
The useCloudilloEditor hook sets up a Yjs document with WebSocket sync. It returns a Y.Doc and a WebsocketProvider — bind these to any Yjs-compatible editor (Quill, ProseMirror, CodeMirror, BlockNote). Wait for synced before initializing the editor binding.
import { useCloudilloEditor } from'@cloudillo/react'const { yDoc, provider, synced, error, ownerTag, fileId } =useCloudilloEditor('my-app')
// Once synced, bind to your editor:
constyText=yDoc.getText('content')
constbinding=newQuillBinding(yText, quill, provider.awareness)
The error field captures connection errors (e.g., 440x codes from the CRDT server) so you can show appropriate UI.
Cloudillo connections are bidirectional. Send a request by creating a CONN action, and accept incoming requests with accept:
// Send a connection request
awaitapi.actions.create({
type:'CONN',
subject: profile.idTag,
content:'Would love to connect!'})
// Accept an incoming request
awaitapi.actions.accept(actionId)
Check profile.connected for the current connection state:
Use api.files.uploadBlob with a preset name. The preset determines what variants (thumbnail, standard definition) are automatically generated server-side:
Service worker encryption key for push notifications (optional)
Combined Login Init
POST /api/auth/login-init
Combined login initialization that returns all available authentication methods in a single request. If the user already has a valid token, returns the authenticated session directly.
constresult=awaitapi.profile.register({
type:'idp',
idTag:'alice@example.com',
email:'alice@gmail.com',
token:'registration-token'})
// User is now registered and logged in
console.log('Registered:', result.data.idTag)
Create Community
PUT /api/profiles/{id_tag}
Create a new community profile. The authenticated user becomes the community owner.
// First verify the community name is available
constcheck=awaitapi.profile.verify({
idTag:'devs@example.com',
type:'idp'})
if (check.data.available) {
constresponse=awaitfetch('/api/profiles/devs@example.com', {
method:'PUT',
headers: {
'Authorization':`Bearer ${token}`,
'Content-Type':'application/json' },
body: JSON.stringify({
type:'idp',
name:'Developer Community' })
})
constcommunity=awaitresponse.json()
console.log('Created community:', community.data.idTag)
}
Community Ownership
The authenticated user who creates the community becomes the owner. Only the owner can manage community settings and membership.
Profile Management
Get Own Profile
GET /api/me
Get the authenticated user’s profile (requires authentication). For the public server identity endpoint, see GET /api/me in the Authentication API.
connected - Filter by connection status (disconnected, pending, connected)
following - Filter by follow status (true/false)
q - Search query for name
idTag - Filter by specific identity tag
Example:
// List all communities
constcommunities=awaitapi.profiles.list({
type:'community'})
// List connected profiles
constfriends=awaitapi.profiles.list({
connected:'connected'})
// Search for profiles
constresults=awaitapi.profiles.list({
q:'alice'})
Update Relationship
PATCH /api/profiles/:idTag
Update your relationship with another profile (follow, block, etc.).
Only draft actions (status R) can be updated. Published actions are signed JWTs and cannot be modified.
Delete Action
DELETE /api/actions/:actionId
Delete an action. Only the issuer can delete their actions.
Authentication: Required (must be issuer)
Example:
awaitapi.actions.delete('act_123')
Response:
{
"data": "ok"}
Accept Action
POST /api/actions/:actionId/accept
Accept a pending action (e.g., connection request, follow request).
Authentication: Required (must be the subject/target)
DSL Hooks: When an action is accepted, the server triggers the on_accept hook defined in the action type’s DSL configuration. This can execute custom logic such as:
Creating reciprocal connections (CONN actions)
Adding the user to groups (INVT actions)
Granting permissions (FSHR actions)
Example:
// Accept a connection request
awaitapi.actions.accept('act_connreq123')
// Accept a follow request (for private accounts)
awaitapi.actions.accept('act_follow456')
Response:
{
"data": {
"actionId": "act_connreq123",
"status": "A" }
}
Reject Action
POST /api/actions/:actionId/reject
Reject a pending action.
Authentication: Required (must be the subject/target)
DSL Hooks: When an action is rejected, the server triggers the on_reject hook defined in the action type’s DSL configuration. This can execute cleanup logic such as:
Receive federated actions from other Cloudillo instances. This is the primary endpoint for cross-instance action delivery. Processing is asynchronous.
Authentication: Not required (actions are verified via signatures)
Request Body: Action token (JWT)
Example:
// This is typically called by other Cloudillo servers
constactionToken='eyJhbGc...'// Signed action token
constresponse=awaitfetch('/api/inbox', {
method:'POST',
headers: {
'Content-Type':'application/jwt' },
body: actionToken})
Receive federated actions with synchronous processing. Unlike the standard inbox, this endpoint processes the action immediately and returns the result.
Authentication: Not required (actions are verified via signatures)
Both inbox endpoints verify the action signature against the issuer’s public key before accepting it.
Action Status Flow
Actions have a lifecycle represented by status:
R (Draft) → S (Scheduled) → A (Active/Published)
→ A (Active) ↘ R (Cancelled)
↘ D (Deleted)
C (Created) → A (Active/Accepted)
↘ D (Deleted/Rejected)
N (New) → (Dismissed)
P (Pending) → A (Active)
↘ D (Deleted)
R (Draft): Unpublished draft, can be edited
S (Scheduled): Scheduled for future publication
A (Active): Published, visible, and finalized
D (Deleted): Soft-deleted or rejected
C (Created): Awaiting acceptance (e.g., connection requests)
N (New): Notification awaiting acknowledgment
P (Pending): Legacy pending status
Status transitions:
Draft actions can be updated, published, scheduled, or deleted
Scheduled actions can be cancelled (reverts to Draft) or auto-publish at scheduled time
Created actions can be accepted (→ Active) or rejected (→ Deleted)
New notifications can be dismissed
Any action can be deleted by issuer (changes status to Deleted)
Content Schemas
Different action types have different content structures:
Actions have visibility levels that control who can see them:
Code
Level
Description
P
Public
Anyone can view
V
Verified
Authenticated users only
F
Follower
User’s followers only
C
Connected
Mutual connections only
null
Direct
Owner + explicit audience
// Create a public post
constpublicPost=awaitapi.actions.create({
type:'POST',
visibility:'P',
content: { text:'Hello everyone!' }
})
// Create a followers-only post
constfollowersPost=awaitapi.actions.create({
type:'POST',
visibility:'F',
content: { text:'Just for my followers' }
})
The Files API handles file upload, download, and management in Cloudillo. It supports four file types: BLOB (binary files), CRDT (collaborative documents), RTDB (real-time databases), and FLDR (folders).
File Types
Type
Description
Use Cases
BLOB
Binary files (images, PDFs, etc.)
Photos, documents, attachments
CRDT
Collaborative documents
Rich text, spreadsheets, diagrams
RTDB
Real-time databases
Structured data, forms, todos
FLDR
Folders
Organize files hierarchically
File Status
Code
Status
Description
A
Active
File is available
P
Pending
File is being processed
D
Deleted
File is in trash
Image Variants
For BLOB images, Cloudillo automatically generates 5 variants:
Variant
Code
Max Dimension
Quality
Format
Thumbnail
tn
150px
Medium
JPEG/WebP
Icon
ic
64px
Medium
JPEG/WebP
SD
sd
640px
Medium
JPEG/WebP
HD
hd
1920px
High
JPEG/WebP
Original
orig
Original
Original
Original
Automatic format selection:
Modern browsers: WebP or AVIF
Fallback: JPEG or PNG
Endpoints
List Files
GET /api/files
List all files accessible to the user. Uses cursor-based pagination.
Note: For BLOB files (images, PDFs, etc.), use POST /api/files/{preset}/{file_name} instead, which creates metadata and uploads the file in a single step.
Upload File (BLOB)
POST /api/files/{preset}/{file_name}
Upload binary file data directly. This creates the file metadata and uploads the binary in a single operation.
Download a file. Returns binary data with appropriate Content-Type.
Query Parameters:
variant - Image variant (tn, ic, sd, hd, orig)
Example:
// Direct URL usage
<imgsrc="/api/files/b1~abc123" />
// Get specific variant
<imgsrc="/api/files/b1~abc123?variant=sd" />
// Fetch with API
constresponse=awaitfetch(`/api/files/${fileId}`)
constblob=awaitresponse.blob()
consturl=URL.createObjectURL(blob)
Update user-specific file metadata (pinned, starred). This updates only the authenticated user’s relationship with the file, not the file itself. Users can pin/star any file they have read access to.
Use hyphens for multi-word tags (e.g., project-alpha)
Limit to 3-5 tags per file
Use namespaced tags for projects (e.g., proj:alpha, proj:beta)
Tag filtering:
// Files with ANY of these tags
constfiles=awaitapi.files.list({
tags:'vacation,travel'})
// Files with ALL of these tags (use multiple requests)
constvacationFiles=awaitapi.files.list({ tags:'vacation' })
constsummerFiles=vacationFiles.data.filter(f=>f.tags?.includes('summer')
)
Permissions
File access is controlled by:
Ownership - Owner has full access
FSHR actions - Files shared via FSHR actions grant temporary access
Public files - Files attached to public actions are publicly accessible
Audience - Files attached to actions inherit action audience permissions
Sharing a file:
// Share file with read access
awaitapi.actions.create({
type:'FSHR',
subject:'bob@example.com',
attachments: ['b1~abc123'],
content: {
permission:'READ', // or 'WRITE'
message:'Check out this photo!' }
})
Storage Considerations
File size limits:
Free tier: 100 MB per file
Pro tier: 1 GB per file
Enterprise: Configurable
Total storage:
Free tier: 10 GB
Pro tier: 100 GB
Enterprise: Unlimited
Variant generation:
Only for image files (JPEG, PNG, WebP, AVIF, GIF)
Automatic async processing
Lanczos3 filtering for high quality
Progressive JPEG for faster loading
Best Practices
1. Always Create Metadata First
// ✅ Correct order
constmetadata=awaitapi.files.create({ fileTp:'BLOB', contentType:'image/png' })
awaituploadBinary(metadata.fileId, imageBlob)
// ❌ Wrong - upload will fail without metadata
awaituploadBinary('unknown-id', imageBlob)
2. Use Appropriate Variants
// ✅ Use thumbnails in lists
<imgsrc={`/api/files/${fileId}?variant=tn`} />
// ✅ Use HD for detail views
<imgsrc={`/api/files/${fileId}?variant=hd`} />
// ❌ Don't use original for thumbnails (wastes bandwidth)
<imgsrc={`/api/files/${fileId}`} width="100" />
// Get all settings
constsettings=awaitapi.settings.get()
// Get specific setting
consttheme=awaitapi.settings.name('theme').get()
// Update setting
awaitapi.settings.name('theme').put('light')
awaitapi.settings.name('fontSize').put(16)
awaitapi.settings.name('notifications').put(true)
Common Settings
theme - UI theme preference
language - User language
fontSize - Text size
notifications - Enable/disable notifications
darkMode - Dark mode preference
Apps API
Overview
The Apps API manages app packages (APKGs) in Cloudillo. Apps are microfrontend plugins that extend the platform with new functionality.
Endpoints
List Available Apps
GET /api/apps
List all available apps published on the platform.
Authentication: Optional
Query Parameters:
search - Search term (matches app name, description, tags)
References (refs) are shareable tokens for various workflows including file sharing, email verification, password reset, and invitations. They support configurable expiration, usage limits, and access levels.
Endpoints
List References
GET /api/refs
List references for the current tenant.
Authentication: Required
Query Parameters:
Parameter
Type
Required
Description
type
string
No
Filter by type (e.g., share.file, email-verify)
filter
string
No
Status filter: active, used, expired, all (default: active)
// List all active file shares
constshares=awaitapi.refs.list({
type:'share.file',
filter:'active'})
// List shares for a specific file
constfileShares=awaitapi.refs.list({
resourceId:'f1~xyz789'})
Actions API - FSHR actions for federation-level sharing
Identity Provider API
Overview
The Identity Provider (IDP) API enables identity management for Cloudillo’s DNS-based identity system. It allows identity providers to register, manage, and activate identities within their domain.
IDP Availability
IDP functionality must be enabled for the tenant. When disabled, all IDP endpoints return 404 Not Found.
Public Endpoints
These endpoints are available without authentication.
Get IDP Info
GET /api/idp/info
Get public information about this Identity Provider. Used by registration UIs to help users choose a provider.
import { createApiClient } from'@cloudillo/core'constapi=createApiClient({ idTag:'alice.cloudillo.net', authToken: token })
// List all tags
consttags=awaitapi.tags.list()
// List tags with prefix
constprojectTags=awaitapi.tags.list({ prefix:'proj-' })
// Add tag to file
awaitapi.files.addTag(fileId, 'important')
// Remove tag from file
awaitapi.files.removeTag(fileId, 'old-tag')
Tag Naming Conventions
Tags are case-sensitive
Use lowercase with hyphens for consistency: project-alpha, q1-2025
Avoid special characters except hyphens and underscores
Keep tags concise but descriptive
Filtering Files by Tag
// List files with a specific tag
constfiles=awaitapi.files.list({ tag:'important' })
// Multiple tags (all must match)
constfiles=awaitapi.files.list({ tags: ['project-alpha', 'active'] })
The Push Notifications API enables Web Push notifications for Cloudillo. It uses the VAPID (Voluntary Application Server Identification) protocol to securely deliver notifications to users’ browsers when they’re offline.
Push notifications are sent when actions are received for the user while they are not connected via WebSocket.
Endpoints
Get VAPID Public Key
GET /api/auth/vapid
Get the VAPID public key for subscribing to push notifications. The key is automatically generated on first request if it doesn’t exist.
Authentication: Required
Response:
{
"vapidPublicKey": "BM5..."}
Field
Type
Description
vapidPublicKey
string
Base64-encoded VAPID public key
Example:
constresponse=awaitapi.notifications.getVapidPublicKey()
constvapidPublicKey=response.vapidPublicKey// Use with browser Push API
constsubscription=awaitregistration.pushManager.subscribe({
userVisibleOnly: true,
applicationServerKey: vapidPublicKey})
Register Subscription
POST /api/notifications/subscription
Register a push notification subscription. The subscription is stored and used to send notifications when the user is offline.
// After getting VAPID public key and subscribing via Push API
constbrowserSubscription=awaitregistration.pushManager.subscribe({
userVisibleOnly: true,
applicationServerKey: vapidPublicKey})
// Send subscription to server
constresult=awaitapi.notifications.subscribe({
subscription: browserSubscription.toJSON()
})
// Store subscription ID for later unsubscription
localStorage.setItem('pushSubscriptionId', result.id)
Unregister Subscription
DELETE /api/notifications/subscription/{id}
Remove a push notification subscription. The subscription will no longer receive notifications.
Authentication: Required
Path Parameters:
Parameter
Type
Description
id
number
Subscription ID to delete
Response: 204 No Content
Example:
constsubscriptionId=localStorage.getItem('pushSubscriptionId')
if (subscriptionId) {
awaitapi.notifications.unsubscribe(subscriptionId)
localStorage.removeItem('pushSubscriptionId')
}
Complete Integration Example
// 1. Check if push is supported
if (!('PushManager'in window)) {
console.log('Push notifications not supported')
return}
// 2. Get service worker registration
constregistration=awaitnavigator.serviceWorker.ready// 3. Get VAPID public key from server
const { vapidPublicKey } =awaitapi.notifications.getVapidPublicKey()
// 4. Subscribe via browser Push API
constsubscription=awaitregistration.pushManager.subscribe({
userVisibleOnly: true,
applicationServerKey: urlBase64ToUint8Array(vapidPublicKey)
})
// 5. Send subscription to Cloudillo server
constresult=awaitapi.notifications.subscribe({
subscription: subscription.toJSON()
})
console.log('Push subscription registered with ID:', result.id)
// Helper function to convert base64 key
functionurlBase64ToUint8Array(base64String: string):Uint8Array {
constpadding='='.repeat((4-base64String.length%4) %4)
constbase64= (base64String+padding)
.replace(/-/g, '+')
.replace(/_/g, '/')
constrawData=atob(base64)
returnUint8Array.from([...rawData].map(char=>char.charCodeAt(0)))
}
Notification Settings
Users can control which notification types they receive through the Settings API:
Setting
Type
Description
notify.push.message
boolean
Receive notifications for new messages
notify.push.mention
boolean
Receive notifications when mentioned
notify.push.reaction
boolean
Receive notifications for reactions
notify.push.connection
boolean
Receive notifications for connection requests
notify.push.follow
boolean
Receive notifications for new followers
Example:
// Disable reaction notifications
awaitapi.settings.set('notify.push.reaction', false)
// Get current notification settings
constsettings=awaitapi.settings.list()
constpushSettings= Object.entries(settings)
.filter(([key]) =>key.startsWith('notify.push.'))
Automatic trash cleanup (retention period) is planned for future releases. Currently, files remain in trash indefinitely until manually restored or deleted.
import { createApiClient } from'@cloudillo/core'constapi=createApiClient({ idTag:'alice.cloudillo.net', authToken: token })
// Verify community name is available
constverification=awaitapi.profile.verify({
type:'community',
idTag:'mygroup.cloudillo.net'})
if (verification.available) {
// Create the community
constcommunity=awaitapi.communities.create('mygroup.cloudillo.net', {
type:'community',
name:'My Community',
ownerIdTag:'alice.cloudillo.net' })
}
Member Management
Member roles are managed through the Profiles API.
Update Member Role
// As community leader/moderator
awaitapi.profiles.adminUpdate('member.cloudillo.net', {
roles: ['contributor']
})
The IDP (Identity Provider) Management API enables identity provider administrators to manage identities and API keys for their hosted identities.
Info
This API is for identity provider administrators who host identities for other users (e.g., cloudillo.net service). For end-user identity operations, see IDP API.
Endpoints
List Managed Identities
GET /api/idp/identities
List all identities managed by this identity provider.
Force access level (default: determined by permissions)
via
file ID
Container file ID for embedded access (caps access by share entry)
Info
The /ws/bus endpoint requires authentication – unauthenticated connections are rejected with close code 4401. The RTDB and CRDT endpoints support guest (unauthenticated) access with read-only permissions for public files.
WebSocket close codes
Code
Meaning
4400
Invalid store ID format
4401
Unauthorized (authentication required)
4403
Access denied or write access denied
4404
File/document not found
4409
Store type mismatch (e.g. RTDB endpoint for a CRDT file)
4500
Internal server error
Message bus (/ws/bus)
The bus provides direct user-to-user messaging and notifications. All messages use the format { id, cmd, data }.
Client → Server:
cmd
Description
ping
Keepalive; server responds with ack "pong"
ACTION
Send an action; server responds with ack "ok"
Any other
Custom command (presence, typing, etc.); server acks with "ok"
Server → Client:
Messages from other users are forwarded with the same { id, cmd, data } format. The bus does not use channels or subscriptions – it’s a direct messaging system where the server forwards relevant messages to registered users.
Client-side connection
The openMessageBus() function from @cloudillo/core returns a raw WebSocket:
Real-time synchronization of structured data. All messages use the format { id, type, ...payload }. See RTDB for the client library documentation.
Client → server messages
Type
Key fields
Description
transaction
operations: [{type, path, data}]
Atomic batch of create/update/replace/delete operations
query
path, filter?, sort?, limit?, offset?, aggregate?
Query documents with optional filtering and aggregation
get
path
Get a single document
subscribe
path, filter?, aggregate?
Start real-time change notifications for a path
unsubscribe
subscriptionId
Stop receiving change notifications
lock
path, mode
Lock a document ("soft" or "hard")
unlock
path
Release a document lock
ping
–
Keepalive
Server → client messages
Type
Key fields
Description
ack
status, timestamp
Acknowledges a transaction/command
transactionResult
results: [{ref?, id}]
Per-operation results from a transaction
queryResult
data: [...]
Query results
getResult
data
Single document result
subscribeResult
subscriptionId, data
Initial subscription data
change
subscriptionId, event: {action, path, data?}
Real-time change notification
lockResult
locked, holder?, mode?
Lock operation result
pong
–
Keepalive response
error
code, message
Error response
Transaction operations
Each operation in a transaction has a type and a path:
Operation
Description
create
Create a document; returns generated ID. Supports ref for cross-referencing within the transaction
update
Shallow merge (Firebase-style) with existing document
replace
Full document replacement (no merge)
delete
Delete a document
All operations in a transaction are atomic – if any fails, the entire transaction rolls back. Operations support computed values ($op, $fn, $query) and reference substitution (${$ref} patterns) for creating related documents in a single transaction.
Change event actions
The event.action field in change notifications can be: create, update, delete, lock, unlock, or ready.
Client-side connection
The openRTDB() function from @cloudillo/core returns a raw WebSocket. For higher-level usage, use the @cloudillo/rtdb client library:
RTDB supports auto-created store files using the pattern s~{app_id} (e.g. s~taskillo). These are created automatically on first WebSocket connection, providing persistent app-specific data storage without manual file creation.
Collaborative documents (/ws/crdt/{doc_id})
CRDT synchronization using the Yjs binary protocol. See CRDT for full documentation.
Protocol
The endpoint uses the y-websocket binary protocol:
Message type
Code
Description
MSG_SYNC
0
Sync protocol (SyncStep1, SyncStep2, Update)
MSG_AWARENESS
1
User presence and cursor updates
The sync flow:
Client sends SyncStep1 (state vector)
Server responds with SyncStep2 (missing updates)
Both sides exchange Updates incrementally as edits happen
Awareness messages broadcast cursor positions and user presence
Read-only connections can receive sync and awareness data but cannot send Update messages.
Client-side connection
Use openYDoc() from @cloudillo/crdt, which handles authentication, client ID reuse, offline caching, and token refresh automatically:
import { openYDoc } from'@cloudillo/crdt'import*asYfrom'yjs'constyDoc=newY.Doc()
const { provider, persistence, offlineCached } =awaitopenYDoc(yDoc, 'ownerTag:docId')
// Access shared types
constyText=yDoc.getText('content')
// Awareness is available via provider.awareness
Note
openYDoc() automatically handles WebSocket close codes: on 4401 (unauthorized) it requests a fresh token from the shell and reconnects. On other 44xx errors it stops reconnection and notifies the shell via bus.notifyError().
Connection lifecycle
All three endpoints share common behaviors:
Heartbeat: Server sends WebSocket ping frames every 30 seconds
Multi-tab support: Each connection gets a unique conn_id; multiple connections per user are supported
Cleanup: On disconnect, locks are released (RTDB), subscriptions cancelled, and user unregistered (bus)
Activity tracking: File access and modification times are recorded (throttled to 60-second intervals)
The Cloudillo RTDB provides a Firebase-like real-time database with TypeScript support.
RTDB vs CRDT
RTDB is best for structured data with queries (todos, settings, lists). For collaborative document editing where multiple users edit simultaneously, see CRDT. Compare both in Data Storage & Access.
Documents are individual records accessed by path.
// Reference a document by path
constuserDoc=rtdb.ref('users/alice')
// Get document data
constsnapshot=awaituserDoc.get()
if (snapshot.exists) {
console.log(snapshot.data())
}
CRUD Operations
Create
Use batch operations to create documents:
consttodos=rtdb.collection('todos')
constbatch=rtdb.batch()
// Create with auto-generated ID
batch.create(todos, {
title:'New task',
completed: false})
// Create with ref for tracking
batch.create(todos, {
title:'Another task',
completed: false}, { ref:'task-ref' })
// Commit returns results with IDs
constresults=awaitbatch.commit()
console.log('Created IDs:', results.map(r=>r.id))
Read
// Get single document
constdoc=rtdb.ref('todos/task_123')
constsnapshot=awaitdoc.get()
if (snapshot.exists) {
console.log(snapshot.data())
}
// Query collection
consttodos=rtdb.collection('todos')
constresults=awaittodos.get()
results.docs.forEach(doc=> {
console.log(doc.id, doc.data())
})
asyncfunctionstartEditing(docRef: DocumentRef) {
constresult=awaitdocRef.lock('hard')
if (!result.locked) {
alert(`Document is locked by ${result.holder}`)
returnfalse }
// Edit the document...
returntrue}
asyncfunctionstopEditing(docRef: DocumentRef) {
awaitdocRef.unlock()
}
Info
Locks have a TTL (time-to-live) and expire automatically if the client disconnects or fails to renew them. This prevents permanently locked documents from abandoned sessions.
Aggregate Queries
Perform server-side aggregations on collections.
Aggregate API
interfaceAggregateOptions {
groupBy?: string// Field to group results by
ops: AggregateOp[] // Aggregation operations
}
typeAggregateOp='sum'|'avg'|'min'|'max'interfaceAggregateGroupEntry {
group: any// Value of the groupBy field
count: number// Number of documents in the group
[key: string]:any// Aggregate results (e.g., sum_hours, avg_hours)
}
interfaceAggregateSnapshot {
groups: AggregateGroupEntry[]
}
Cloudillo uses Yjs for real-time collaborative editing with CRDT (Conflict-Free Replicated Data Types).
CRDT vs RTDB
CRDT is best for collaborative editing where multiple users edit simultaneously. For structured data with queries (todos, settings, lists), see RTDB. Compare all storage types in Data Storage & Access.
Installation
pnpm add yjs y-websocket
Quick Start
import*ascloudillofrom'@cloudillo/core'import*asYfrom'yjs'// Initialize
awaitcloudillo.init('my-app')
// Create Yjs document
constyDoc=newY.Doc()
// Open collaborative document
const { provider } =awaitcloudillo.openYDoc(yDoc, 'my-document-id')
// Use shared text
constyText=yDoc.getText('content')
yText.insert(0, 'Hello, collaborative world!')
// Listen for changes
yText.observe(() => {
console.log('Text updated:', yText.toString())
})
Shared Types
Yjs provides several shared data types:
YText - Shared Text
Best for plain text or rich text content.
constyText=yDoc.getText('content')
// Insert text
yText.insert(0, 'Hello ')
yText.insert(6, 'world!')
// Delete text
yText.delete(0, 5) // Delete 5 characters from position 0
// Format text (for rich text)
yText.format(0, 5, { bold: true })
// Get text content
console.log(yText.toString()) // "world!"
// Observe changes
yText.observe((event) => {
event.changes.delta.forEach(change=> {
if (change.insert) {
console.log('Inserted:', change.insert)
}
if (change.delete) {
console.log('Deleted', change.delete, 'characters')
}
})
})
YMap - Shared Object
Best for key-value data like form fields or settings.
Yjs documents work offline and sync when reconnected.
import { IndexeddbPersistence } from'y-indexeddb'constyDoc=newY.Doc()
// Persist to IndexedDB
constindexeddbProvider=newIndexeddbPersistence('my-doc-id', yDoc)
indexeddbProvider.on('synced', () => {
console.log('Loaded from IndexedDB')
})
// Also connect to server
const { provider } =awaitcloudillo.openYDoc(yDoc, 'my-doc-id')
// Now works offline with local persistence
// Syncs to server when connection available
Transactions
Group multiple changes into a single transaction:
yDoc.transact(() => {
constyText=yDoc.getText('content')
yText.insert(0, 'Hello ')
yText.insert(6, 'world!')
yText.format(0, 11, { bold: true })
})
// All changes sync as one update
// Only one observer event fired
Undo/Redo
import { UndoManager } from'yjs'constyText=yDoc.getText('content')
constundoManager=newUndoManager(yText)
// Make changes
yText.insert(0, 'Hello')
// Undo
undoManager.undo()
// Redo
undoManager.redo()
// Track who made changes
undoManager.on('stack-item-added', (event) => {
console.log('Change by:', event.origin)
})
Document Lifecycle
// Create document
constyDoc=newY.Doc()
// Open collaborative connection
const { provider } =awaitcloudillo.openYDoc(yDoc, 'doc_123')
// Use document...
// Close connection
provider.destroy()
// Destroy document
yDoc.destroy()
Best Practices
1. Use Subdocs for Large Documents
constyDoc=newY.Doc()
constyMap=yDoc.getMap('pages')
// Create subdocument for each page
constpage1=newY.Doc()
yMap.set('page1', page1)
constpage1Text=page1.getText('content')
page1Text.insert(0, 'Page 1 content')
2. Batch Operations in Transactions
// ✅ Single transaction
yDoc.transact(() => {
for (leti=0; i<100; i++) {
yText.insert(i, 'x')
}
})
// ❌ Many transactions
for (leti=0; i<100; i++) {
yText.insert(i, 'x') // Sends 100 updates!
}
asyncfunctionfetchWithRetry(fn, maxRetries=3) {
for (leti=0; i<maxRetries; i++) {
try {
returnawaitfn()
} catch (error) {
if (errorinstanceofFetchError) {
// Retry on transient errors
if (error.code==='E-SYS-UNAVAIL'||error.code==='E-SYS-TIMEOUT') {
if (i<maxRetries-1) {
// Exponential backoff
awaitnewPromise(r=>setTimeout(r, 1000* Math.pow(2, i)))
continue }
}
// Don't retry on auth or client errors
if (error.code.startsWith('E-AUTH-') ||error.code.startsWith('E-CORE-')) {
throwerror }
}
throwerror }
}
}
// Usage
constdata=awaitfetchWithRetry(() =>api.profiles.getOwn())
Pattern 4: User-Friendly Messages
functiongetUserFriendlyMessage(error: FetchError):string {
constmessages: Record<string, string> = {
'E-AUTH-UNAUTH':'Please log in to continue',
'E-AUTH-FORBID':'You don\'t have permission to do that',
'E-AUTH-EXPIRED':'Your session has expired. Please log in again',
'E-CORE-NOTFOUND':'The item you\'re looking for doesn\'t exist',
'E-CORE-LIMIT':'You\'re making too many requests. Please slow down',
'E-FILE-TOOLARGE':'This file is too large. Maximum size is 100MB',
'E-FILE-BADTYPE':'This file type is not supported',
'E-SYS-UNAVAIL':'The service is temporarily unavailable. Please try again later',
}
returnmessages[error.code] ||'An unexpected error occurred. Please try again'}
// Usage
try {
awaitapi.files.uploadBlob('default', file.name, file)
} catch (error) {
if (errorinstanceofFetchError) {
alert(getUserFriendlyMessage(error))
}
}
// ✅ Good - handle different errors appropriately
if (error.code==='E-AUTH-UNAUTH') {
redirectToLogin()
} elseif (error.code==='E-CORE-NOTFOUND') {
show404Page()
} else {
showGenericError()
}
// ❌ Bad - same handling for all errors
alert('Error!')
4. Log Errors for Debugging
// ✅ Good - logs help debug issues
catch (error) {
console.error('Failed to create post:', {
error,
action: newAction,
user: cloudillo.idTag })
showError('Failed to create post')
}
// ❌ Bad - no debugging info
catch (error) {
showError('Failed')
}
Cloudillo uses a microfrontend architecture where apps run as sandboxed iframes and communicate with the shell via a typed postMessage protocol.
Architecture overview
Apps are loaded into the Cloudillo shell as iframes with opaque origins (no allow-same-origin), ensuring strong isolation between apps and the shell. All communication flows through a message bus layer provided by @cloudillo/core.
Isolation – apps are sandboxed, preventing access to the shell’s DOM, cookies, or service worker keys
Technology agnostic – use any framework (React, Vue, vanilla JS)
Independent deployment – update apps without redeploying the shell
Shared authentication – tokens are managed by the shell and pushed to apps via the message bus
Getting started
Initialization with @cloudillo/core
The getAppBus() singleton provides the main API for apps to communicate with the shell:
import { getAppBus } from'@cloudillo/core'asyncfunctionmain() {constbus=getAppBus()
conststate=awaitbus.init('my-app')
// state contains: idTag, tnId, roles, accessToken, access, darkMode, theme, ...
console.log('User:', state.idTag)
console.log('Access:', state.access) // 'read' | 'write'
// Token is also available as bus.accessToken
// bus.init() automatically calls notifyReady('auth')
}
main().catch(console.error)
AppState fields
The init() call returns an AppState object:
Field
Type
Description
idTag
string?
User’s identity tag
tnId
number?
Tenant ID
roles
string[]?
User roles
accessToken
string?
JWT access token for API calls
access
'read' | 'write'
Access level for the current resource
darkMode
boolean
Dark mode preference
theme
string
UI theme variant (e.g. 'glass')
tokenLifetime
number?
Token lifetime in seconds
displayName
string?
Display name (for guest users via share links)
navState
string?
Navigation state passed from the shell
Lifecycle notifications
Apps signal their readiness to the shell in stages using bus.notifyReady(stage):
Stage
When to call
Notes
'auth'
After authentication completes
Called automatically by bus.init()
'synced'
After CRDT/data sync completes
Call manually when your data is loaded
'ready'
When the app is fully interactive
Call when UI is ready for user interaction
The shell shows a loading indicator until the app signals 'ready'. You can also report errors with bus.notifyError(code, message).
React integration
useCloudillo hook
The primary hook for React apps. It calls bus.init() internally and provides the app state:
useCloudillo extracts ownerTag and fileId from the URL hash (#ownerTag:fileId). The hash is how the shell passes resource context to apps.
useCloudilloEditor hook
For collaborative document apps using CRDT:
import { useCloudilloEditor } from'@cloudillo/react'functionEditor() {const { yDoc, provider, synced, error } =useCloudilloEditor('quillo')
if (error) return <div>Error: {error.code}</div>
if (!synced) return <div>Syncing...</div>
// yDoc is a Y.Doc connected to the collaborative backend
return <MyEditoryDoc={yDoc} />
}
This hook handles the full lifecycle: initialization, WebSocket connection, CRDT persistence, and cleanup on unmount. It automatically calls notifyReady('synced') when the document is synchronized.
Apps don’t need to handle the protocol directly. The AppMessageBus class (via getAppBus()) provides typed methods for all operations. The protocol details are mainly useful for debugging or building non-JS integrations.
Storage and settings
Storage API
Apps have access to namespaced key-value storage via the message bus:
constbus=getAppBus()
// Store and retrieve data
awaitbus.storage.set('my-app', 'preferences', { theme:'dark' })
constprefs=awaitbus.storage.get<{ theme: string }>('my-app', 'preferences')
// List keys and check quota
constkeys=awaitbus.storage.list('my-app', 'cache:')
const { limit, used } =awaitbus.storage.quota('my-app')
Method
Signature
Description
get
get<T>(ns, key): Promise<T?>
Get a value by key
set
set(ns, key, value): Promise<void>
Set a value
delete
delete(ns, key): Promise<void>
Delete a key
list
list(ns, prefix?): Promise<string[]>
List keys with optional prefix
clear
clear(ns): Promise<void>
Clear all data in namespace
quota
quota(ns): Promise<{limit, used}>
Get storage quota info
Settings API
Apps can read and write server-side settings scoped to app.<appName>.*:
Method
Signature
Description
get
get<T>(key): Promise<T?>
Get a setting value
set
set(key, value): Promise<void>
Set a setting value
list
list(prefix?): Promise<Array<{key, value}>>
List settings
Security
Warning
The shell loads app iframes with sandbox="allow-scripts allow-forms allow-downloads". The allow-same-origin attribute is deliberately excluded to create opaque origins, which prevents apps from accessing the shell’s service worker registration keys or cookies. This is a critical security boundary.
Token handling: Access tokens are held in memory only (inside the AppMessageBus instance). Never store tokens in localStorage or sessionStorage – even with opaque origins, this would create unnecessary persistence of credentials.
Message validation: The SDK validates all incoming messages automatically (protocol version, envelope structure, message type). Apps using getAppBus() do not need to implement manual postMessage validation.
Token refresh: The shell proactively pushes refreshed tokens via auth:token.push messages. Apps can also request a refresh manually with bus.refreshToken().
Debugging
Enable debug logging by passing a config to getAppBus():
constbus=getAppBus({ debug: true })
awaitbus.init('my-app')
// All message bus traffic will be logged to the console
To inspect an app’s iframe context in DevTools, use the console’s context selector dropdown to switch to the iframe’s execution context.
Example apps
Cloudillo includes several built-in apps that use these patterns:
A comprehensive guide to designing collaborative data structures using Yjs and CRDTs for real-time applications.
Overview
Building collaborative applications requires careful consideration of how data structures behave when multiple users edit simultaneously. This guide covers the design patterns, best practices, and common pitfalls when working with Conflict-free Replicated Data Types (CRDTs) in Cloudillo applications.
Early Stage Documentation
The patterns in this guide are based on internal Cloudillo applications (Calcillo, Ideallo, Prezillo, Quillo) which have shown promising results in our testing. However, Cloudillo has not yet achieved wide adoption, so these recommendations should be considered with appropriate caution. We’re sharing our experience to help the community, but real-world usage at scale may reveal patterns that need adjustment.
Who This Guide Is For
This guide is for developers who:
Are building collaborative features in Cloudillo applications
Need to understand how to structure data for real-time synchronization
Want to learn from real-world patterns used in Cloudillo apps (Calcillo, Ideallo, Prezillo, Quillo)
Core Yjs concepts you need to understand before designing collaborative data structures.
Overview
Yjs provides a set of shared data types that automatically synchronize across clients and resolve conflicts. Understanding these primitives is essential for building robust collaborative applications.
Topics
Shared Types - Y.Map, Y.Array, Y.Text, and Y.XmlFragment
Internals - How Yjs works under the hood (optional deep dive)
Key Concepts
Shared Types Are Not Regular Objects
Yjs shared types look similar to JavaScript objects and arrays, but they behave differently:
// Regular JavaScript - changes are local only
constobj= { name:'Alice' }
obj.name='Bob'// Only visible locally
// Yjs shared type - changes synchronize
constyMap=yDoc.getMap('user')
yMap.set('name', 'Alice')
yMap.set('name', 'Bob') // Syncs to all connected clients
Documents Contain All Shared Data
A Y.Doc is the root container for all collaborative data. Different parts of your application access different top-level keys:
constyDoc=newY.Doc()
// Each getMap/getArray/getText creates a named root-level shared type
constcells=yDoc.getMap('cells') // Spreadsheet data
constorder=yDoc.getArray('rowOrder') // Row ordering
constmeta=yDoc.getMap('metadata') // Document metadata
Changes Must Go Through Yjs APIs
Yjs only tracks changes made through its APIs. Direct mutation of extracted values does not synchronize:
// WRONG - changes not tracked
constobj=yMap.get('config')
obj.theme='dark'// This change is lost!
// CORRECT - use Yjs API
yMap.set('config', { ...yMap.get('config'), theme:'dark' })
Subsections of Fundamentals
Shared Types
Understanding Yjs shared types: Y.Map, Y.Array, Y.Text, and Y.XmlFragment.
Overview
Yjs provides four primary shared types. Each has specific characteristics for different use cases.
Y.Map
A key-value store similar to JavaScript’s Map. Supports nested shared types for hierarchical structures.
Key behavior: Setting a plain object snapshots it—later mutations don’t sync. For granular updates, nest Y.Map instances.
Best For:
Keyed data where order doesn’t matter
Configuration objects
Entity storage (keyed by ID)
Hierarchical structures (nested maps)
Y.Array
An ordered list similar to JavaScript’s Array. Handles concurrent insertions gracefully with position-aware merging.
Key behavior: Reordering items (delete + insert) creates copies, not moves. For reorderable collections, store only IDs in the array.
Best For:
Ordered lists where sequence matters
ID arrays for ordering (with content in a separate Y.Map)
Text editor paragraphs
Timeline events
Avoid Complex Objects in Arrays
Don’t store complex objects in Y.Array if you need to reorder them. Store IDs in the array and content in a Y.Map instead. See ID-Based Storage.
Y.Text
A shared string optimized for collaborative text editing. Supports character-level insertions, deletions, and formatting attributes.
Key behavior: Concurrent edits merge at character positions. Formatting uses Quill-style delta operations.
// Rich text formatting
yText.insert(0, 'Bold text', { bold: true })
yText.format(0, 4, { italic: true }) // Apply to range
Editor Bindings: Integrates with Quill, ProseMirror, Monaco, CodeMirror, and TipTap through official bindings.
Best For:
Rich text documents
Code editors
Chat messages
Any content needing character-level merging
Y.XmlFragment
An XML-like structure for representing DOM or document trees. Used primarily with ProseMirror for complex rich text with nested elements.
How Yjs works under the hood—understanding the mechanics behind CRDT synchronization.
The CRDT Model
Simplified Overview
This page provides a practical understanding of Yjs internals. For definitive details, consult the Yjs documentation.
Yjs is primarily operation-based: it stores and transmits operations (inserts, deletes). However, it also supports state encoding for snapshots and initial sync. This combination provides:
Efficient sync - Only missing operations are transmitted based on vector clock comparison
Full state snapshots - New clients can receive complete state without operation replay
Compact updates - Ongoing changes are small binary operation deltas
Items and the Item List
Internally, all data is a linked list of “items”:
[item1] <-> [item2] <-> [item3] <-> [item4]
Each item contains:
ID - Unique (clientId, clock) pair
Content - The actual data
Origin - Item this was inserted after
Right Origin - Item this was inserted before
Client IDs and Clocks
Every client has a unique ID and logical clock. Item IDs are (clientId, clock) pairs, ensuring globally unique identifiers without coordination.
Vector Clocks
State vectors track what each client has seen:
{
clientA: 15, // Has seen A's operations up to clock 15
clientB: 8, // Has seen B's operations up to clock 8
}
When syncing, only missing operations are sent based on vector clock comparison.
Conflict Resolution
Y.Map: Last-writer-wins by logical timestamp. Higher clock wins.
Y.Array: Concurrent insertions at same position are both preserved. Order determined by client ID.
Y.Text: Character-level merging. Concurrent insertions both appear; order by position and client ID.
The Update Format
Changes are encoded as compact binary:
yDoc.on('update', (update: Uint8Array) => {
// Send over network or store for persistence
})
Y.applyUpdate(yDoc, update) // Apply received update
Y.mergeUpdates([u1, u2, u3]) // Compact multiple updates
Garbage Collection
Deleted items become tombstones (needed for concurrent operation resolution). Tombstones are eventually garbage collected when all clients have moved past them.
GC Implications
Heavy editing accumulates tombstones until GC. Very long-lived, heavily-edited documents may grow larger than expected.
Subdocuments
For large documents, split into subdocuments for lazy loading:
The following are approximate complexities for typical use cases. Actual performance varies by implementation details, document structure, and operation history:
Operation
Approximate Complexity
Map get/set
O(1) average
Array push
O(1)
Array insert at index
O(n)
Text insert
O(log n) typical*
Sync (diff)
O(changes)
* Text insertion complexity depends on the document’s internal structure and edit history.
Space overhead: For typical documents, expect 2-10x the raw data size due to CRDT metadata and tombstones. Very long-lived, heavily-edited documents may accumulate more overhead. Documents with minimal edits will be closer to the lower bound.
Proven patterns for structuring collaborative data that scales and handles concurrent edits gracefully.
Overview
These patterns emerge from real-world collaborative applications. They solve common problems like maintaining order while allowing concurrent edits, organizing complex hierarchies, and keeping data structures efficient.
Topics
ID-Based Storage - Store content by ID, reference by ID (most important pattern)
The most important pattern for collaborative applications: storing content by ID and referencing by ID.
Overview
ID-based storage separates what content exists from where it appears. Store content in a map keyed by unique IDs, and reference those IDs from elsewhere.
This prevents data loss during concurrent reordering and enables reliable cross-references.
When two users reorder the same slide concurrently, delete + insert creates copies—resulting in duplicated or lost content.
The Solution
Separate content storage from ordering:
constslideContent=yDoc.getMap('slides')
constslideOrder=yDoc.getArray('slideOrder')
// Store content by ID
slideContent.set('k8d2fn3m', { title:'Intro', content: [...] })
// Store only ID in ordering array
slideOrder.push(['k8d2fn3m'])
Now reordering only moves IDs—lightweight operations that merge cleanly.
Core Operations
All operations should be wrapped in yDoc.transact() for atomicity:
Operation
Steps
Create
content.set(id, data) + order.push([id])
Reorder
Delete ID from old index, insert at new index
Delete
order.delete(index, 1) + content.delete(id)
Read
order.toArray().map(id => content.get(id))
Always delete from both order and content to avoid orphaned data.
Benefits
Safe Reordering: Moving items only moves IDs, which merge cleanly
Stable References: Other parts can reference by ID without breaking
Efficient Updates: Content changes don’t affect order, and vice versa
Easy Deletion: References become stale IDs that can be filtered
Undo Granularity: Content and order changes are separate undo steps
Hierarchical Data (Trees)
ID-based storage extends naturally to trees. Store all nodes flat with parent references:
Splitting data by type into separate Y.Maps for better organization and performance.
The Pattern
Instead of one nested structure, use separate maps by type:
// Instead of one big data.objects with mixed types...
constshapes=yDoc.getMap('shapes')
constimages=yDoc.getMap('images')
consttextBoxes=yDoc.getMap('textBoxes')
constpaths=yDoc.getMap('paths')
Benefits
Targeted observers: Subscribe only to relevant types (shapes.observe() won’t fire for image changes)
Faster lookups:images.toJSON() is faster than filtering a mixed collection by type
Type safety: Each map can have its own TypeScript interface (Y.Map<ShapeData>, Y.Map<ImageData>)
Shared Ordering
Objects from different maps can share ordering via layer arrays:
constlayerOrder=yDoc.getMap('layerOrder') // Map<layerId, Array<objectId>>
// Object IDs in layers, regardless of type
layerOrder.get('default').push([shapeId])
layerOrder.get('default').push([imageId])
Getting All Objects
When you need all objects regardless of type, spread the values from each map or check each map when looking up by ID. With consistent ID formats (e.g., type-prefixed IDs like shape-xxx, image-xxx), lookups can go directly to the right map.
Using Y.Array to maintain element order in collaborative applications.
Overview
Y.Array provides ordered sequences that handle concurrent insertions gracefully. Combined with ID-based storage, Y.Array becomes the standard way to represent ordered collections.
The Pattern
Store only IDs in Y.Array; store content in Y.Map. See ID-Based Storage for the complete pattern and core operations.
Concurrent Insert Behavior
When two users insert at the same position simultaneously:
Initial: [A, B, C]
User 1 inserts X after A: [A, X, B, C]
User 2 inserts Y after A: [A, Y, B, C]
Merged: [A, X, Y, B, C] or [A, Y, X, B, C]
The order of X and Y is determined by client IDs (arbitrary but consistent). Both items appear—neither is lost.
Grouped Ordering
For items grouped into categories, use a Map of Arrays:
Moving an item between groups: delete ID from source array, insert into target array, update item’s groupId field—all in one transaction.
Performance Tips
Large arrays (10,000+ items):
Cache order.toArray() instead of calling repeatedly
Use UI pagination/virtualization
Batch operations:
// WRONG: multiple syncs
for (constidofidsToRemove) {
order.delete(order.toArray().indexOf(id), 1)
}
// CORRECT: single transaction, delete from end first
yDoc.transact(() => {
constindices=idsToRemove .map(id=>order.toArray().indexOf(id))
.filter(i=>i!==-1)
.sort((a, b) =>b-a) // Descending
for (constiofindices) order.delete(i, 1)
})
Implementing prototype chains and style inheritance for themes, defaults, and templates.
Application Pattern
Style inheritance is an application-level pattern built on top of CRDTs, not a CRDT feature itself. It leverages CRDT properties (automatic sync, conflict resolution) while keeping the inheritance logic in application code.
The Pattern
Instead of storing all properties on each element:
Resolution cascades: element overrides → template defaults → theme values.
Named Style Classes
Like CSS classes, elements can reference multiple styles by name. Store class definitions in a map (styleClasses), and let elements specify an array of class names. Resolution merges classes in order, then applies overrides.
Cascading Updates
When a base style changes, all dependent elements automatically get new values:
theme.observeDeep(() => {
renderAll() // Elements resolve to new values
})
Specific design guidance for different types of collaborative documents.
Overview
Different application types have different data structure needs. A text editor has very different requirements from a spreadsheet or drawing canvas. This section provides tailored guidance for each category.
Application Categories
Text Editors - Rich text with Y.Text and editor bindings
Spreadsheets - 2D grids with cells, rows, and columns (Calcillo patterns)
Canvas Apps - Drawing and whiteboard applications (Ideallo patterns)
Presentations - Slide-based documents with containers and views (Prezillo patterns)
Choosing the Right Approach
Application Type
Primary Data Structure
Key Pattern
Text editor
Y.Text
Editor binding (Quill, ProseMirror)
Spreadsheet
Y.Map of cells
ID-based cells, ordered rows/columns
Canvas/Whiteboard
Y.Map of objects
Separate content maps by type
Presentations
Y.Map of containers
Style inheritance, templates
Common Themes
Despite their differences, all collaborative applications share these needs:
Stable references - Use IDs, not indices, to reference other elements
Separate ordering from content - Store order in arrays, content in maps
Batch changes - Use transactions to group related modifications
Local state separation - Keep UI state (selection, scroll) out of the CRDT
Each application type page shows how to apply these principles to that specific domain.
Subsections of Application Types
Text Editors
Designing collaborative rich text editors with Y.Text.
Convert between absolute and relative positions when creating/reading comments. Relative positions stay valid even when text is inserted or deleted around them.
// WRONG: position 42 becomes invalid when text changes
constsavedPosition=42// CORRECT: relative position adapts to edits
constrelPos=Y.createRelativePositionFromTypeIndex(yText, 42)
Designing collaborative presentation software with slides, templates, and views.
Looking for Prezillo’s exact format?
This page covers generic CRDT design patterns for presentation apps. For Prezillo’s complete type definitions, field tables, and data model, see the Prezillo Format Specification.
Implementing multi-user collaboration features: transactions, undo/redo, presence, and conflict handling.
Overview
Beyond basic data synchronization, collaborative applications need features that make the multi-user experience smooth and intuitive. This section covers the key collaboration patterns.
Topics
Transactions - Batching changes with yDoc.transact()
// Only track changes to cells, rowOrder, colOrder
constundoManager=newUndoManager([cells, rowOrder, colOrder], {
trackedOrigins: newSet(['user-action'])
})
// Changes to other types (metadata) not tracked
yDoc.transact(() => {
items.set('a', data1)
items.set('b', data2)
items.set('c', data3)
}, 'user-action')
undoManager.undo() // Reverts all three at once
For typing, use captureTimeout to group rapid changes:
constundoManager=newUndoManager([content], {
trackedOrigins: newSet([binding]),
captureTimeout: 500// Group changes within 500ms
})
Clear History
undoManager.clear() // Clear undo/redo stacks
undoManager.stopCapturing() // End current group, start new one
Implementing presence, cursors, and real-time user status with the Yjs awareness protocol.
Overview
Awareness provides ephemeral state synchronization—data that syncs in real-time but doesn’t persist: cursor positions, user presence, selections, typing indicators.
Understanding how Yjs CRDTs automatically merge concurrent changes.
Core Principle
CRDTs guarantee eventual consistency: all clients receiving the same operations converge to identical state, regardless of operation order.
Y.Map: Last-Writer-Wins
When multiple clients set the same key, the highest logical timestamp wins. When timestamps are equal, the client ID breaks ties (arbitrary but consistent ordering):
Alice: map.set('color', 'blue') // timestamp: 100
Bob: map.set('color', 'green') // timestamp: 101
Result: 'green' (Bob's timestamp higher)
// When timestamps match:
Alice: map.set('color', 'blue') // timestamp: 100, clientId: 'abc'
Bob: map.set('color', 'green') // timestamp: 100, clientId: 'xyz'
Result: determined by client ID comparison (consistent across all peers)
Design tip: To preserve both values, use unique keys:
map.set(`comment-${odieId}`, 'X') // Both preserved
map.set(`comment-${bobId}`, 'Y')
Y.Array: Position-Aware Merge
Concurrent insertions at the same position are both preserved:
Initial: [A, B, C]
Alice inserts X after A
Bob inserts Y after A
Result: [A, X, Y, B, C] or [A, Y, X, B, C]
Order of X/Y is deterministic (by client ID) but arbitrary. Design UIs that tolerate this.
Example: Counters and votes. Rather than storing a single number (where concurrent increments get lost to LWW), track each user’s contribution separately:
// WRONG: concurrent increments overwrite each other
counter.set('votes', counter.get('votes') +1)
// CORRECT: track per-user contributions, sum at read time
constuserVotes=yDoc.getMap('votes')
userVotes.set(userId, (userVotes.get(userId) ||0) +1)
functiongetTotalVotes():number {
lettotal=0userVotes.forEach(count=>total+=count)
returntotal}
This pattern preserves all concurrent operations by giving each user their own key.
Common mistakes that cause data corruption, sync issues, or unexpected behavior—and how to avoid them.
Overview
CRDT-based applications can fail in subtle ways that are hard to debug. Many issues only appear when multiple users edit simultaneously, making them difficult to reproduce in development. This section documents the most common pitfalls organized by what you’re doing when you encounter them.
Topics
Data Modeling - Schema and structure decisions that cause problems
Detailed specifications of the document formats used by each Cloudillo application.
Overview
Each Cloudillo app stores collaborative documents using application-specific data models. Most apps use Yjs CRDTs for conflict-free concurrent editing, while some use the Real-Time Database (RTDB) for query-oriented structured data. This section provides the complete format specification for each app’s document structure, enabling third-party developers, tool builders, and contributors to understand, extend, and interoperate with Cloudillo documents.
Relationship to CRDT Design Guide
The CRDT Design Guide teaches generic patterns for building collaborative apps (ID-based storage, style inheritance, separate content maps). This section documents the concrete format specifications — the exact field names, types, and structures used by each app.
CRDT-based apps use short field names (typically 1-3 characters) to minimize wire overhead during real-time synchronization. For example, t for type, xy for position, wh for dimensions. Each app’s format spec documents the mapping from compact names to their meanings.
ID Format
All entity IDs (objects, containers, views, styles, templates) use 72-bit entropy encoded as 12 base64url characters. IDs are generated client-side using crypto.getRandomValues() and are typed using branded types (ObjectId, ContainerId, ViewId, StyleId, RichTextId, TemplateId) for compile-time safety.
ChildRef Tuples
Several apps use a ChildRef tuple to reference children that can be either objects or containers:
typeChildRef= [0|1, string] // [0, objectId] or [1, containerId]
The discriminant (0 or 1) allows a single ordered array to contain references to both types without ambiguity.
v3 Generic Export Format
Starting with format version 3.0.0, all CRDT-based apps use a unified export function (exportYDoc()) from @cloudillo/crdt. This function walks yDoc.share and serializes all shared types with inline @T type markers that preserve the original Yjs type information.
Export Envelope
Every exported document shares this envelope structure:
Nested types are serialized recursively. For example, a Y.Map<Y.Text> becomes a map with "@T": "M" containing entries that each have "@T": "T" with text and delta fields.
Primitive values pass through
Plain values (strings, numbers, booleans, null) inside Yjs types are serialized as-is without markers. The @T marker only appears on Yjs shared types.
Changes from Previous Versions
Aspect
Pre-v3
v3
Data keys
Long descriptive names (objects, rootChildren, richTexts)
Raw CRDT keys (o, r, rt)
Type information
Implicit (consumer must know the schema)
Explicit @T markers on every Yjs type
Text content
Plain text string or { plainText, delta }
{ "@T": "T", "text": "...", "delta": [...] }
Export function
App-specific custom serialization
Generic exportYDoc() from @cloudillo/crdt
Format version
App-specific (1.0.0 or 2.0.0)
Unified 3.0.0 across all apps
See Also
CRDT Design Guide — Generic collaboration patterns and best practices
Complete format specification for Calcillo, Cloudillo’s collaborative spreadsheet application.
Overview
Calcillo is a real-time collaborative spreadsheet that supports multiple sheets, formulas, merged cells, borders, hyperlinks, data validation, conditional formatting, and frozen panes. Documents are stored as Yjs CRDT structures for conflict-free concurrent editing. The cell data model is derived from FortuneSheet with inline styling.
Per-sheet encapsulation: Each sheet is a self-contained unit with its own rows, columns, merges, borders, and other features. This prevents cross-sheet conflicts and enables efficient partial sync – only active sheets need to be observed.
Nested row maps: Cell data uses rows[rowId][colId] = Cell, allowing efficient row-level operations (insert, delete, move) without touching unrelated cells.
ID-based addressing: Rows, columns, and sheets use random IDs (not sequential indices) for CRDT stability. IDs survive concurrent insertions and deletions without rebasing.
Inline styles: All cell formatting (font, color, alignment) is stored directly on each cell. There is no named style system – this trades storage efficiency for simplicity and avoids the style cascade complexity of apps like Prezillo.
Document Architecture
graph LR
Doc[Y.Doc]
subgraph Root
so["sheetOrder (Y.Array<SheetId>)<br/>Sheet tab order"]
sheets["sheets (Y.Map<YSheetStructure>)<br/>All sheets"]
meta["meta (Y.Map)<br/>Document metadata"]
end
subgraph "Per-Sheet (YSheetStructure)"
name["name (Y.Text)"]
rows["rows (Y.Map<Y.Map<Cell>>)"]
ro["rowOrder (Y.Array<RowId>)"]
co["colOrder (Y.Array<ColId>)"]
merges["merges (Y.Map<MergeInfo>)"]
borders["borders (Y.Map<BorderInfo>)"]
more["... 7 more sub-types"]
end
Doc --> Root
sheets --> name
sheets --> rows
sheets --> ro
sheets --> co
sheets --> merges
sheets --> borders
sheets --> more
Quick Reference
Root-Level Shared Types
Key
Yjs Type
Purpose
sheetOrder
Y.Array<SheetId>
Sheet tab order
sheets
Y.Map<YSheetStructure>
All sheets keyed by SheetId
meta
Y.Map
Document metadata
Per-Sheet Sub-Types
Sub-type
Yjs Type
Purpose
name
Y.Text
Sheet name (collaborative editing)
rowOrder
Y.Array<RowId>
Stable row ordering
colOrder
Y.Array<ColId>
Stable column ordering
rows
Y.Map<Y.Map<Cell>>
Nested: rows[rowId][colId] = Cell (sparse)
merges
Y.Map<MergeInfo>
Key: "${startRow}_${startCol}"
borders
Y.Map<BorderInfo>
Key: "${rowId}_${colId}"
hyperlinks
Y.Map<HyperlinkInfo>
Key: "${rowId}_${colId}"
validations
Y.Map<ValidationRule>
Key: unique validation ID
conditionalFormats
Y.Array<ConditionalFormat>
Ordered rules
hiddenRows
Y.Map<boolean>
rowId → true if hidden
hiddenCols
Y.Map<boolean>
colId → true if hidden
rowHeights
Y.Map<number>
rowId → height in pixels
colWidths
Y.Map<number>
colId → width in pixels
frozen
Y.Map<string|number>
Freeze pane settings
Detailed Documentation
Document Structure – Root Y.Doc, per-sheet structure, ID system, metadata, and initialization
Cells – Cell data model, values, formulas, inline styles, and cell types
Sheet Features – Borders, hyperlinks, data validation, conditional formatting, and frozen panes
Sheets – Multi-sheet support, sheet ordering, and sheet operations
Export Format – JSON export envelope with complete example
See Also
CRDT Design Guide – Generic collaboration patterns and best practices
Prezillo Format – Prezillo uses a more complex architecture with hierarchy, views, and style inheritance
Ideallo Format – Ideallo uses a flat object model for infinite-canvas whiteboards
Subsections of Calcillo Format
Document Structure
The root CRDT document structure, per-sheet structure, ID system, metadata, and initialization defaults.
Root-Level Shared Types
A Calcillo document is a Y.Doc with only 3 named shared types:
Key
Yjs Type
Description
sheetOrder
Y.Array<SheetId>
Sheet tab order (presentation sequence)
sheets
Y.Map<YSheetStructure>
All sheets keyed by SheetId
meta
Y.Map
Document metadata
Minimal root structure
Unlike Prezillo’s 12 or Ideallo’s 5 top-level shared types, Calcillo uses only 3. The complexity lives inside each sheet’s self-contained structure, which keeps the root document clean and enables efficient per-sheet synchronization.
Each sheet is a self-contained Y.Map with 14 named sub-types:
Sub-type
Yjs Type
Description
name
Y.Text
Sheet name (collaborative text editing)
rowOrder
Y.Array<RowId>
Stable row ordering
colOrder
Y.Array<ColId>
Stable column ordering
rows
Y.Map<Y.Map<Cell>>
Cell data: rows[rowId][colId] = Cell
merges
Y.Map<MergeInfo>
Merged cell ranges, keyed by "${startRow}_${startCol}"
borders
Y.Map<BorderInfo>
Per-cell border info, keyed by "${rowId}_${colId}"
hyperlinks
Y.Map<HyperlinkInfo>
Per-cell hyperlinks, keyed by "${rowId}_${colId}"
validations
Y.Map<ValidationRule>
Data validation rules, keyed by unique validation ID
conditionalFormats
Y.Array<ConditionalFormat>
Ordered conditional formatting rules
hiddenRows
Y.Map<boolean>
rowId → true for hidden rows
hiddenCols
Y.Map<boolean>
colId → true for hidden columns
rowHeights
Y.Map<number>
Custom row heights in pixels (absent = default)
colWidths
Y.Map<number>
Custom column widths in pixels (absent = default)
frozen
Y.Map<string|number>
Freeze pane configuration
Accessing Sheet Sub-Types
// Get a sheet by ID
constsheet=sheets.get(sheetId) asY.Map<unknown>
// Access sub-types
constname=sheet.get('name') asY.TextconstrowOrder=sheet.get('rowOrder') asY.Array<string>
constcolOrder=sheet.get('colOrder') asY.Array<string>
constrows=sheet.get('rows') asY.Map<Y.Map<Cell>>
constmerges=sheet.get('merges') asY.Map<MergeInfo>
constborders=sheet.get('borders') asY.Map<BorderInfo>
// Access a specific cell
constrowMap=rows.get(rowId) asY.Map<Cell>
constcell=rowMap?.get(colId) asCell|undefined
Per-sheet encapsulation
Each sheet manages its own rows, columns, merges, borders, and all other features independently. There are no cross-sheet references within the CRDT – formulas referencing other sheets are stored as plain strings and resolved by the calculation engine at runtime.
ID System
Calcillo uses 3 branded types with variable-length IDs, all encoded as base64url characters:
All IDs are generated client-side using crypto.getRandomValues() and encoded as base64url (A-Z, a-z, 0-9, -, _).
Why variable-length IDs?
Sheets use standard 72-bit IDs like other Cloudillo apps. Row and column IDs use shorter lengths because spreadsheets contain many more rows and columns than typical document entities, and the shorter IDs reduce CRDT storage overhead. The entropy levels are chosen to keep collision probability negligible for practical spreadsheet sizes.
Composite Key Convention
Several per-sheet maps use composite keys formed by joining two IDs with an underscore:
Map
Key Format
Example
merges
"${startRowId}_${startColId}"
"aB3x_Qm7k_Xk2nR"
borders
"${rowId}_${colId}"
"aB3x_Qm7k_Xk2nR"
hyperlinks
"${rowId}_${colId}"
"aB3x_Qm7k_Xk2nR"
This convention provides a deterministic, unique key for cell-position-based features without requiring additional ID generation.
Metadata
The meta map stores document-level settings as individual key-value entries:
Key
Type
Default
Description
initialized
boolean
true
Set during initialization, prevents re-initialization
name
string
"Untitled Spreadsheet"
Document name
The meta map is compatible with Cloudillo’s cloudillo.init() initialization system – the initialized flag is checked before setting up default content.
Document Initialization
When a new empty document is created, the following defaults are established in a single Yjs transaction:
The default sheet starts with 26 columns (corresponding to A-Z) and 100 rows. All cell data maps start empty – cells are created on first edit (sparse storage).
Cells
The cell data model, storage pattern, values, formulas, inline styles, and cell types.
Cell Storage
Cells are stored in a nested Y.Map structure within each sheet:
This two-level nesting provides efficient row-level operations:
Insert/delete row: Add or remove a single entry in the outer map
Move row: Reorder in rowOrder array; the row’s cell data stays intact
Access cell: Two map lookups: rows.get(rowId)?.get(colId)
// Read a cell
constrowMap=rows.get(rowId) asY.Map<Cell> |undefinedconstcell=rowMap?.get(colId) asCell|undefined// Write a cell
letrowMap=rows.get(rowId) asY.Map<Cell>
if (!rowMap) {
rowMap=newY.Map()
rows.set(rowId, rowMap)
}
rowMap.set(colId, cellData)
Sparse storage
Only cells with actual content or formatting are stored. Empty cells have no entry in the map. When all cells in a row are cleared, the empty inner Y.Map can be garbage collected by deleting the outer map entry.
Cell Data Model
The Cell interface defines all possible fields on a cell. All fields are optional – an empty object {} represents a blank cell with all defaults.
Value Fields
Field
Type
Description
v
string | number | boolean
Display value (the computed/entered value)
f
string
Formula string (starts with =, e.g. "=SUM(A1:A10)")
Cell Type and Format
Field
Type
Description
ct
CellType
Cell type descriptor (see below)
The ct object describes how the cell value should be interpreted and formatted:
interfaceCellType {
t?:'t'|'n'|'s'|'b'|'g'// Type code
fa?: string// Format code
s?: Array<{ v: string }>// Rich text segments
}
Type Codes (ct.t)
Code
Meaning
Example Values
g
General
Auto-detected type
n
Number
42, 3.14, -100
s
String
"Hello", "ABC"
t
Time/Date
"2026-01-15", "14:30:00"
b
Boolean
true, false
Format Codes (ct.fa)
The fa field contains a format pattern string compatible with spreadsheet number formatting:
Pattern
Description
Example Output
"General"
Auto-format (default)
1234.5
"0"
Integer
1235
"0.00"
Two decimal places
1234.50
"#,##0"
Thousands separator
1,235
"#,##0.00"
Thousands + decimals
1,234.50
"0%"
Percentage
12%
"0.00%"
Percentage with decimals
12.35%
"$#,##0.00"
Currency
$1,234.50
"yyyy-mm-dd"
Date
2026-01-15
"h:mm:ss"
Time
14:30:00
Rich Text Segments (ct.s)
When a cell contains rich text (mixed formatting within a single cell), the ct.s array holds text segments:
{
"ct": {
"s": [
{ "v": "Bold text" },
{ "v": " and normal text" }
]
}
}
Each segment contains a v field with the text content. Additional formatting fields may appear on individual segments.
Font Styling
All styling is inline on the cell – there is no named style or style inheritance system.
Formulas are stored as plain strings in the f field:
{
"v": 150,
"f": "=SUM(A1:A10)"}
The f field contains the formula string as entered by the user (always starts with =)
The v field contains the last computed result
Formula references use A1-style notation (e.g. A1, B2:D10, Sheet2!A1)
The CRDT stores only the formula string – no ID-based cell references
Formula evaluation is delegated to the FortuneSheet calculation engine at runtime
A1 references vs ID-based addressing
Internally, Calcillo uses random IDs for rows and columns in the CRDT. However, formulas use traditional A1-style references. The conversion between column IDs (from colOrder) and letter codes (A, B, C…) happens at the application layer. This means formulas may need adjustment when rows or columns are inserted or deleted – this is handled by the formula engine, not the CRDT.
Default Stripping
To minimize CRDT storage overhead, fields that match their default values are stripped when saving a cell. The following fields are omitted when they match these defaults:
Field
Default Value
bl
0
it
0
un
0
cl
0
ff
0
fs
10
tb
0
tr
0
Fields with no default (like v, f, fc, bg, ht, vt) are stored whenever present.
Cell Addressing
Cells are addressed internally by their (rowId, colId) pair. For display, the column position in colOrder is converted to a letter code:
Position
Letter Code
0
A
1
B
…
…
25
Z
26
AA
27
AB
Row position in rowOrder is converted to a 1-based number. For example, the cell at position (row index 2, col index 0) displays as A3.
Grid Structure
Row and column ordering, sizing, visibility, and merged cells.
Row and Column Ordering
Each sheet maintains two Y.Array structures for row and column ordering:
Sub-type
Yjs Type
Description
rowOrder
Y.Array<RowId>
Ordered list of row IDs (9-char base64url)
colOrder
Y.Array<ColId>
Ordered list of column IDs (5-char base64url)
The position of an ID in its array determines the display position. Row rowOrder[0] displays as row 1, rowOrder[1] as row 2, etc. Column colOrder[0] displays as column A, colOrder[1] as column B, etc.
Row and Column Operations
// Insert a new row at position 5
constnewRowId=generateRowId()
rowOrder.insert(5, [newRowId])
// Delete row at position 3
rowOrder.delete(3, 1)
// Also clean up cell data:
rows.delete(rowOrder.get(3))
// Move a column from position 2 to position 5
constcolId=colOrder.get(2)
colOrder.delete(2, 1)
colOrder.insert(5, [colId])
ID-based stability
Because rows and columns are identified by random IDs rather than sequential indices, concurrent insertions and deletions merge cleanly. Two users inserting rows at different positions will both succeed without conflict, and the resulting order is deterministic.
Row and Column Sizing
Custom dimensions override the application defaults:
Sub-type
Yjs Type
Description
rowHeights
Y.Map<number>
rowId → height in pixels
colWidths
Y.Map<number>
colId → width in pixels
Rows and columns not present in these maps use application default sizes. Only non-default sizes are stored.
// Set column width to 200px
colWidths.set(colId, 200)
// Get row height (with default fallback)
constheight=rowHeights.get(rowId) ??DEFAULT_ROW_HEIGHT
Hidden Rows and Columns
Sub-type
Yjs Type
Description
hiddenRows
Y.Map<boolean>
rowId → true for hidden rows
hiddenCols
Y.Map<boolean>
colId → true for hidden columns
Hidden rows and columns remain in the rowOrder/colOrder arrays (preserving their position) but are not rendered. Only rows/columns that are actually hidden have entries in these maps.
// Hide a row
hiddenRows.set(rowId, true)
// Unhide a row
hiddenRows.delete(rowId)
// Check if a column is hidden
constisHidden=hiddenCols.get(colId) ===true
Merged Cells
Merged cells are stored in the per-sheet merges map:
Sub-type
Yjs Type
Key Format
merges
Y.Map<MergeInfo>
"${startRowId}_${startColId}"
MergeInfo Structure
interfaceMergeInfo {
startRow: RowId// Top-left row ID
endRow: RowId// Bottom-right row ID
startCol: ColId// Top-left column ID
endCol: ColId// Bottom-right column ID
}
The merge key uses the top-left cell’s composite key. The value stores all four corner IDs, which define the rectangular merge region.
When a row or column that participates in a merge is deleted concurrently, the merge must be validated. If the start row/column of a merge no longer exists in rowOrder/colOrder, the merge entry becomes orphaned and should be cleaned up. The application layer handles this validation when processing CRDT updates.
Cell Content in Merged Regions
Only the top-left cell of a merged region holds content. Other cells in the region should be empty. When a merge is created, content from non-top-left cells is discarded. When a merge is removed, only the top-left cell retains its content.
Cell Access Patterns
Common patterns for working with the grid:
// Iterate over all cells in a row
constrowMap=rows.get(rowId) asY.Map<Cell>
if (rowMap) {
for (const [colId, cell] ofrowMap.entries()) {
// Process cell
}
}
// Get the display position of a cell
constrowIndex=rowOrder.toArray().indexOf(rowId) // 0-based
constcolIndex=colOrder.toArray().indexOf(colId) // 0-based
constcellRef=`${indexToColumnLetter(colIndex)}${rowIndex+1}`// e.g. "B3"
// Find the ID for a display reference like "C5"
constcolId=colOrder.get(2) // C = index 2
constrowId=rowOrder.get(4) // 5 = index 4 (0-based)
Sheet Features
Per-sheet features including borders, hyperlinks, data validation, conditional formatting, and frozen panes.
Each cell can have independent borders on all four edges. Only edges with explicit borders are stored.
Border Style Codes
Code
Style
1
Thin
2
Medium
3
Thick
4
Dashed
5
Dotted
6
Double
Example
// Set a thick red bottom border on a cell
borders.set(`${rowId}_${colId}`, {
bottom: { style: 3, color:'#ff0000' }
})
Adjacent cell borders
Border rendering between adjacent cells follows the convention that each cell owns its own border edges. When two adjacent cells define conflicting borders on the shared edge (e.g. cell A’s right border vs cell B’s left border), the application layer resolves which to display.
Hyperlinks
Hyperlinks are stored per-cell in the hyperlinks map:
Sub-type
Yjs Type
Key Format
hyperlinks
Y.Map<HyperlinkInfo>
"${rowId}_${colId}"
HyperlinkInfo Structure
interfaceHyperlinkInfo {
type:'external'|'internal'|'email'address: string// URL, cell reference, or email address
tooltip?: string// Hover tooltip text
}
Unlike borders and hyperlinks which are per-cell, validation rules apply to rectangular ranges. A single rule can cover multiple cells, avoiding duplication when the same constraint applies to an entire column or region.
Conditional Formatting
Conditional formatting rules are stored as an ordered array:
Freeze pane settings are stored in the per-sheet frozen map:
Sub-type
Yjs Type
Description
frozen
Y.Map<string|number>
Freeze pane configuration
Frozen Map Keys
Key
Type
Description
type
string
Freeze type: "row", "column", "both", or "range"
rowIndex
number
Number of frozen rows (from top)
colIndex
number
Number of frozen columns (from left)
Freeze Types
Type
Description
row
Freeze rows above the focus row
column
Freeze columns to the left of the focus column
both
Freeze both rows and columns
range
Freeze a specific range (uses both rowIndex and colIndex)
Example
// Freeze the first 2 rows and first column
frozen.set('type', 'both')
frozen.set('rowIndex', 2)
frozen.set('colIndex', 1)
// Remove freeze
frozen.delete('type')
frozen.delete('rowIndex')
frozen.delete('colIndex')
Sheets
Multi-sheet support, sheet ordering, and sheet operations.
Sheet Definition
Each sheet is a self-contained Y.Map entry in the root sheets map, keyed by a SheetId (12-char base64url). The sheet’s name is stored as a Y.Text instance, enabling collaborative editing of the sheet name itself.
// Get sheet name
constsheet=sheets.get(sheetId) asY.Map<unknown>
constname=sheet.get('name') asY.Textconsole.log(name.toString()) // "Sheet 1"
// Rename a sheet (collaborative)
name.delete(0, name.length)
name.insert(0, 'Revenue Data')
Why Y.Text for sheet names?
Using Y.Text instead of a plain string allows two users to concurrently edit a sheet name (e.g. both typing in the rename field). While rare, this prevents the last-writer-wins conflict that a plain string would cause.
Sheet Ordering
Sheet tab order is maintained by the root sheetOrder array:
The position of a SheetId in this array determines its tab position. The first entry is the leftmost tab, etc.
// Get the first sheet
constfirstSheetId=sheetOrder.get(0) asstringconstfirstSheet=sheets.get(firstSheetId) asY.Map<unknown>
// Iterate over all sheets in tab order
for (leti=0; i<sheetOrder.length; i++) {
constsheetId=sheetOrder.get(i) asstringconstsheet=sheets.get(sheetId) asY.Map<unknown>
constname= (sheet.get('name') asY.Text).toString()
console.log(`Tab ${i+1}: ${name}`)
}
Sheet Independence
Each sheet is fully self-contained. All of the following are scoped to individual sheets and do not reference other sheets:
yDoc.transact(() => {
// Remove from tab order
constindex=sheetOrder.toArray().indexOf(sheetId)
if (index!==-1) {
sheetOrder.delete(index, 1)
}
// Remove sheet data
sheets.delete(sheetId)
})
Last sheet protection
The application layer should prevent deleting the last sheet. A Calcillo document must always have at least one sheet.
Reordering Sheets
yDoc.transact(() => {
// Move sheet from position 2 to position 0 (make it first tab)
constsheetId=sheetOrder.get(2) asstringsheetOrder.delete(2, 1)
sheetOrder.insert(0, [sheetId])
})
Duplicating a Sheet
Sheet duplication involves deep-copying all sub-type data into a new sheet with fresh IDs. The new sheet gets a new SheetId, but internal row and column IDs must also be regenerated to avoid ID collisions. Cell content and formatting are copied, but formulas referencing the original sheet’s cells are not automatically updated.
Active Sheet
The currently active (visible) sheet is not stored in the CRDT. Each user can view a different sheet independently. The active sheet is communicated through Yjs awareness:
Since format version 3.0.0, Calcillo uses the generic exportYDoc() serializer from @cloudillo/crdt. All Yjs types carry inline @T type markers and data keys match the raw CRDT shared type names. See v3 Generic Export Format for the full specification.
Each sheet in the sheets map is a Y.Map (@T: "M") containing nested shared types:
Key
@T
Yjs Type
Description
name
T
Y.Text
Sheet name (with text and delta fields)
rowOrder
A
Y.Array<RowId>
Row IDs in display order
colOrder
A
Y.Array<ColId>
Column IDs in display order
rows
M
Y.Map<Y.Map<Cell>>
Nested: rowId → colId → Cell
merges
M
Y.Map<MergeInfo>
Merge definitions keyed by composite key
borders
M
Y.Map<BorderInfo>
Border definitions keyed by composite key
hyperlinks
M
Y.Map<HyperlinkInfo>
Hyperlink definitions keyed by composite key
validations
M
Y.Map<ValidationRule>
Validation rules keyed by validation ID
conditionalFormats
A
Y.Array<ConditionalFormat>
Ordered conditional formatting rules
hiddenRows
M
Y.Map<boolean>
Hidden row flags
hiddenCols
M
Y.Map<boolean>
Hidden column flags
rowHeights
M
Y.Map<number>
Custom row heights in pixels
colWidths
M
Y.Map<number>
Custom column widths in pixels
frozen
M
Y.Map<string | number>
Freeze pane settings
Sheet names are Y.Text in v3
The name field is serialized as a Y.Text with @T: "T", containing both text and delta fields. This preserves any concurrent edit state. In pre-v3 exports, sheet names were plain text strings from Y.Text.toString().
Default cell values are stripped
Calcillo applies a transformSheets post-processing step that removes default cell property values to reduce export size. Empty rows (containing only the @T marker) are also omitted.
Numeric Precision
All numeric values are rounded to 3 decimal places in the export to produce cleaner output. Cell values retain their original precision.
Complete Example
A spreadsheet with 2 sheets. The first sheet has values, a formula, styling, a merge, and a border. The second sheet is a simple data table.
Header row with bold text, blue background, and centered alignment
Product data with currency formatting ($#,##0.00)
Formula cells computing totals (=B2+C2, =B3+C3, =D2+D3)
“Grand Total” row with a merge spanning columns A-C and italic styling
Medium blue bottom border on all header cells
Custom column widths (150px for product name, 120px for data columns)
Frozen first row (header stays visible while scrolling)
Raw Data sheet (Xk2nR8vH_wYq):
Simple 2-column table with date and amount data
Date cells with yyyy-mm-dd format, number cells with thousands separator
No merges, borders, or custom sizing (all defaults)
All Y.Map entries carry "@T": "M", arrays carry "@T:A", and sheet names are Y.Text with "@T": "T"
Ideallo Format
Complete format specification for Ideallo, Cloudillo’s collaborative infinite-canvas whiteboard and diagramming app.
Overview
Ideallo is a real-time collaborative whiteboard that supports freehand drawing, shapes, text labels, sticky notes, polygons, connectors, and images on an infinite canvas. Documents are stored as Yjs CRDT structures for conflict-free concurrent editing.
Compact field names: All stored types use short keys (t, xy, wh, sc) to minimize CRDT sync overhead. This section documents the compact names directly – they map 1:1 to what you see in the code and on the wire.
Separate maps by content type: Objects, text content, polygon geometry, freehand paths, and z-order each get their own top-level Yjs shared type. This enables targeted observers and prevents the CRDT shared-type nesting pitfall.
Flat object model: Unlike Prezillo’s hierarchy of layers, groups, views, and style inheritance, Ideallo uses a flat structure – all objects live in a single map with no parent-child relationships, no layers, and no global style system. Every style property is inline on each object.
Document Architecture
graph LR
Doc[Y.Doc]
subgraph Content
o["o (Y.Map<StoredObject>)<br/>Objects"]
r["r (Y.Array<string>)<br/>Z-Order"]
txt["txt (Y.Map<Y.Text>)<br/>Text Content"]
geo["geo (Y.Map<Y.Array<number>>)<br/>Polygon Geometry"]
paths["paths (Y.Map<string>)<br/>Freehand Paths"]
end
subgraph Settings
m["m (Y.Map)<br/>Metadata"]
end
Doc --> Content
Doc --> Settings
Quick Reference
Map Key
Yjs Type
Purpose
o
Y.Map<StoredObject>
All canvas objects (rects, text, images, etc.) keyed by ObjectId
r
Y.Array<string>
Z-order array of ObjectId values (index 0 = backmost)
txt
Y.Map<Y.Text>
Text content for Text and Sticky objects (Quill Delta format)
Prezillo Format – Prezillo uses a similar but more complex architecture with layers, views, and style inheritance
Subsections of Ideallo Format
Document Structure
The top-level CRDT document structure, initialization defaults, ID system, and metadata.
Top-Level Shared Types
An Ideallo document is a Y.Doc with 6 named shared types:
Map Key
Yjs Type
Description
o
Y.Map<StoredObject>
All canvas objects keyed by ObjectId
r
Y.Array<string>
Z-order array of ObjectId values (index 0 = backmost)
m
Y.Map
Document metadata
txt
Y.Map<Y.Text>
Text content keyed by ObjectId (Quill Delta format)
geo
Y.Map<Y.Array<number>>
Polygon vertex arrays keyed by ObjectId (flat [x, y, x, y, ...])
paths
Y.Map<string>
SVG path strings keyed by ObjectId
Why compact map keys?
Map keys like o, m, txt are used instead of objects, metadata, texts because these keys appear in every Yjs sync message. Shorter keys reduce wire overhead during real-time collaboration without affecting readability – this documentation provides the complete mapping.
Accessing the Document
import*asYfrom'yjs'constyDoc=newY.Doc()
// Access each shared type by its map key
constobjects=yDoc.getMap('o') // StoredObject entries
constzOrder=yDoc.getArray('r') // Z-order (ObjectId list)
constmeta=yDoc.getMap('m') // Metadata
consttexts=yDoc.getMap('txt') // Y.Text entries
constgeometry=yDoc.getMap('geo') // Y.Array<number> entries
constpaths=yDoc.getMap('paths') // SVG path strings
ID System
All entity IDs use 72-bit entropy encoded as 12 base64url characters, generated client-side via crypto.getRandomValues().
Ideallo uses a single branded type for compile-time safety:
Branded Type
Used In
Example
ObjectId
o map keys, txt/geo/paths map keys, tid/gid/pid field values
"aB3x_Qm7kL9p"
Unlike Prezillo’s 6 branded types, Ideallo only needs ObjectId because there are no containers, views, styles, or templates. The same ID type is used for both object identifiers and content map keys.
Linked copy IDs
Objects with text, geometry, or path content normally use their own ObjectId as the key in the corresponding content map. Linked copies override this with explicit tid, gid, or pid fields pointing to a different object’s content entry. See Linked Copies for details.
Metadata
The m map stores document-level settings as individual key-value entries:
Key
Type
Default
Description
initialized
boolean
true
Set during initialization, prevents re-initialization
name
string
"Untitled Board"
Document name
backgroundColor
string
"#f8f9fa"
Canvas background color
gridSize
number
–
Grid spacing in pixels (if grid enabled)
snapToGrid
boolean
–
Whether objects snap to grid
Document Initialization
When a new empty document is created, the following defaults are established in a single Yjs transaction:
The initialized flag prevents re-initialization when the document is reopened. Unlike Prezillo, there are no default layers, views, styles, or palette entries – just the metadata.
Z-Order
The r shared type is a Y.Array<string> that defines the front-to-back rendering order of all objects on the canvas. Each entry is an ObjectId. Index 0 is the backmost object; the last index is the frontmost.
Why a Separate Array?
Z-order is stored as a standalone Y.Array rather than as a numeric property on each object because:
Reordering is a list operation: Moving an object forward or backward changes the position of one entry relative to others. A CRDT array handles concurrent reorder operations (insert/delete at positions) naturally, while numeric z-index values on objects would require renumbering and create conflicts.
Rendering order is global: The canvas needs a single authoritative ordering of all objects. A separate array makes this explicit and avoids scanning every object to reconstruct the order.
Operations
Operation
Implementation
Add object
r.push([objectId]) – new objects appear on top
Delete object
Find index of objectId in r, then r.delete(index, 1)
Bring to front
Delete from current position, r.push([objectId])
Send to back
Delete from current position, r.insert(0, [objectId])
Move forward/backward
Delete from current position, r.insert(newIndex, [objectId])
Separate Content Maps
Ideallo uses three separate content maps to store data that cannot be embedded directly in object entries:
Text Content (txt)
Stores Y.Text instances for Text (T) and Sticky (S) objects. Uses Quill Delta format for rich text operations (bold, italic, links, etc.). The map key is the object’s own ObjectId (or the tid value for linked copies).
Polygon Geometry (geo)
Stores Y.Array<number> instances for Polygon (P) objects. Vertices are stored as flat interleaved pairs: [x1, y1, x2, y2, ...]. Using Y.Array allows efficient incremental updates – new points can be appended without replacing the entire vertex set.
Freehand Paths (paths)
Stores SVG path strings (e.g., "M 0 0 C 10 5 20 10 30 15") for Freehand (F) objects. Unlike geometry, paths are stored as plain strings rather than Y.Array because freehand strokes are committed as a complete unit after the stroke ends (not incrementally during drawing).
Why separate maps?
Y.Text and Y.Array are Yjs shared types that need their own identity for collaborative editing – they cannot be stored as plain JSON values inside a Y.Map entry. Even paths uses a separate map for consistency and to support the linked copy pattern where multiple objects share the same content entry.
Object Types
Ideallo supports 9 object types, all sharing a common set of base fields and inline style fields with type-specific extensions.
Base Fields
Every stored object has the following fields defined by StoredObjectBase:
Field
Type
Default
Description
t
ObjectTypeCode
(required)
Object type discriminant
xy
[number, number]
(required)
Position [x, y] on the infinite canvas
r
number
0
Rotation in degrees (omitted if 0)
pv
[number, number]
[0.5, 0.5]
Pivot point normalized 0–1 (omitted if center)
lk
true
false
Locked – only stored when true
sn
true
false
Snapped – Smart Ink auto-detected as shape (only stored when true)
Inline Style Fields
Every stored object also includes inline style fields from StoredStyle:
Field
Type
Default
Description
sc
string
'n0'
Stroke color (palette key or CSS color)
fc
string
'transparent'
Fill color (palette key or CSS color)
sw
number
2
Stroke width in pixels
ss
StrokeStyleCode
'S' (solid)
Stroke style
op
number
1
Opacity (0–1)
All style fields are optional – when omitted, the default value is used. Only non-default values are stored.
No global style system
Unlike Prezillo, Ideallo has no global style definitions or style inheritance. All style properties are stored inline on each object. This keeps the format simple and avoids the complexity of style cascading for a whiteboard use case.
Object Type Codes
Code
Name
Has Content Map
Description
F
Freehand
paths
Bezier path stored as SVG path string
R
Rectangle
–
Rectangle with optional corner radius
E
Ellipse
–
Ellipse/circle
L
Line
–
Two-point line
A
Arrow
–
Two-point arrow with configurable arrowheads
T
Text
txt
Text label with rich text content
P
Polygon
geo
Multi-vertex polygon (triangle, pentagon, etc.)
S
Sticky
txt
Sticky note with rich text content
I
Image
–
Uploaded image
Per-Type Fields
Freehand (F)
Field
Type
Default
Description
wh
[number, number]
(required)
Bounding box [width, height] of the path
pid
string
–
Path content ID. If omitted, the object’s own ID is used as the key in the paths map. Set explicitly for linked copies
cl
true
false
Closed path – only stored when true
The SVG path data (e.g., "M 0 0 C 10 5 20 10 30 15") is stored in the paths map, not on the object itself.
Rectangle (R)
Field
Type
Default
Description
wh
[number, number]
(required)
Dimensions [width, height]
cr
number
–
Corner radius (omitted if sharp corners)
Ellipse (E)
Field
Type
Default
Description
wh
[number, number]
(required)
Dimensions [width, height]
No additional fields beyond wh.
Line (L)
Field
Type
Default
Description
pts
[[number, number], [number, number]]
(required)
Start and end points as absolute canvas coordinates [[startX, startY], [endX, endY]]
Absolute coordinates
Unlike Prezillo where line points are relative to the bounding box, Ideallo stores line and arrow endpoints as absolute canvas coordinates.
Arrow (A)
Field
Type
Default
Description
pts
[[number, number], [number, number]]
(required)
Start and end points as absolute canvas coordinates [[startX, startY], [endX, endY]]
ah
ArrowheadPosition
'E' (end)
Where to draw arrowheads (omitted if end-only, the default)
Text (T)
Field
Type
Default
Description
wh
[number, number]
(required)
Dimensions [width, height]
tid
string
–
Text content ID. If omitted, the object’s own ID is used as the key in the txt map. Set explicitly for linked copies
ff
string
–
Font family override
fz
number
–
Font size override
Rich text content is stored as a Y.Text entry in the txt map (keyed by the object’s own ID or the tid value), using Quill Delta format. See Document Structure > Text Content.
Polygon (P)
Field
Type
Default
Description
gid
string
–
Geometry content ID. If omitted, the object’s own ID is used as the key in the geo map. Set explicitly for linked copies
Vertices are stored in the geo map as a flat Y.Array<number> of interleaved coordinate pairs: [x1, y1, x2, y2, ...].
Sticky (S)
Field
Type
Default
Description
wh
[number, number]
(required)
Dimensions [width, height]
tid
string
–
Text content ID. If omitted, the object’s own ID is used as the key in the txt map. Set explicitly for linked copies
Sticky notes use the standard fc (fill color) field for their background color and store rich text content in the txt map, identical to Text objects.
Image (I)
Field
Type
Default
Description
wh
[number, number]
(required)
Dimensions [width, height]
fid
string
(required)
File ID from the Cloudillo media/file system
Supporting Types
StrokeStyleCode
Code
Name
S
Solid
D
Dashed
T
Dotted
ArrowheadPosition
Code
Name
Description
S
Start
Arrowhead at the start point only
E
End
Arrowhead at the end point only (default)
B
Both
Arrowheads at both start and end
Linked Copies
Ideallo supports linked copies – objects that share the same underlying content while maintaining independent position, style, and other metadata.
Overview
When an object is duplicated as a linked copy, the new object shares the same text content, polygon geometry, or freehand path data as the original. Editing the shared content in one object immediately updates all linked copies. However, each copy has its own position (xy), rotation (r), style fields (sc, fc, etc.), and dimensions (wh).
This is useful for repeating elements like labels, shapes, or icons that should stay synchronized across the board.
Content ID Fields
Three optional fields control which content map entry an object references:
Field
Object Types
Content Map
Description
tid
Text (T), Sticky (S)
txt
Text content ID – keys into the Y.Text map
gid
Polygon (P)
geo
Geometry ID – keys into the Y.Array<number> map
pid
Freehand (F)
paths
Path ID – keys into the SVG path string map
Rule: When the content ID field is omitted, the object’s own ObjectId is used as the key in the corresponding content map. When present, it points to a different object’s content entry.
How It Works
graph LR
subgraph "Objects Map (o)"
A["Object A<br/>(original)<br/>tid: --"]
B["Object B<br/>(linked copy)<br/>tid: 'A'"]
end
subgraph "Text Map (txt)"
T["'A' → Y.Text<br/>'Hello, world!'"]
end
A -- "uses own ID as key" --> T
B -- "tid points to A" --> T
Object A uses its own ID (A) as the key in the txt map. Object B has tid: 'A', so it references the same Y.Text entry. Editing the text through either object updates the shared content.
True Copy vs Linked Copy
Ideallo provides two duplication operations with different content semantics:
True Copy (duplicateObject)
Creates a fully independent copy with its own content entry:
The true copy gets a new Y.Text entry with the same initial content but is fully independent – editing one does not affect the other. No tid field is stored.
Linked Copy (duplicateAsLinkedCopy)
Creates a copy that shares the original’s content entry:
The linked copy has an explicit tid field pointing to the original’s content. Both objects render the same text, and editing through either one updates both.
Chained Linking
When duplicating a linked copy as another linked copy, the new copy points to the original source, not to the intermediate copy. This prevents chains of indirection:
// Object B is a linked copy of A: B.tid = 'A'
// Creating a linked copy of B:
duplicated.tid=existing.tid??objectId// Result: C.tid = 'A' (not 'B')
All linked copies in a group always point directly to the same source content entry, keeping lookups to a single indirection.
Deletion and Orphan Handling
When an object is deleted, its associated content map entries are not deleted. This is for two reasons:
CRDT tombstones: Deleting a Y.Map entry creates a tombstone that takes space anyway – no storage is reclaimed by also deleting content entries.
Linked copies may still reference the content: Other objects might have tid/gid/pid pointing to the deleted object’s content.
Orphaned content entries (those with no remaining objects referencing them) are cleaned up during export or compaction operations.
Content Access Helpers
The CRDT module provides helper functions that automatically resolve content ID indirection:
Function
Returns
Description
getObjectYText(doc, objectId)
Y.Text | undefined
Resolves tid or falls back to objectId for Text/Sticky objects
getObjectYArray(doc, objectId)
Y.Array<number> | undefined
Resolves gid or falls back to objectId for Polygon objects
getObjectPathData(doc, objectId)
string | undefined
Resolves pid or falls back to objectId for Freehand objects
These helpers look up the stored object, check for a content ID field, and return the corresponding content map entry. Application code should always use these helpers rather than accessing content maps directly.
Export Format
Ideallo documents can be exported as self-contained JSON files for backup, sharing, and interoperability.
Since format version 3.0.0, Ideallo uses the generic exportYDoc() serializer from @cloudillo/crdt. All Yjs types carry inline @T type markers and data keys match the raw CRDT shared type names. See v3 Generic Export Format for the full specification.
All objects keyed by ObjectId, using compact field names
r
A
Y.Array<string>
Z-order array of ObjectId values (index 0 = backmost)
txt
M
Y.Map<Y.Text>
Text content keyed by ObjectId – Y.Text with text and delta fields
geo
M
Y.Map<Y.Array<number>>
Polygon vertices keyed by ObjectId – flat [x, y, x, y, ...] arrays
paths
M
Y.Map<string>
SVG path strings keyed by ObjectId
Text content preserves formatting in v3
The txt entries are Y.Text instances serialized with @T: "T", containing both text (plain text) and delta (Quill Delta operations). This preserves rich text formatting. In pre-v3 exports, text was a plain string from Y.Text.toJSON().
Numeric Precision
All numeric values are rounded to 3 decimal places in the export to produce cleaner output. For example, a position of [100.123456, 200.789012] becomes [100.123, 200.789].
Complete Example
A minimal whiteboard with a rectangle, text label, sticky note, and freehand path:
Rectangle (aB3x_Qm7kL9p): Blue filled rectangle with rounded corners, custom stroke color
Text (Xk2nR8vH_wYq): Text label positioned inside the rectangle, using default stroke color
Sticky (m4Jf_L1pZq8w): Yellow sticky note with reminder text
Freehand (Hw5_qT2mLkJx): Wavy freehand path with custom stroke width, SVG path data stored in paths map
The r array lists objects from back to front – the rectangle is behind everything, and the freehand path is on top
All Y.Map entries carry "@T": "M", the z-order array carries "@T:A", and text content uses "@T": "T" with text and delta fields
Prezillo Format
Complete format specification for Prezillo, Cloudillo’s collaborative presentation editor.
Overview
Prezillo is a real-time collaborative presentation editor that supports slides, layers, groups, rich text, shapes, images, connectors, templates, a palette system, and style inheritance. Documents are stored as Yjs CRDT structures for conflict-free concurrent editing.
Compact field names: All stored types use short keys (t, xy, wh, si) to minimize CRDT sync overhead. This section documents the compact names directly — they map 1:1 to what you see in the code and on the wire.
Separate maps by purpose: Objects, containers, views, styles, and templates each get their own top-level Yjs shared type. This enables targeted observers, type-safe access, and efficient partial sync.
ID-based storage: All entities are stored in Y.Map keyed by random IDs. Ordering is maintained separately in Y.Array structures. This prevents the CRDT data-loss pitfall of storing complex objects directly in arrays.
Map keys like o, c, r are used instead of objects, containers, rootChildren because these keys appear in every Yjs sync message. Shorter keys reduce wire overhead during real-time collaboration without affecting readability — this documentation provides the complete mapping.
Default palette: The built-in palette with background, text, 6 accent colors, and 4 gradients (see Styling and Palette)
Default styles: 10 built-in styles — 6 shape styles (Default Shape, Primary, Secondary, Accent, Outline, Connector) and 4 text styles (Default Text, Heading, Body, Caption) with parent-child inheritance chains
Rich Text Storage
Text objects (type 'T') store their formatted content as Y.Text entries in the rt map, keyed by the same ObjectId used in the o map. The Y.Text uses Quill Delta format for rich text operations (bold, italic, links, etc.).
A legacy tx field on the stored object held plain text in older documents. On load, migration code automatically converts tx strings to Y.Text entries in rt and removes the tx field.
Separate map for rich text
Rich text content is stored in the rt map, not embedded in the object data in o. This is because Y.Text is a Yjs shared type that needs its own identity for collaborative editing — it cannot be stored as a plain JSON value inside a Y.Map entry.
Object Types
Prezillo supports 14 object types, all sharing a common set of base fields with type-specific extensions.
Base Fields
Every stored object has the following fields defined by StoredObjectBase:
Field
Type
Default
Description
t
ObjectTypeCode
(required)
Object type discriminant
p
string
—
Parent ContainerId (omitted if root-level)
vi
string
—
ViewId — if set, xy is relative to this view’s origin
proto
string
—
Prototype ObjectId — inherit properties from this object
xy
[number, number]
(required)
Position [x, y] — global canvas coords or view-relative if vi is set
wh
[number, number]
(required)
Dimensions [width, height]
r
number
0
Rotation in degrees (omitted if 0)
pv
[number, number]
[0.5, 0.5]
Pivot point relative (0–1), center is default
o
number
1
Opacity (0–1, omitted if 1)
v
false
true
Visible — only stored when false
k
true
false
Locked — only stored when true
hid
true
false
Hidden — visible in editor at 50% opacity, invisible in presentation mode
n
string
—
User-assigned name
si
string
—
Shape StyleId reference
ti
string
—
Text StyleId reference
s
ShapeStyle
—
Inline shape style overrides (applied on top of si chain)
ts
TextStyle
—
Inline text style overrides (applied on top of ti chain)
Object Type Codes
Code
Name
Description
R
Rect
Rectangle with optional corner radius
E
Ellipse
Ellipse/circle
L
Line
Two-point line with optional arrows
P
Path
Freeform SVG path
G
Polygon
Multi-point polygon or polyline
T
Text
Rich text box
I
Image
Uploaded image
M
Embed
Embedded media (iframe, video, audio)
C
Connector
Object-to-object connector with routing
Q
QR Code
QR code generator
F
Poll Frame
Interactive voting element
Tg
Table Grid
Visual grid layout with snap points
S
Symbol
Reference to symbol library
V
State Variable
Displays dynamic runtime values
Per-Type Fields
Rect (R)
Field
Type
Default
Description
cr
number | [number, number, number, number]
—
Corner radius — single value for uniform, or [topLeft, topRight, bottomRight, bottomLeft]
Ellipse (E)
No additional fields beyond the base.
Line (L)
Field
Type
Default
Description
pts
[[number, number], [number, number]]
(required)
Start and end points relative to bounding box
sa
ArrowDef
—
Start arrow
ea
ArrowDef
—
End arrow
Path (P)
Field
Type
Default
Description
d
string
(required)
SVG path data (M, L, C, Z commands, etc.)
Polygon (G)
Field
Type
Default
Description
pts
[number, number][]
(required)
Array of points
cl
boolean
—
Closed polygon (if true, last point connects to first)
Text (T)
Field
Type
Default
Description
tx
string
—
Legacy plain text (migrated to rt map on load)
mh
number
—
Minimum height — original height at creation for auto-sizing
Rich text content is stored as a Y.Text entry in the rt map (keyed by the same ObjectId), using Quill Delta format. See Document Structure > Rich Text Storage.
Image (I)
Field
Type
Default
Description
fid
string
(required)
File ID from the Cloudillo media/file system
Embed (M)
Field
Type
Default
Description
mt
'iframe' | 'video' | 'audio'
(required)
Media type
src
string
(required)
Source URL
Connector (C)
Field
Type
Default
Description
so_
string
—
Start ObjectId (uses so_ to avoid conflict with style override s.o)
sa
AnchorPoint
—
Start anchor point
eo
string
—
End ObjectId
ea
AnchorPoint
—
End anchor point
wp
[number, number][]
—
Waypoints for manual routing
rt
RoutingCode
—
Routing algorithm
sar
ArrowDef
—
Start arrow
ear
ArrowDef
—
End arrow
QR Code (Q)
Field
Type
Default
Description
url
string
(required)
URL to encode
ecl
QrErrorCorrectionLevel
'M'
Error correction level
fg
string
'#000000'
Foreground color (hex)
bg
string
'#ffffff'
Background color (hex)
Poll Frame (F)
Field
Type
Default
Description
sh
'R' | 'E'
'R'
Frame shape: R=rectangle, E=ellipse
lb
string
—
Label text to display on the frame
Table Grid (Tg)
Field
Type
Default
Description
c
number
(required)
Column count
rw
number
(required)
Row count
cw
number[]
—
Column widths as proportions (0–1, equal if omitted)
rh
number[]
—
Row heights as proportions (0–1, equal if omitted)
Border styling uses the inherited ShapeStyle (s field) for line color and thickness.
Children are referenced using ChildRef tuples that discriminate between objects and containers:
typeChildRef= [0|1, string]
Tuple
Meaning
Look Up In
[0, objectId]
References an object
o map
[1, containerId]
References a container
c map
This allows a single ordered array to contain a mix of direct objects and nested containers.
Children Arrays
Container children are stored in the ch map, not embedded in the container data:
// ch: Y.Map<Y.Array<ChildRef>>
// Key: ContainerId
// Value: Y.Array of ChildRef tuples
// Example: get children of a layer
constlayerChildren=doc.ch.get(layerId) // Y.Array<ChildRef>
// Iterate children
for (const [type, id] oflayerChildren) {
if (type===0) {
constobj=doc.o.get(id) // StoredObject
} else {
constcontainer=doc.c.get(id) // StoredContainer
}
}
Children are separate from container data
The ch map stores Y.Array<ChildRef> entries — these are Yjs shared types that enable collaborative reordering. They are not embedded in the StoredContainer JSON in the c map. Always look up children via doc.ch.get(containerId), never by reading a children property from the container object.
Z-Ordering
The position of a ChildRef within its parent’s children array determines draw order:
Index 0 is drawn first (bottom/back)
Last index is drawn last (top/front)
Reordering is done by moving entries within the Y.Array, which Yjs handles correctly for concurrent edits.
Parent References
Objects and containers store a p (parent) field pointing to their containing ContainerId. This enables:
Quick lookup of an item’s parent without scanning children arrays
Efficient tree traversal in both directions
When an item is at root level (directly in r), the p field is omitted.
Views
Views represent slides, pages, or artboards — named rectangular regions on the infinite canvas.
What Views Represent
A view defines a visible area on the canvas that corresponds to a slide in presentation mode or a page in print/export. Objects can be associated with a view via their vi field, making their coordinates relative to that view’s origin.
StoredView Fields
Field
Type
Default
Description
name
string
(required)
Display name (e.g., "Page 1", "Title Slide")
x
number
(required)
X position on the infinite canvas
y
number
(required)
Y position on the infinite canvas
width
number
1920
View width in pixels
height
number
1080
View height in pixels
backgroundColor
string
—
Background color (hex)
backgroundGradient
StoredBackgroundGradient
—
Background gradient (takes precedence over backgroundColor)
backgroundImage
string
—
Background image file ID
backgroundFit
'contain' | 'cover' | 'fill' | 'tile'
—
How background image is sized
showBorder
boolean
—
Whether to show the view border in the editor
transition
object
—
Slide transition for presentation mode
notes
string
—
Speaker notes (plain text)
hidden
boolean
—
If true, visible in editor at 50% opacity but invisible in presentation mode
duration
number
—
Auto-advance duration in seconds (presentation mode)
tpl
string
—
TemplateId reference — view inherits template background when own background fields are absent
View fields use full names
Unlike objects and containers, view fields use human-readable names (backgroundColor, not bc). This is because views are low-volume data (typically dozens, not thousands) — readability was prioritized over wire efficiency.
View Ordering
The vo array holds ViewId strings in presentation order:
// vo: Y.Array<string>
constviewOrder=doc.vo.toArray() // ["m4Jf_L1pZq8w", "Xk2n_R8vHwYq", ...]
// First view in presentation
constfirstViewId=doc.vo.get(0)
constfirstView=doc.v.get(firstViewId)
// Reorder: move view from index 2 to index 0
doc.vo.delete(2, 1)
doc.vo.insert(0, [viewId])
Page-Relative Coordinates
When an object’s vi field is set, its xy position is interpreted relative to the view’s origin (x, y), not the global canvas:
Global position = (view.x + object.xy[0], view.y + object.xy[1])
This allows slides to be repositioned on the canvas without affecting the relative positions of their objects.
Background System
View backgrounds resolve in priority order:
backgroundGradient — if present, renders a gradient background
backgroundImage — if present (and no gradient), renders an image
backgroundColor — if present (and no gradient/image), renders a solid color
Template background — if tpl is set and the view’s own background fields are absent, the template’s background is used
StoredBackgroundGradient
Field
Type
Default
Description
gt
'l' | 'r'
—
Gradient type: 'l'=linear, 'r'=radial
ga
number
—
Angle in degrees (linear gradients only)
gx
number
—
Center X position 0–1 (radial gradients only)
gy
number
—
Center Y position 0–1 (radial gradients only)
gs
[string, number][]
—
Color stops: [color, position] pairs where position is 0–1
Transitions
The transition object defines how a slide enters during presentation mode:
Field
Type
Default
Description
type
'none' | 'fade' | 'slide' | 'zoom' | 'push'
'none'
Transition effect
duration
number
—
Duration in milliseconds
direction
'left' | 'right' | 'up' | 'down'
—
Direction (for slide and push types)
Default Dimensions
New documents use 1920×1080 (Full HD landscape) as the default view size. This can be changed via the defaultViewWidth and defaultViewHeight metadata fields.
Hidden Views
When a view has hidden: true:
In the editor: The view is displayed at 50% opacity to distinguish it from active views
In presentation mode: The view is skipped entirely
In view order: The view remains in the vo array at its current position
Styling and Palette
Prezillo uses a cascading style system with global style definitions, inline overrides, and a document-wide color palette.
Style Resolution Cascade
Styles resolve in layers, with later layers overriding earlier ones:
graph LR
D["Built-in Defaults"] --> S["Style Chain<br/>(si/ti → parent p)"]
S --> O["Inline Override<br/>(s/ts on object)"]
style D fill:#e8e8e8,stroke:#999
style S fill:#d4e6f1,stroke:#2980b9
style O fill:#d5f5e3,stroke:#27ae60
Built-in defaults: Hard-coded fallback values (e.g., fill #cccccc, strokeWidth 1)
Style chain: The object’s si (shape style) or ti (text style) references a global StoredStyle in the st map. That style may have a parent (p field), forming a chain. Properties are inherited up the chain until a value is found.
Inline overrides: The object’s s (shape style) or ts (text style) fields contain direct property overrides that take highest precedence.
StoredStyle Fields
Global styles are stored in the st map, keyed by StyleId.
Field
Type
Description
n
string
Style name (user-visible, e.g., "Primary", "Heading")
t
'S' | 'T'
Type: S=shape style, T=text style
p
string
Parent StyleId (for inheritance chain)
Shape style properties (when t='S'):
Field
Type
Description
f
ColorValue
Fill color (hex string or palette reference)
fo
number
Fill opacity (0–1)
s
ColorValue
Stroke color (hex string or palette reference)
sw
number
Stroke width
so
number
Stroke opacity (0–1)
sd
string
Stroke dasharray (SVG format, e.g., "5,5")
sc
'butt' | 'round' | 'square'
Stroke linecap
sj
'miter' | 'round' | 'bevel'
Stroke linejoin
sh
[number, number, number, ColorValue]
Shadow: [offsetX, offsetY, blur, color]
cr
number
Corner radius (for rects using this style)
Text style properties (when t='T'):
Field
Type
Description
ff
string
Font family (e.g., "Inter, system-ui")
fs
number
Font size in pixels
fw
'normal' | 'bold' | number
Font weight
fi
boolean
Font italic
td
'u' | 's'
Text decoration: u=underline, s=strikethrough
fc
ColorValue
Text fill color (hex string or palette reference)
ta
'l' | 'c' | 'r' | 'j'
Text align: left/center/right/justify
va
't' | 'm' | 'b'
Vertical align: top/middle/bottom
lh
number
Line height multiplier
ls
number
Letter spacing in pixels
lb
string
List bullet character (UTF-8, e.g., "•")
ShapeStyle and TextStyle (Inline)
The s and ts fields on objects use the same property names as StoredStyle, but without the n, t, and p fields. They contain only the properties being overridden.
The palette provides a set of named color and gradient slots that can be referenced by any style or object. This allows changing the document’s color theme by updating a single palette entry.
StoredPalette Structure
The palette is stored as a single entry in the pl map under the key 'default':
Field
Type
Description
n
string
Palette name (e.g., "Default", "Office Blue")
bg
StoredPaletteColor
Background color slot
tx
StoredPaletteColor
Text color slot
a1–a6
StoredPaletteColor
Accent color slots 1–6
g1–g4
StoredBackgroundGradient
Gradient slots 1–4
Where StoredPaletteColor is simply { c: string } (a hex color).
Palette Slot Codes
Color slots:
Code
Name
bg
Background
tx
Text
a1
Accent 1
a2
Accent 2
a3
Accent 3
a4
Accent 4
a5
Accent 5
a6
Accent 6
Gradient slots:
Code
Name
g1
Gradient 1
g2
Gradient 2
g3
Gradient 3
g4
Gradient 4
StoredPaletteRef
A palette reference replaces a literal color value in any ColorValue field:
// View with template
{
name:'Title Slide',
x: 0, y: 0,
width: 1920, height: 1080,
tpl:'Hw5_qT2mLkJx'// TemplateId
// No backgroundColor → inherits from template
}
Background resolution: The view’s own background fields (backgroundColor, backgroundGradient, backgroundImage) take precedence. When absent, the template’s background (bc, bg, bi) is used as a fallback.
Prototype System
Templates can define prototype objects — objects that serve as editable defaults for views using the template.
How It Works
graph LR
T["Template<br/>(tpl map)"] -->|"defines"| P["Prototype Object<br/>(o map, referenced via tpo)"]
P -->|"proto field"| I["Instance Object<br/>(o map, in a view)"]
style T fill:#d4e6f1,stroke:#2980b9
style P fill:#d5f5e3,stroke:#27ae60
style I fill:#fdebd0,stroke:#e67e22
Template prototype objects are stored in the tpo map: TemplateId → Y.Array<ObjectId>. These are regular objects stored in the o map, but logically belonging to a template.
Instance objects reference a prototype via their proto field (an ObjectId pointing to the prototype).
Property inheritance: Instance objects inherit all properties from their prototype. Only overridden properties need to be stored on the instance.
Storage
// tpo: Y.Map<Y.Array<string>>
// Key: TemplateId
// Value: array of ObjectIds that are prototypes for this template
constprotoIds=doc.tpo.get(templateId) // Y.Array<string>
// e.g., ["aB3x_Qm7kL9p", "Xk2nR8vH_wYq"]
Property Override Tracking
When a user modifies an instance:
The changed properties are stored directly on the instance object
Unchanged properties continue to resolve from the prototype
At render time, instance properties override prototype properties (similar to the style cascade)
Single-level inheritance
Prototype inheritance is deliberately single-level — an instance references one prototype, and prototypes do not chain to other prototypes. This keeps conflict resolution predictable: when two users concurrently modify a prototype and an instance, the CRDT can resolve the conflict without ambiguity across multiple inheritance levels.
Lock/Unlock
Prototype instances can be locked or unlocked:
Locked (k: true): The instance cannot be individually edited; it reflects prototype changes automatically
Unlocked: The instance can be edited independently, with changes stored as overrides
Export Format
Prezillo documents can be exported as self-contained JSON files for backup, sharing, and interoperability.
Since format version 3.0.0, Prezillo uses the generic exportYDoc() serializer from @cloudillo/crdt. All Yjs types carry inline @T type markers and data keys match the raw CRDT shared type names. See v3 Generic Export Format for the full specification.
The document palette (single entry keyed by 'default')
Rich Text Serialization
Rich text entries in the rt map are Y.Text instances, serialized with the @T: "T" marker containing both the plain text and the full Quill Delta operations:
All numeric values are rounded to 3 decimal places in the export to produce cleaner output. For example, a position of [100.123456, 200.789012] becomes [100.123, 200.789].
Complete Example
A minimal presentation with 2 slides, one text box, and one rectangle: